
I love making bread. It’s amazing what flour, oil and salt can be transformed into when a little yeast is allowed to perform its magic. It also takes me back to my childhood, when I’d watch my mother make whole wheat bread, four loaves at a time, to feed our family. There’s something about creating the “staff of life” to feed and nurture my own loved ones that fills me with warm fuzzies. And not only that, I find kneading dough to be cathartic and the smell of freshly baked bread heavenly! All around not a bad way to spend a cold Saturday afternoon.
This technical challenge proved difficult (See what I did there?) for many of the contestants on The Great British Baking Show. But it was the plaiting (i.e., braiding) that had them tied up in knots. (OK, go ahead and moan.) Outside of that, it’s a pretty basic dough, and if you can understand the pattern, you should be able to create a decent loaf. Also, if you watch Paul Hollywood make it on the GBBS Masterclass (episode 1), you’ll learn a few tricks to getting the ends just right.
Using Paul’s recipe from the BBC website, the process was pretty straightforward: Add salt and yeast to flour on opposite sides of the bowl. Stir. Add oil, then water in two parts, mixing in between. Knead for about 10 minutes until the dough is silky and stretchy. Let the dough rise in a greased bowl in a warm place for about an hour. Once it’s doubled in size, that’s when the fun begins.
After knocking the air out of the dough, you need to divide it into eight equal parts. Mine were about 120 grams each. Then roll each piece into a long rope about 16 inches long. This part reminded me of working with Play-Doh when I was a kid. There’s a certain technique to rolling the pieces evenly so the ends don’t start flopping around. Start in the middle and spread your fingers as the dough gets longer. A little trial and error and you’ll get the hang of it.
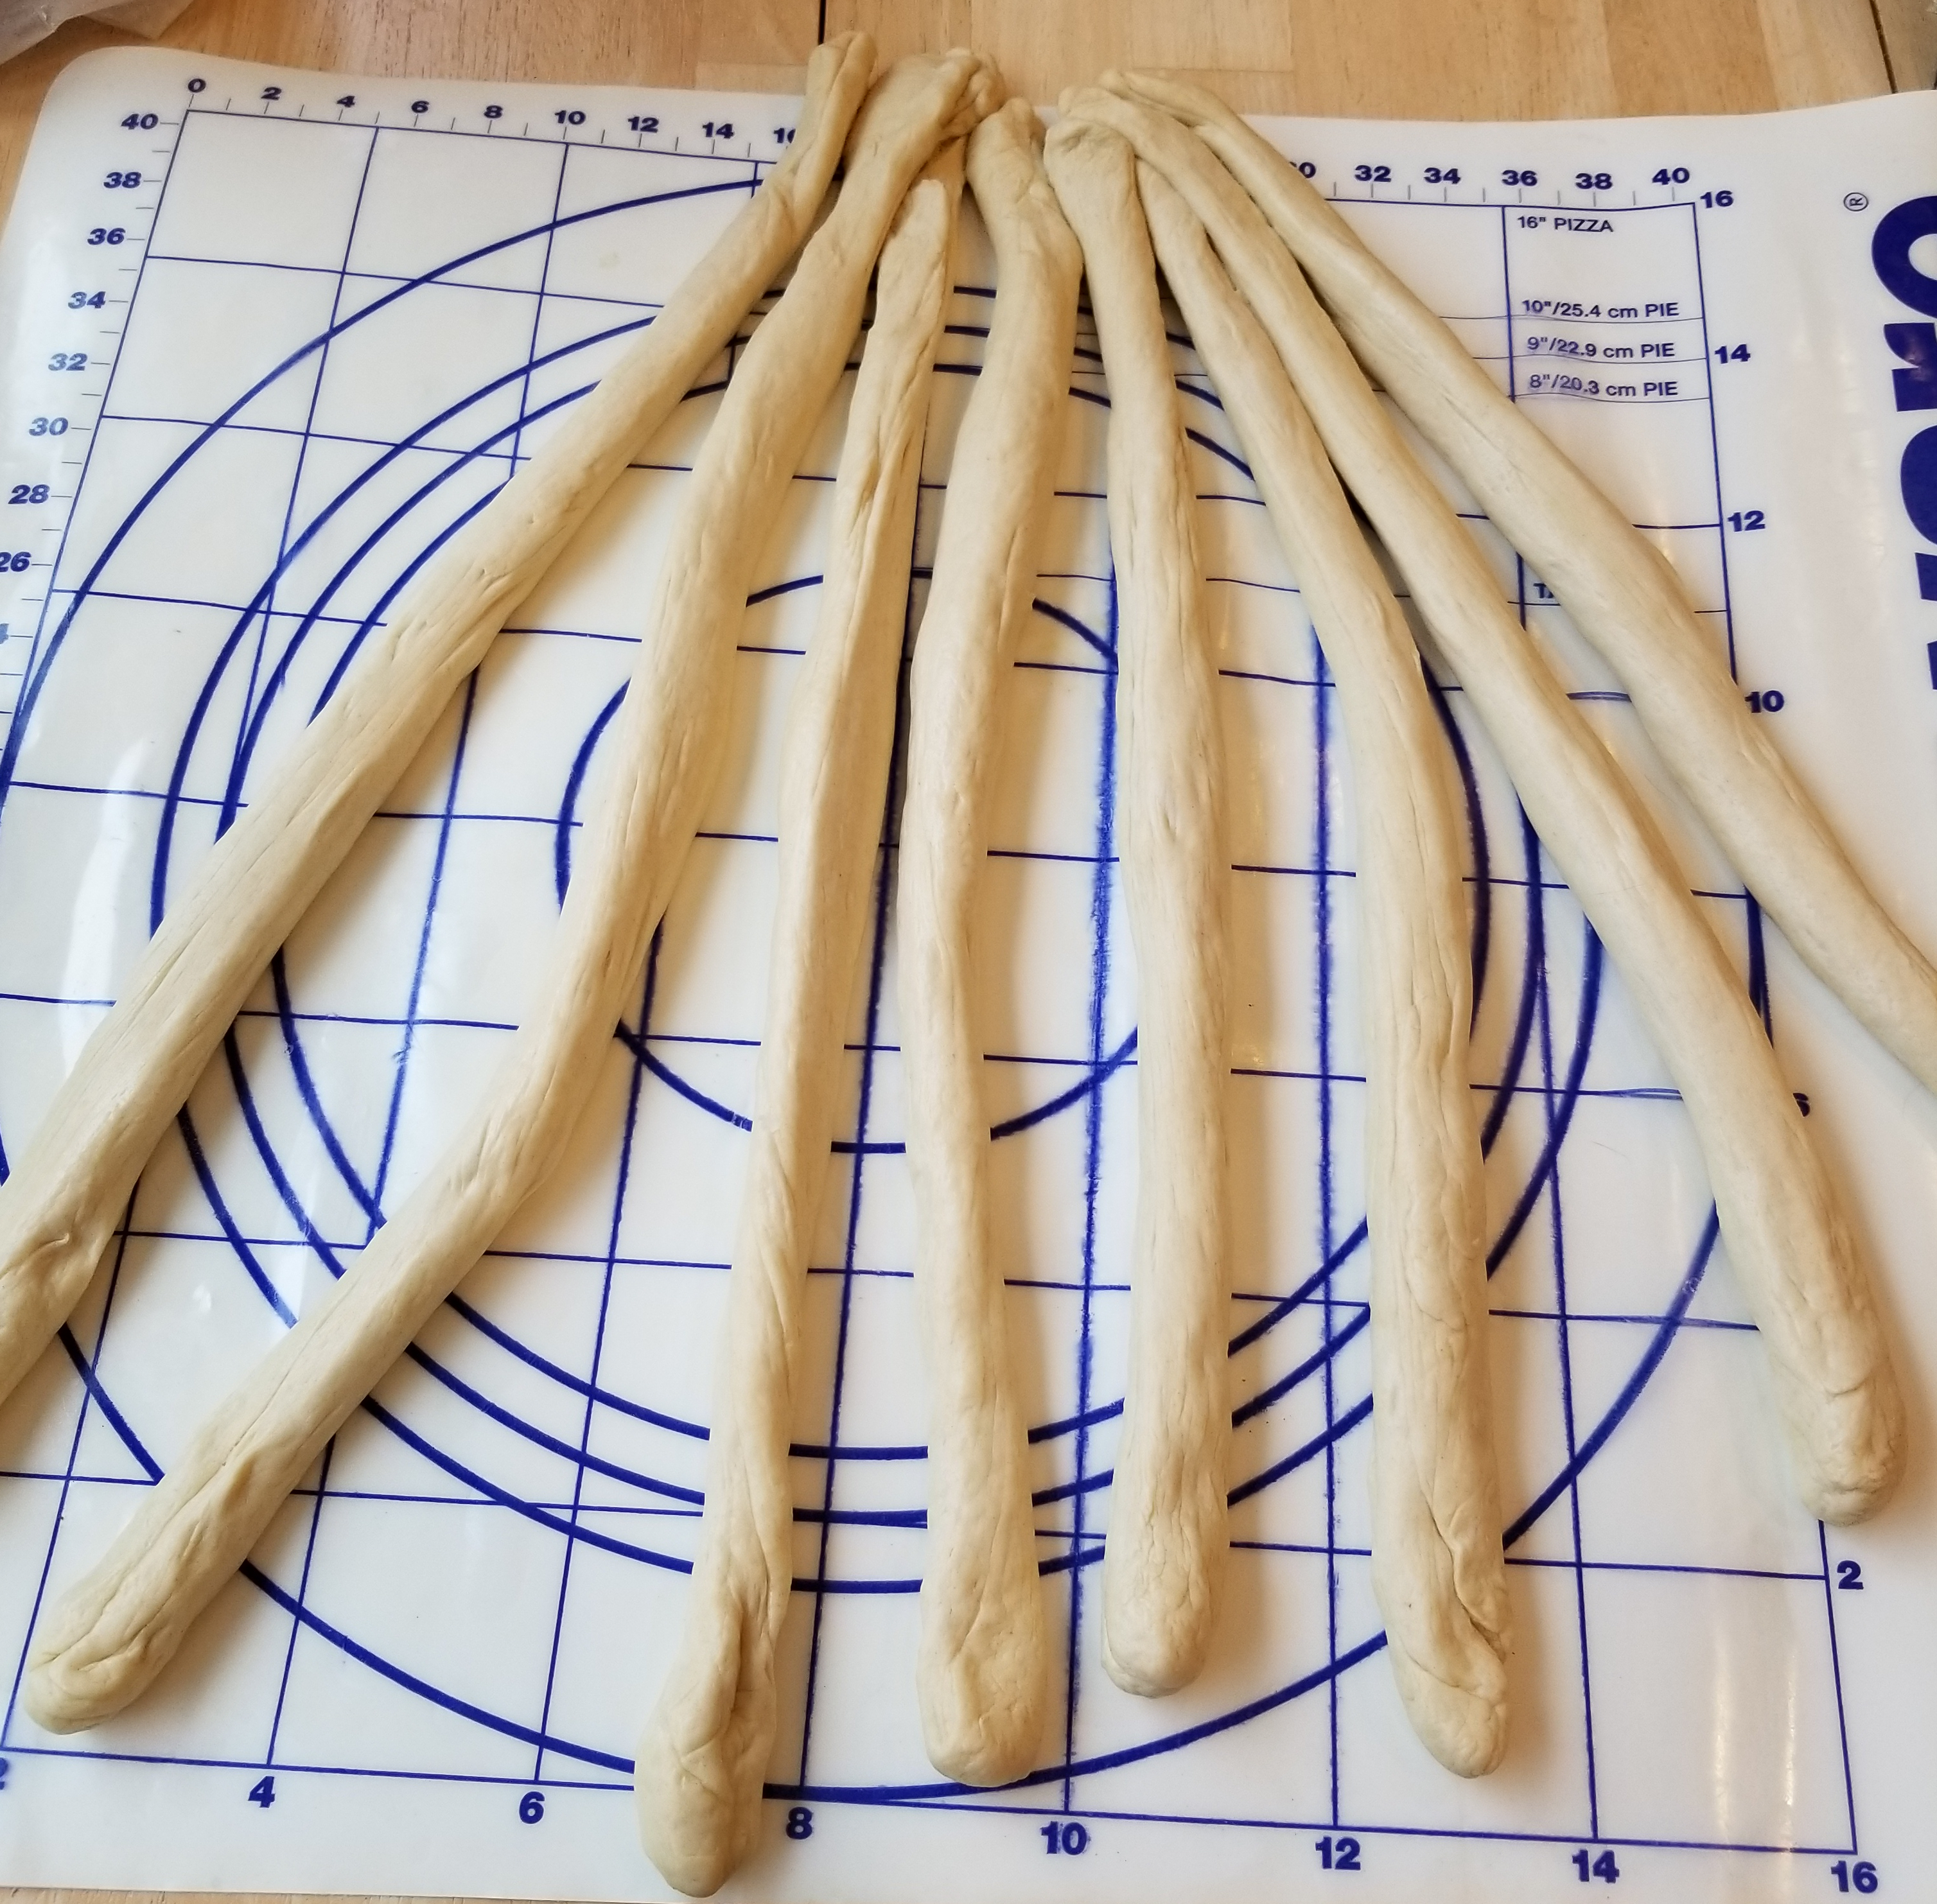
Lay your strands of dough out in a fan shape, with the ends farthest away from you touching each other. Paul calls this “like an octopus,” but I think octopuses (octopi?) squirm around too much. Press the ends that are touching each other (farthest away from you) to the table, spreading the dough out with your thumb to tack it down. This will keep it in place while you are braiding with the other ends.
As I said before, the trick is in the braiding, so I made a diagram on a piece of paper with eight lines and numbered each one from left to right. Then I wrote the pattern to the side like this:
Step 1: 8 under 7 & over 1
Step 2: 8 over 5
Step 3: 2 under 3 & over 8
Step 4: 1 over 4
Step 5: 7 under 6 & over 1
Repeat steps 2-5 until completely braided.
I also drew little arrows from Step 5 to Step 2 and back down again, because I’m a visual learner and that helped me remember the repeating part.
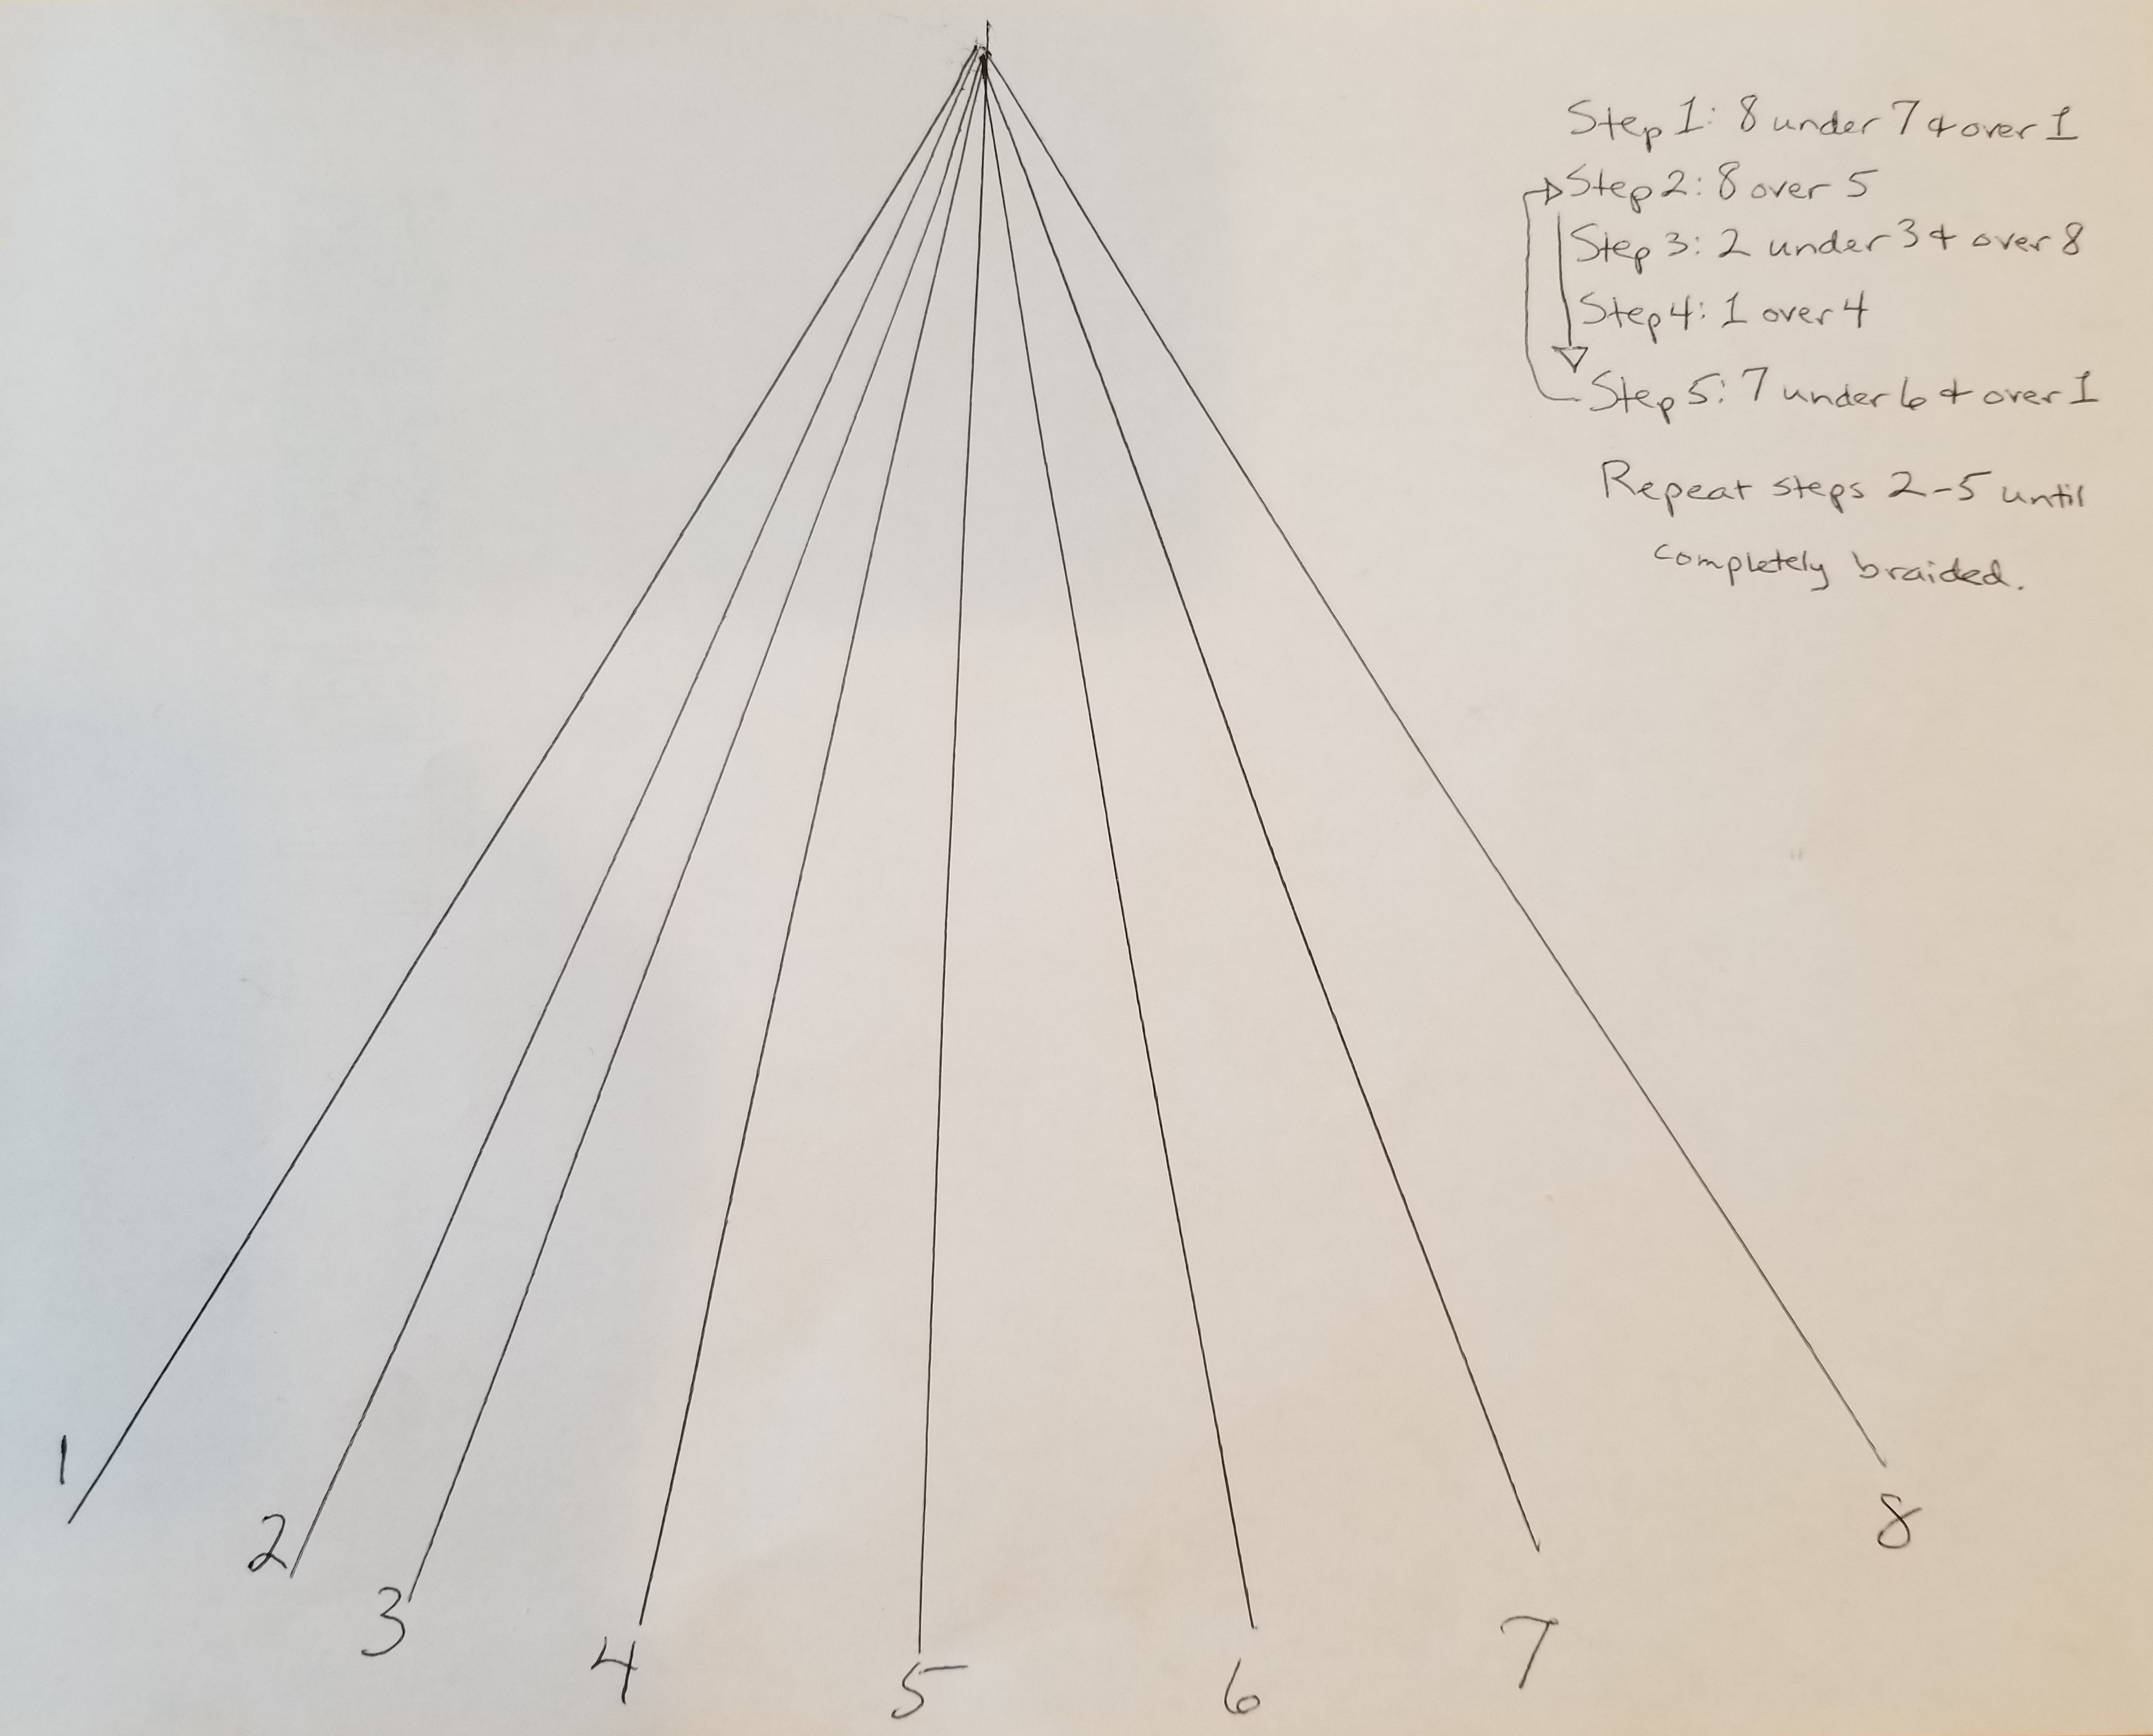
Remember that every time you move a strand, the ropes are renumbered, so the far left strand is always No. 1 and the far right strand is always No. 8.
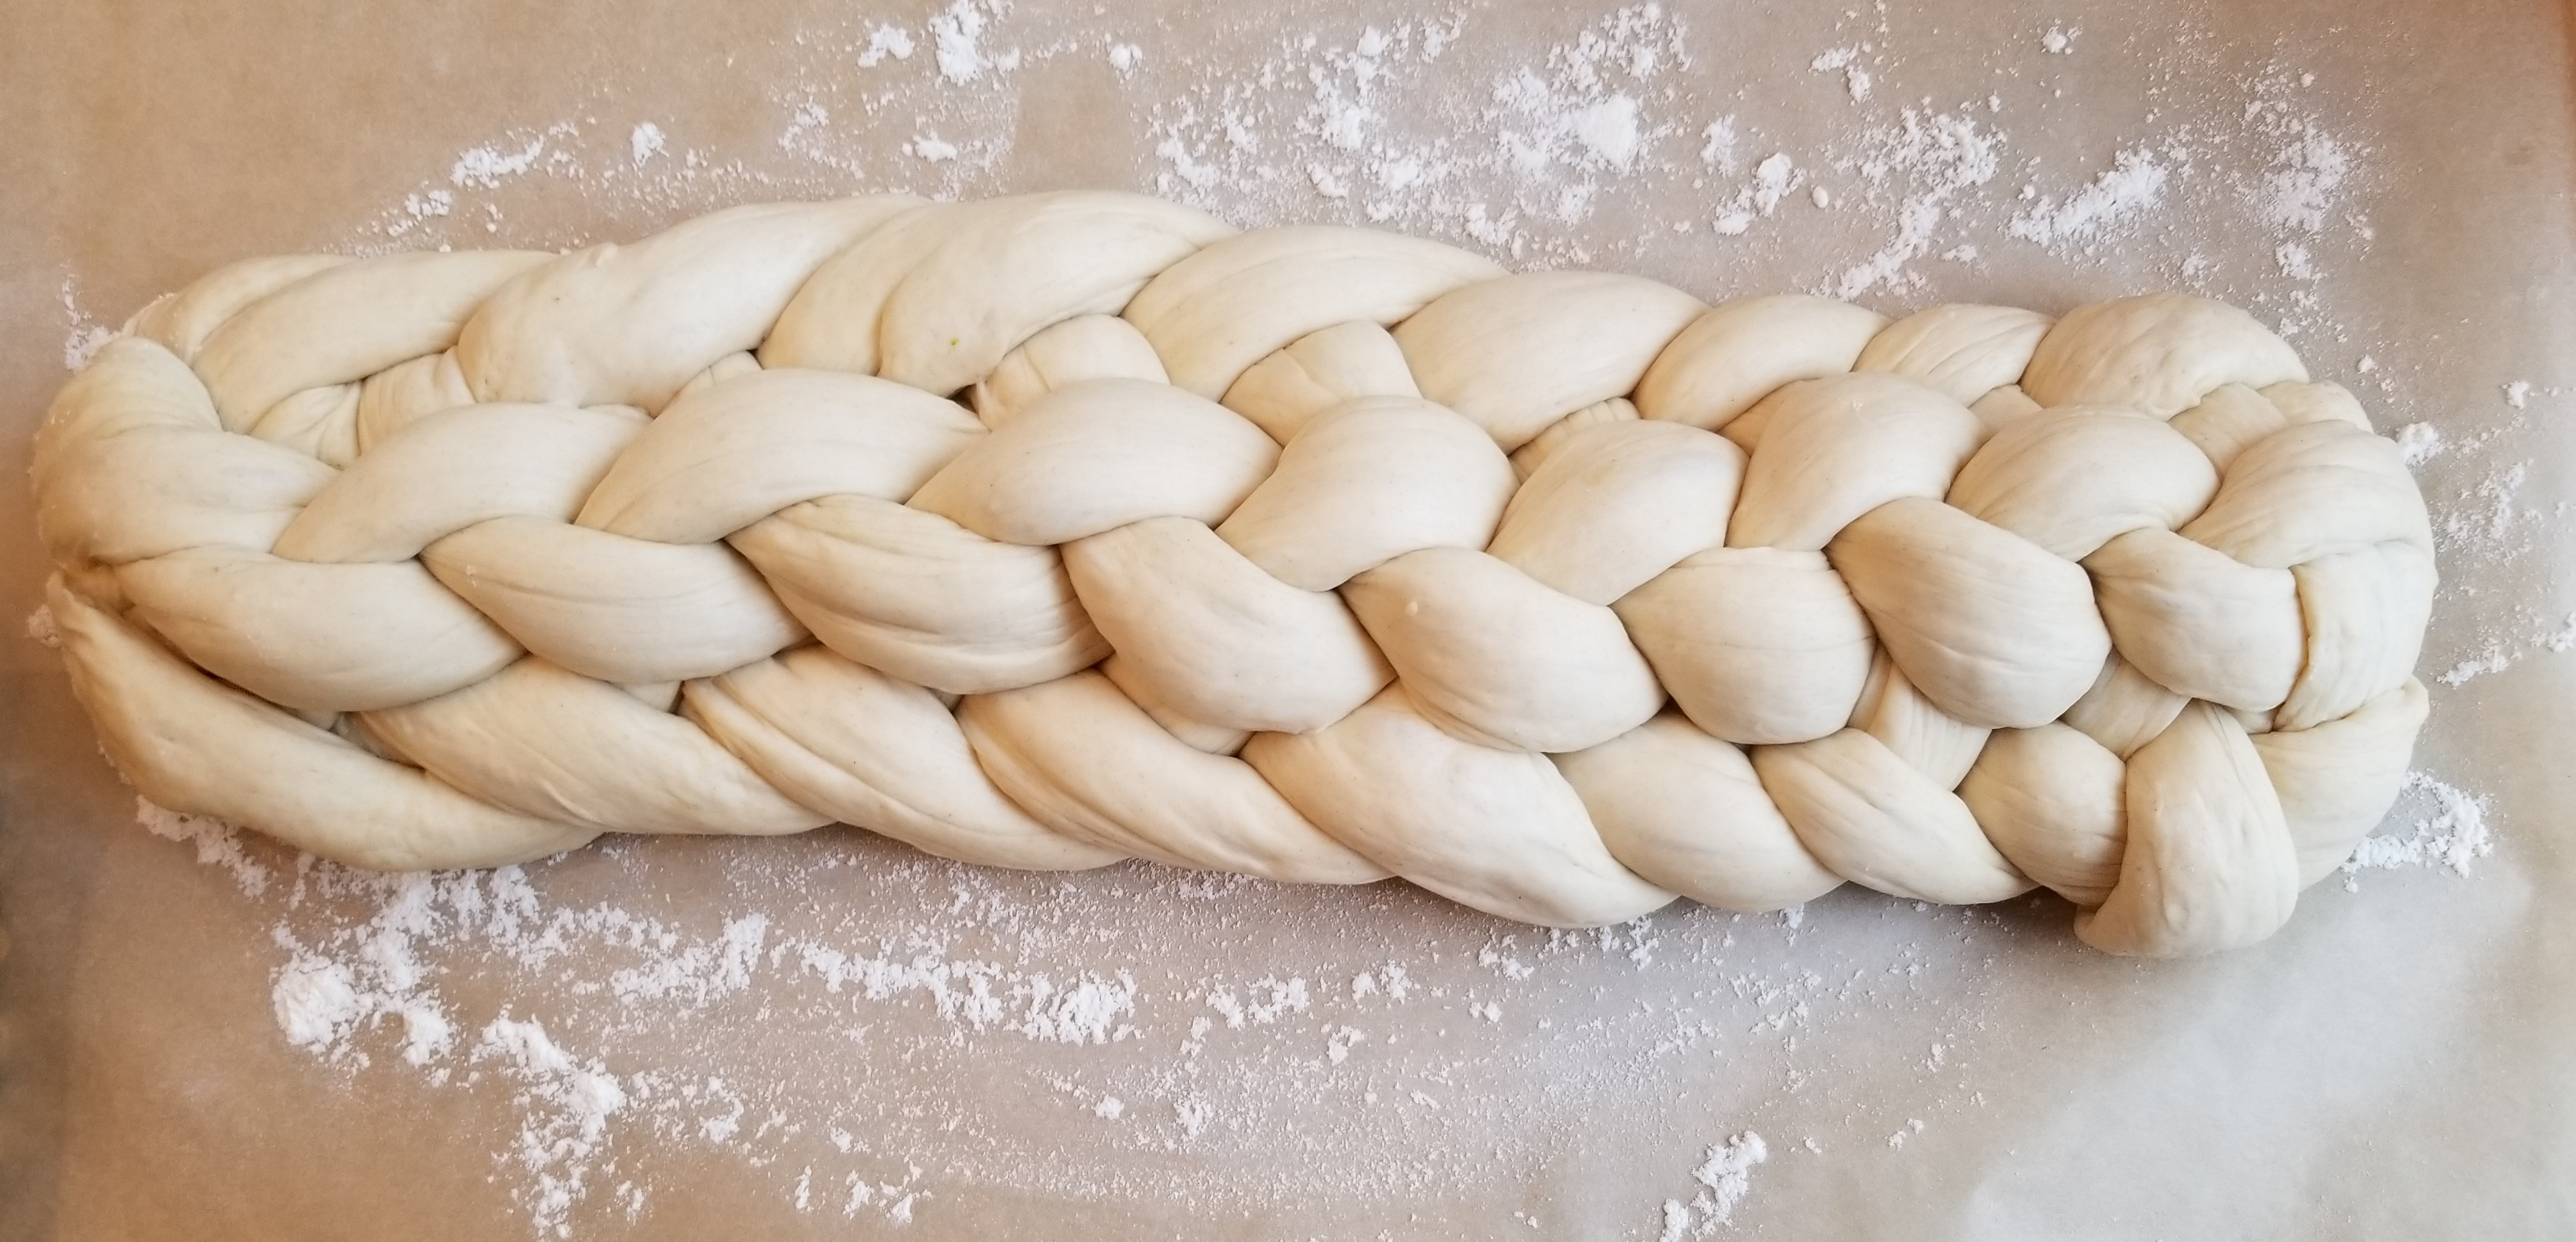
As I was plaiting, I started to see the pattern coming together. It’s almost like a braid on top with another braid on each side.
At the end, when I got to the point where the dough strands were too short to braid anymore, I used the tip I learned from watching Paul in the Masterclass: Unsticking the dough from the table at the top of the loaf, he grabbed each end right where the braiding began and ended (or got messy) and squeezed it in his fist until it broke off. That way, he didn’t have a big glob of dough at the end to tuck under. He just tucked under a little bit at each end to make a beautiful, evenly plaited loaf. Hopefully, mine looks almost as good.
Having learned from watching the bakers in the tent attempt this challenge, I placed my loaf on a baking sheet covered with parchment paper to prevent it from sticking. I put it in a warm spot to prove again for another hour or so. Then I brushed it with an egg wash right before popping it in the oven to bake. About 25 minutes later (as the wonderful aroma of baking bread wafted through the house), I had a pretty decent-looking, golden brown, eight-plaited loaf ready to cool and slice into heavenly cloud-shaped pieces of scrumptiousness!
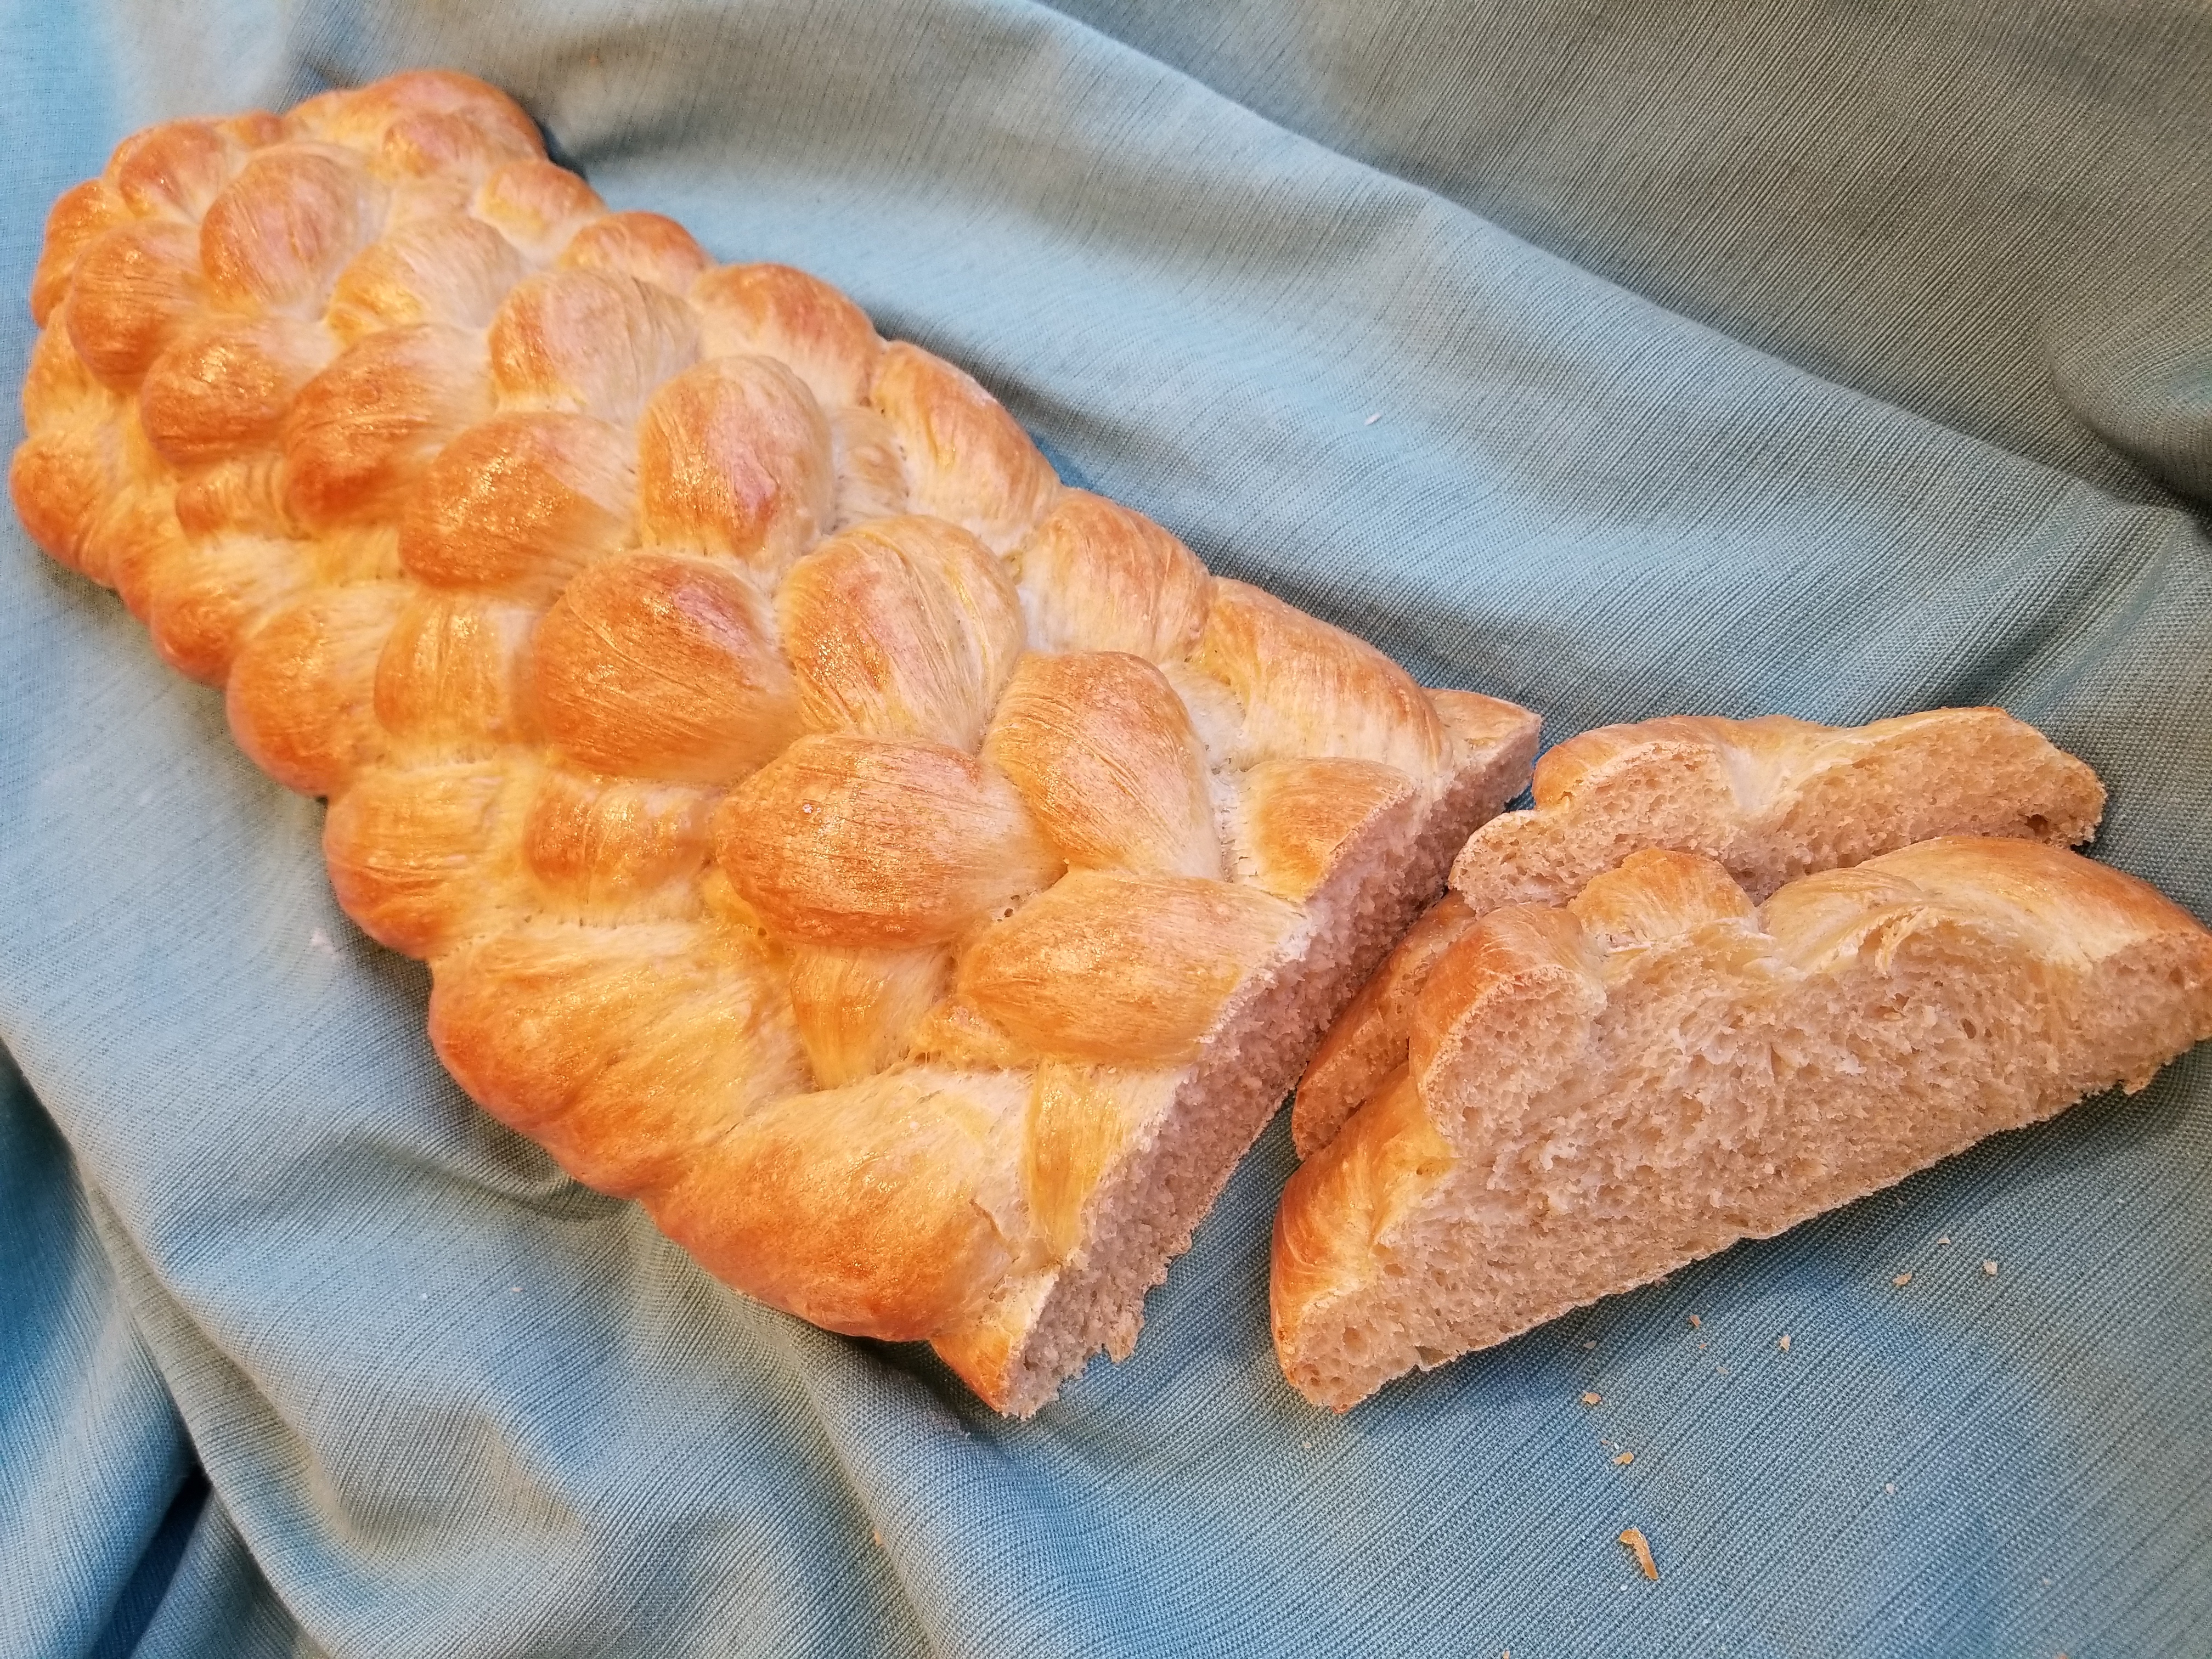
While the shape of the bread isn’t really conducive to sandwiches, my husband and I learned that it makes a really good cheesy garlic bread. I had some leftover ghee with roasted garlic and cilantro from the flatbreads I made for the signature challenge last week, so I spread that on a few slices, sprinkled on some parmesan cheese and popped them in the toaster oven (although I’m sure the regular oven would work just as well) until the cheese was melted and slightly browned. As Mary Berry would say, “That’s a bit of alright!”
Here’s a link to Paul’s original recipe on BBC.com. I’ve adapted it here for American bakers.
Paul Hollywood’s 8-Strand Plaited Loaf
Adapted for American bakers
Ingredients
- 3¾ c. plus 1 T. bread flour, plus extra for dusting
- 1 pkg. quick-rise yeast
- 2 t. salt
- 1½ T. olive oil
- 1½ c. water
- vegetable oil for greasing bowl
- 1 egg, lightly beaten
- a pinch of salt
Directions
- Place flour in a large bowl. Add the yeast to the flour on one side of the bowl and the salt on the other. (Salt should not be placed on top of the yeast, as it could kill it and make in inactive.) Stir together until evenly mixed.
- Pour olive oil and about ¾ of the water (a little over 1 cup) into the flour mixture, and mix by hand. Then add the rest of the liquid, and mix again until a ball of dough is formed.
- Turn the dough out onto a lightly floured work surface, and knead by hand until the dough looks silky and stretchy. This will take approximately 10 minutes.
- Oil a medium-sized mixing bowl, and place the dough into the bowl. Cover with plastic wrap, and set in a warm place to rise for about an hour or until the dough doubles in size.
- When the dough is risen, turn it out onto a lightly floured work surface, and knead just enough to knock most of the air out. Shape it into a ball.
- Divide the dough into eight equal pieces, and roll each piece into a strand about 16 inches long.
- Lay the strands out on the lightly floured surface like an octopus, fanned out from a central point at the top. Stick all the ends at the central point to the table with your thumb.
- For the braiding sequence, number the strands of dough 1 to 8 from left to right. Every time you move a strand it will take the new number of its position in the row.
- Step 1: Place 8 under 7 and over 1
- Tuck both ends of the loaf underneath to give a tidy finish. Place the plaited dough onto a parchment-covered baking tray, and leave to prove for another hour, until risen again.
- Preheat the oven to 400°F. Brush the loaf with the beaten egg wash and bake in the oven for 20-25 minutes.
Step 2: Place 8 over 5
Step 3: Place 2 under 3 and over 8
Step 4: Place 1 over 4
Step 5: Place 7 under 6 and over 1
Repeats steps 2-5 until all the dough is braided.
Did you try an eight-strand plaited loaf? Or six or even three? Let me know how it turned out by commenting below.

Looks great!
LikeLiked by 1 person
Thank you so much for converting this. I can’t wait to try it.
LikeLike
You’re welcome, Crystal! Let me know how yours turns out! 😊
LikeLike