
If you want to improve your skill at something—whether a sport, playing an instrument or, say, baking—you need to master the basics.
So for my showstopper fruit tart, I decided to make the best fruit tart I could muster using the building blocks of some of the best pastries on the planet—pâte sucrée for the base, crème patissiere for the filling, and beautifully arranged and gorgeously glazed fresh fruits and berries on top. After all, those “basic” fruit tarts are often the most beautiful creations in a patisserie window, at least in my opinion.
I was inspired by the fruit tarts we in Milwaukee used to get from V. Richards Bakery, which closed in 2017. Their pastry displays always featured these colorful wheels of fruit, crème pat and pastry. I wish I could show you a photo of one of them, but nothing I found online does them justice.

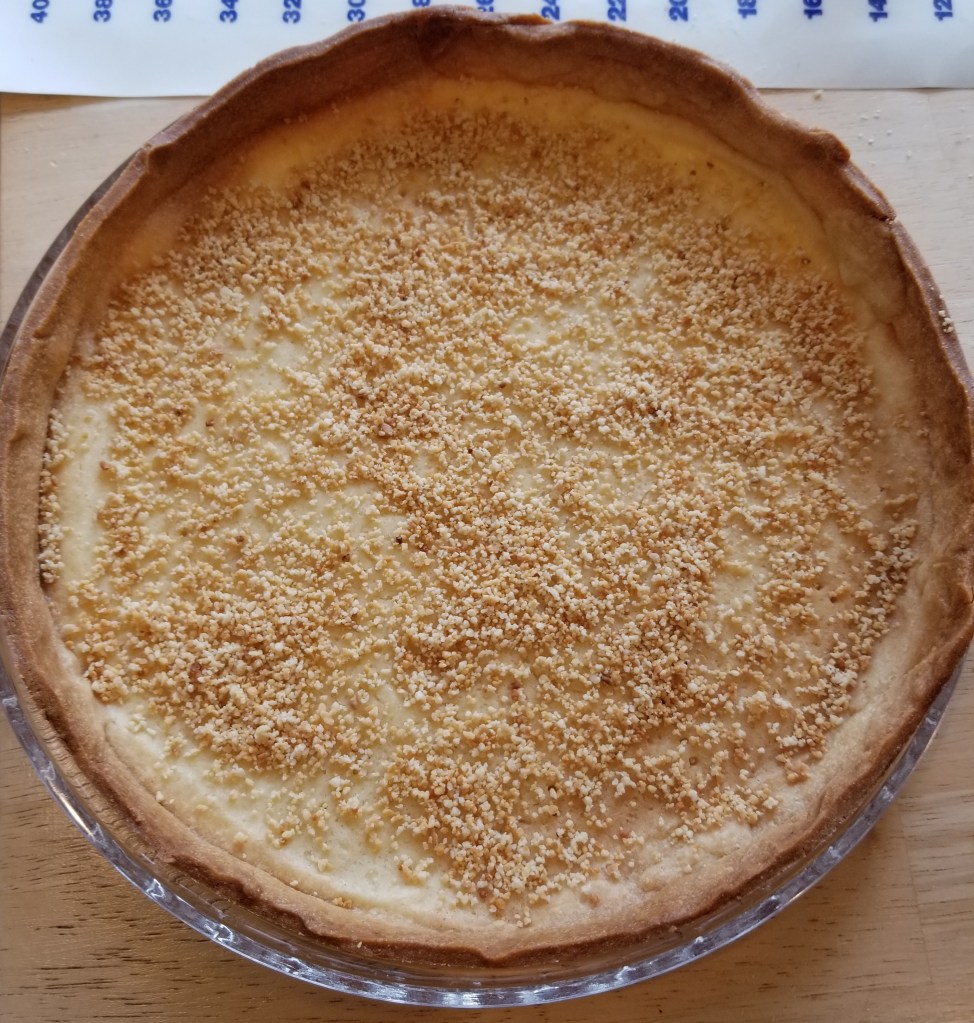
I started my own colorful creation with a pâte sucrée, which is basically a sweet shortcrust pastry enriched with egg yolk. While it seems deceptively easy to make, it can be difficult to work with because it breaks and tears so easily. The trick, I found—after rolling it out once to disaster and having to chill it before rolling it out again—was to work quickly, while it’s still cold, and then piece it together in the pan if it tears or beaks. Once formed in the pan, it must chill again to relax the gluten so it doesn’t shrink in the oven. It is then blind-baked and cooled before being filled.

I didn’t have a large enough tart pan or ring, so I used my springform pan, lining the bottom with parchment paper to make sure I’d be able to get my pastry shell off of the base. I brought the pastry up the side of the pan and trimmed it evenly to about an inch high. The trimmings, once baked, made a tasty morsel that went well with my morning coffee!
Then I made the crème patissiere. The recipe I chose, from TheFlavorBender.com, uses cornstarch instead of flour, which has the added benefit of making the crème pat gluten-free. While not a personal concern of mine, I have several friends who are gluten-free, so it’s always nice to find recipes that allow me to bake for them. The Flavor Bender even explains how to make a dairy-free crème pat. The website also does a good job of describing the different types of custard-based desserts and creams—so if you’re wondering what the difference is between a crème anglaise and crème diplomat, check it out.
Make-Ahead Options
The nice thing about this tart is that each of its parts can be made ahead of time and then assembled the day you plan to serve it. The pastry dough can be made up to five days ahead of time and stored in the refrigerator, or even in the freezer for up to two weeks. If you go so far as to roll out the dough and place it in the tart pan, it can be refrigerated for a day or frozen for two weeks before being baked. The crème pat can be stored in the refrigerator for three or four days (but NOT frozen).
I was also excited that the crème pat recipe called for three egg yolks. (Have I mentioned before that I hate waste?) I had recently used three egg whites and didn’t want to throw out the yolks. So I researched how to freeze the yolks and learned that if you whisk the eggs with 1/8 teaspoon of salt before you freeze them, they won’t remain solid when thawed, a problem I’d dealt with in the past. They do say to mix the thawed yolks with whatever sugar the recipe calls for before adding any liquid, which worked perfectly with this crème pat recipe, which has you mix the eggs and sugar together before adding hot milk to temper the eggs. I simply omitted the salt from the recipe, since it had already been added to the yolks.
I also substituted almond extract for the vanilla. I’ve always loved almond flavor, and I think it goes well with fresh fruit. In addition, I decided to make my filling a crème légère, which is basically crème patissiere with sweetened whipped cream added. I’m not a huge fan of heavy custards, so adding the whipped cream makes it lighter and fluffier. It also allowed me to adjust the sweetness to my liking.
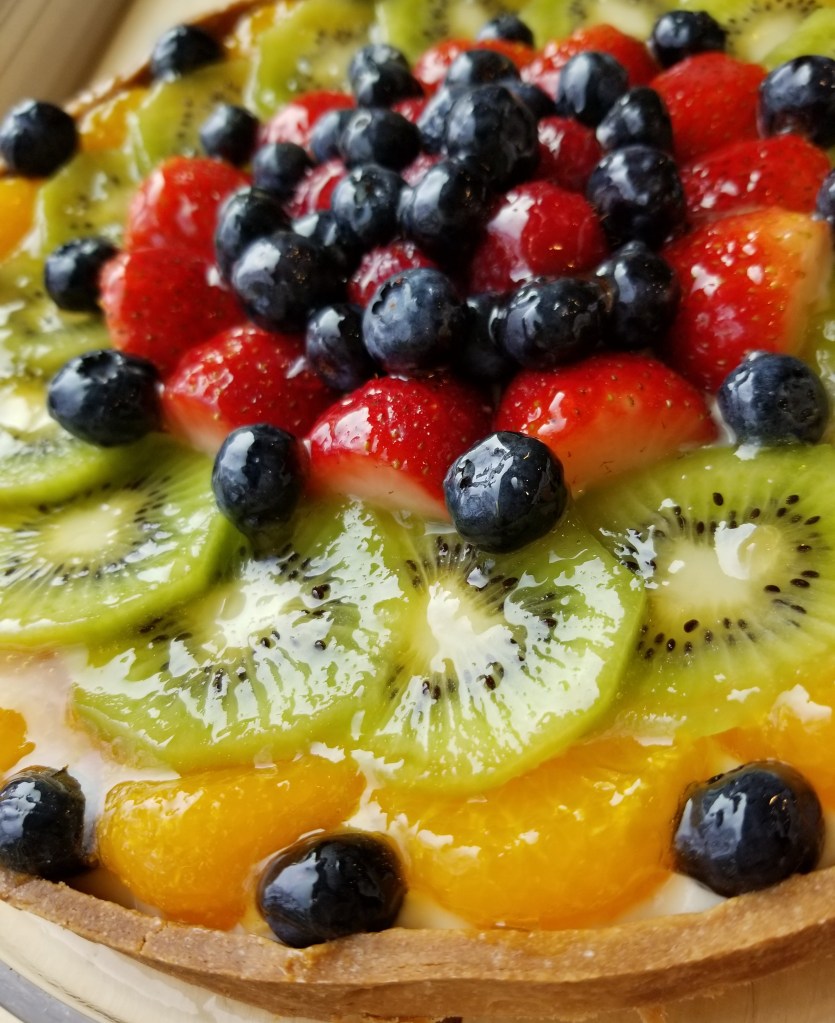
While my tart shell was cooling and my crème pat was chilling, I prepared the fruit topping. I used kiwis, strawberries, raspberries, blueberries and mandarin oranges. I must confess to using canned oranges, as I’m not very good at supreming an orange. That will be a challenge for another day.
When finally ready to assemble everything, I whipped and sweetened the cream and whisked it into the crème pat. I only used about half of the crème pat, so I refrigerated the rest for later. After smoothing the cream filling into the pastry shell, I carefully arranged the fruit from the outside in. Because I didn’t want to see any cream showing through, I used blueberries to fill in gaps between the fruits.

I’ve seen many different designs for arranging fruit on these tarts, so this really allows the baker to be creative. Once I was satisfied with my arrangement, I glazed the fruit with warmed apple jelly flavored with orange blossom water. I wanted to give my tart a little more complexity of flavor and thought the orange blossom water would do the trick, but I was careful to add the flavoring a little at a time so as not to “go knicker drawer” with the floral scent, as Sue Perkins would say.
Glazing the fruit definitely brings the overall appearance of the pastry up a notch, but I wanted to give my showstopper fruit tart some extra pizazz, to make it even more showstoppery, so I decided to make some caramel-dipped almond spikes, much like the hazelnut spikes they often make on GBBS. This gave me another opportunity to practice my sugar work. It’s pretty simple, really. Just skewer the blanched nuts onto wooden skewers, melt the sugar in a large saucepan until it’s a dark amber color, dip the nuts into the hot caramel and tape the skewers to the edge of the counter so the caramel drips down, forming a long string of hardened caramel. (Make sure you cover the floor with newspaper first!) Once cooled, carefully remove the skewers from the almonds, and trim the caramel threads to the desired length. I inserted the almonds into the center of my tart so the spikes pointed upwards, giving my showstopper tart a dramatic finish!

I took this bake to work, and it was devoured within minutes, but because I had enough crème pat and fruit left over, I was able to make a second tart the next day with a gluten-free crust using this recipe. I shared it with some friends who are gluten-free, and it also received rave reviews. While many commented on the almond flavor, I don’t think the orange blossom came through very well, so next time I might be more generous with the glaze to make sure the flavors are more pronounced.
Here are the links to the recipes I used, but my alterations are included in the recipe below. I’m not including instructions for the caramel spikes, but you will find them here. (You can, like me, substitute almonds for hazelnuts.)
*For more baking tips and recipes from Nancy Birtwhistle, check out her YouTube page or her website.

Almond and Orange Blossom Fruit Tart
For the pastry:
- ½ c. unsalted butter (at room temperature, cut into 8 pieces)
- ¼ c. sugar
- ½ t. kosher salt
- 1 c. unbleached, all-purpose flour
- 1 egg yolk
Directions
- Using a standard mixer fitted with a paddle attachment, cream together butter, sugar and salt on medium speed for 2-3 minutes, or until pale and light. Scrape sides and bottom of bowl with rubber spatula. Add flour and beat on low for about 30 seconds or until the flour is blended with the butter-sugar mixture. The mixture will look like wet sand. Add the egg yolk and continue to mix on low speed for about 30 seconds, or until the dough comes together.
- Wrap the dough tightly in plastic wrap and refrigerate for about 1 hour. (At this point, the dough can be stored in the fridge for up to 5 days or in the freezer for up to 2 weeks. If frozen, thaw in the refrigerator overnight.)
- Line a baking sheet with parchment paper and place a 10-inch tart ring on top. (Or, if using a springform pan, line the bottom with parchment paper.) Remove the dough from the refrigerator and let soften at room temperature for about 30 minutes. Use a rolling pin to bang and flatten the dough into a disk about ½ inch thick.
- Flour your work surface and sprinkle a little flour on the dough disk. Working quickly so the dough doesn’t get too warm, roll from the center of the disk outward, and gently rotate the disk one quarter turn after each roll to ensure the disk is evenly stretched into a circle. Make sure the work surface is well floured so the dough doesn’t stick to it, and make sure the dough itself is floured well enough to keep the rolling pin from sticking to it. Roll out the dough into a circle about 2 inches in diameter larger than the tart ring or pan. It should be just under ¼ inch thick. Don’t worry if the dough breaks a bit, especially toward the edges. You can patch any tears once you’ve lined the pan.
- Carefully roll the dough around the pin and then unroll it on top of the tart ring or pan. Press the dough into the bottom and sides of the pan, covering the entire bottom and up the sides at least 1 inch. Use any scraps or odd pieces to patch up any tears or holes. You can also use a small ball of dough to press all the way around the sides of the pan or ring to make sure there are no air pockets. Trim the edge of the dough so it is even with the rim of the ring, or about 1 inch up the sides of the pan.
- Refrigerate the pastry shell for at least 30 minutes so the gluten can chillax and the pastry won’t shrink in the oven. (The unbaked shell, if tightly wrapped in plastic wrap, can be refrigerated for up to 1 day or frozen for up to 2 weeks. Bake directly from the fridge or freezer.)
- Heat the oven to 350°F. Place a piece of foil or parchment paper large enough to hang over the sides of the pastry shell inside the unbaked shell and fill it with pie weights or dry beans. Bake the shell in the center of the oven for 30-35 minutes or until golden brown. Remove from oven and carefully remove the foil or paper with the pie weights in it. Cool the pastry to room temperature on a wire rack, then remove it from the pan or ring.
For the crème patissiere:
- 2 c. milk (preferably 2% or whole)
- 6 T. sugar
- 1 pinch salt
- 2½ T. cornstarch (3 T. for a stiffer cream)
- 1 T. almond extract
- 3 large egg yolks
- 1 large egg
- 3 T. unsalted butter, softened
Directions
- In a saucepan over medium-high heat, heat the milk to a simmer, almost to a boil.
- While the milk is heating, place sugar, salt, cornstarch, almond extract, egg and yolks in a mixing bowl. Whisk (or use the whisk attachment of a mixer) until you have a thick, smooth mixture. If whisking by hand or with a hand mixer, place the bowl on a towel to prevent it from slipping. Set aside until the milk comes to a boil.
- As soon as the milk starts to bubble, remove it from the heat. Transfer about half the hot milk to a heat-proof pitcher or measuring cup with a pour spout. Slowly pour the hot milk in a thin stream into the egg mixture while whisking constantly to temper the eggs. Once it’s all mixed together, pour the tempered egg mixture back into the saucepan with the rest of the hot milk.
- Over medium heat, whisk the mixture vigorously until it starts to thicken; this should take about 1-2 minutes. Continue whisking and let the custard come to a boil. (It should release bubbles.) Then lower the heat and cook further for 1-2 more minutes after the first bubbles break the surface. Remove from heat and add the butter, whisking until the butter is melted and completely mixed in.
- Pour the custard into a bowl, and immediately cover the entire surface with plastic wrap to prevent a skin from forming on the top. Let the custard cool down to room temperature, then chill it in the refrigerator for a few hours or overnight. (Stored in an airtight container, it will last for 3-4 days in the fridge.)
Additional ingredients:
- ½ c. heavy cream
- ¼ c. powdered sugar
- 2-4 T. ground, toasted almonds (optional)
- 2-3 kiwis, peeled and sliced
- 1 pint of strawberries, hulled and halved
- ½ pint of raspberries
- ½ pint of blueberries
- 1 can of mandarin oranges, well drained
- ½ c. apple jelly
- 1½ T. orange blossom water (or to taste)
Directions
- Divide the pastry cream in half, reserving half for another use. Whip the heavy cream with the powdered sugar until soft peaks form. Then whisk it into half of the pastry cream. This is now crème légère.
- To assemble the tart, sprinkle the ground almonds into the prebaked pastry shell. (This will help prevent a soggy bottom.) Fill the shell with the crème légère, smoothing the surface with a knife or spatula. Arrange the fruit on top, as desired.
- Warm the jelly in the microwave at 30-second intervals until it’s almost melted. Stir in the orange blossom water a little at a time until you’ve reached the desired flavor level (not too florally). Brush the jelly onto the fruit with a silicone pastry brush, being careful not to destroy the design you’ve already created. When all the fruit is glazed, place the tart in the fridge to chill until ready to serve.

Beautiful!!
LikeLiked by 1 person
Thanks!
LikeLike