
When I was a college student, I spent a semester in Freiburg, Germany, in the heart of the Black Forest (der Schwarzwald). I loved going into the local Konditerei (a pastry café), with its glass cases full of all sorts of cakes, tortes and pastries. I would spend an afternoon sipping tea and making one piece of Kuchen last as long as I possibly could. (I was a cash-strapped college student, after all.)
Taking pride of place in those display cases was always a Schwarzwälder Kirschtorte (Black Forest cherry cake). What I didn’t know then was that this traditional confection was named not for the Black Forest region, but for one of its products: Schwarzwälder Kirsch, or kirschwasser. This twice-distilled fruit brandy is made from the dark, sour Morello cherries that grow in the region.

As with many traditional foods, it’s hard to pin down the exact time or place that the Black Forest cake was invented. A confectioner named Josef Keller claimed to have created the now-famous gâteau in 1915 when he was working at a café in Bad Godesberg, near Bonn. Another origin story gives credit to a different master pâtissier, Erwin Hildenbrand, who is said to have invented it 15 years later, in 1930, in Tübingen. But the first written mention of the cake didn’t appear until 1934, in a cookbook by J.M. Erich Weber.
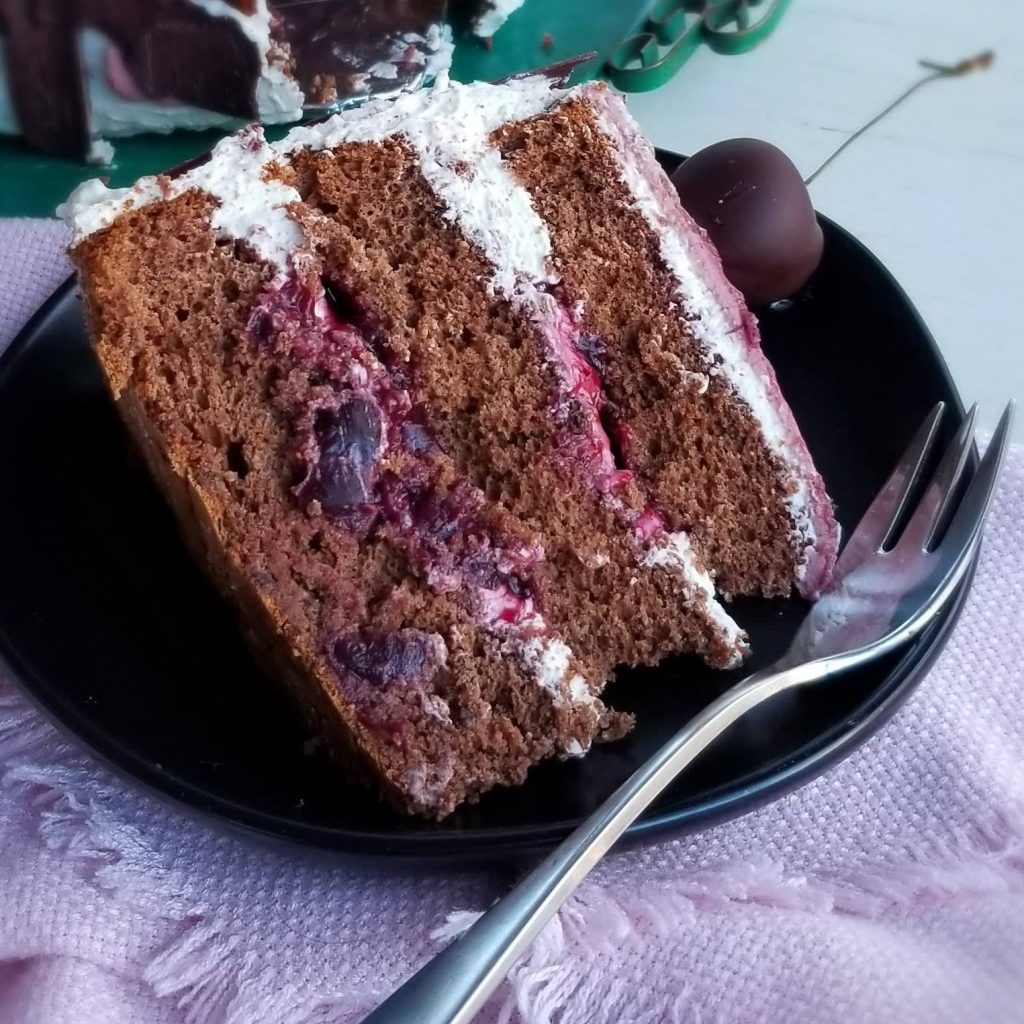
No matter its origins, Black Forest cherry cake is made of multiple layers of chocolate cake filled with cherries and whipped cream and garnished with additional cream, cherries and chocolate. In 2013, the European Commission decreed that any cake calling itself a Black Forest cake must contain certain ingredients, including German kirschwasser.
Unfortunately, in my attempt at making this iconic showstopper, I ran into problems with the cake part. It’s discouraging to have to report a fail this early in the season, but I promised when I began baking through The Great British Bake Off that I would be honest about my attempts, even when I make embarrassing mistakes!
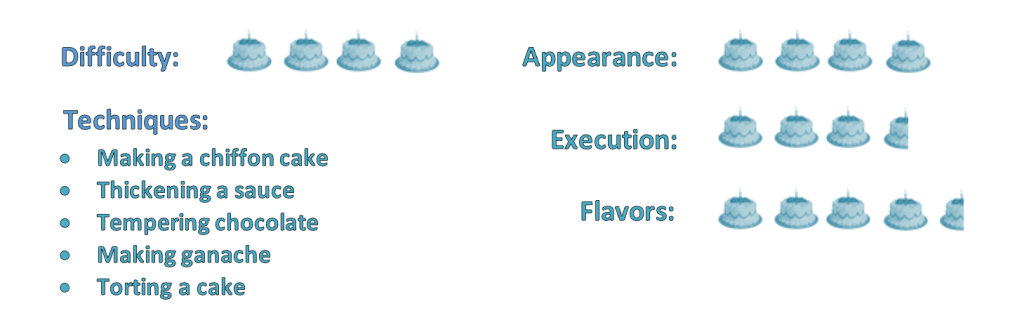
I wanted to revisit a recipe I had used in a previous challenge, my showstopper chiffon cake, in which I combined a chocolate chiffon cake recipe from Food52.com and an almond-flavored one in a yin-yang design. For that challenge, I used a 10-inch springform pan, and despite the fact that there was too much batter for the pan size, it turned out pretty good. So I decided to make it again for my Black Forest gâteau (but this time I placed the parchment collar inside the pan before adding the batter, as opposed to jerry-rigging it on the outside of the pan, like I did the last time).
Another change I made this time was to put cake strips around the outside of the pan to ensure that the cake would rise evenly and be flat on top. What I didn’t account for is that this causes the cake to need a longer bake time. While it looked like it was baking nice and evenly, tall and straight, I didn’t realize that the center it was raw. I kept checking it with toothpicks, and there was always a little chocolate on the toothpick when I pulled it out, but I thought that was because the batter has bits of chocolate in it. I finally took the cake out of the oven about 10 minutes after the maximum bake time, but when I flipped it over to cool upside down (as you’re supposed to with chiffon cakes), the whole thing collapsed onto my stovetop!
In that moment, I had three options: (1) Pile the raw cake batter onto a platter and serve it, like Dorret was forced to do with her gâteau in this episode of GBBO; (2) scoop the unbaked batter off the stovetop, throw it back into the pan and let it keep baking, knowing the texture would be way different from a proper chiffon cake; or (3) start over.
I confess that I did scoop the batter back into the pan and put it back in the oven (because who wants to waste an entire cake?). But my husband urged me to start over. So after checking to make sure I still had enough ingredients on hand, I got back to work.
Knowing that my choice of cake pans was my biggest mistake, the second time I made the cake I used the type of pan the recipe called for — a tube pan, also known as an angel food cake pan. Because it has a cylinder in the center, the cake bakes evenly, and the high sides give the cake more room to rise. This time around, the cake turned out perfectly, and I was able to cool it upside down without it falling out of the pan!
While the cake was baking, I got to work on the filling. Using canned, dark cherries in a sweetened syrup, I simply chopped the cherries, then brought the fruit and syrup (reserving ¼ cup to brush on the cake) to a boil, adding a couple tablespoons of cherry juice, and thickened it with cornstarch. After it cooled, I added 2 tablespoons of kirsch for that authentic flavor.
When the cake was completely cool, I ran a knife around the inside of the pan and carefully removed the cake. (It helps to have a pan with a removable bottom, but you may also have to run a knife or skewer around the tube in the middle.) I then wrapped it in plastic wrap and popped it in the freezer. That makes it easier to torte the cake, or cut it into layers.

While my cake and filling chilled, I tempered some chocolate for the decoration. Rather than fiddle with bain-maries and precise temperatures, I used my go-to easy method from America’s Test Kitchen. It may not result in a perfect temper, but it has worked well for me in the past. I spread most of the chocolate on a piece of acetate for the shards and used the rest of the chocolate to dip fresh cherries in to garnish the top of my gâteau.

When I was ready to assemble the torte, I cut the cake into three layers using the dental floss method, demonstrated here. I actually used some really strong thread I had on hand, but if you do use dental floss, make sure it’s the unflavored kind! Since my vintage angel food cake pan is an odd shape (square with rounded corners, like this one), I cut a piece of cardboard the same size and covered it with aluminum foil for a DIY cake board to place the cake on.
Then I made mascarpone whipped cream by whipping together mascarpone cheese, powdered sugar and whipping cream until it formed stiff peaks. This is my favorite way of making stabilized whipped cream. The mascarpone adds a rich, buttery flavor that’s not too sweet and doesn’t overwhelm the rest of the flavors in the cake. I added a tablespoon of kirsch in the last few seconds of mixing.
I added another tablespoon of kirsch to the reserved cherry syrup and brushed this onto the bottom cake layer. I read somewhere that chiffon cakes are delicate (they are also light and oh so fluffy!) so you shouldn’t brush them with too much syrup or they will collapse, so I used a gentle hand here.

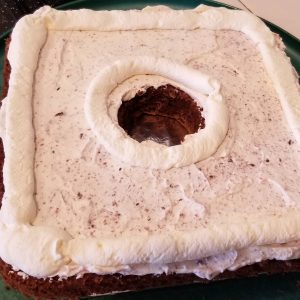
On top of that I spread a thin layer of the mascarpone cream and then piped a rim of cream around the outer and inner edges of the cake. This formed a border to keep the cherry filling from seeping out. I spooned the filling inside the borders and placed the second layer on top. Repeating those steps, I then placed the third layer on top of that and spread the whole cake with a thin layer of the stabilized cream. The cake was very crumbly, so this thin layer of cream served as a crumb coat.

I stuck the cake back in the fridge to chill while I made a ruby ganache for the top. I’ve been wanting to try ruby chocolate ever since I first heard about it on Bake Off. Since I was making this cake just in time for Valentine’s Day, it seemed the perfect opportunity. I ordered a couple of Chocolove ruby chocolate bars and used the recipe on this site for the ganache. I meant to add a tablespoon of corn syrup to make it shinier, but I forgot. C’ést la vie. The ganache seemed a bit grainy, which I learned is because the ratio of fat to liquid is too high. So adding a little corn syrup or kirsch should have fixed it. But I didn’t think of that at the time, and it wasn’t too grainy, so I used it anyway. (I wasn’t real thrilled with the flavor of the ruby chocolate. It tasted a lot like white chocolate but with a slight fruity tang. If you want to know more about it, I recommend this article.)
Finally, I pulled the cake out of the fridge, slathered the sides with the rest of the whipped cream, and poured the ganache over the top. I wanted it to drip down the sides, but it wasn’t flowing well, so I just spread it on top. I then broke my tempered chocolate into shards to decorate the sides and garnished the top with the chocolate-covered cherries. Voilà!
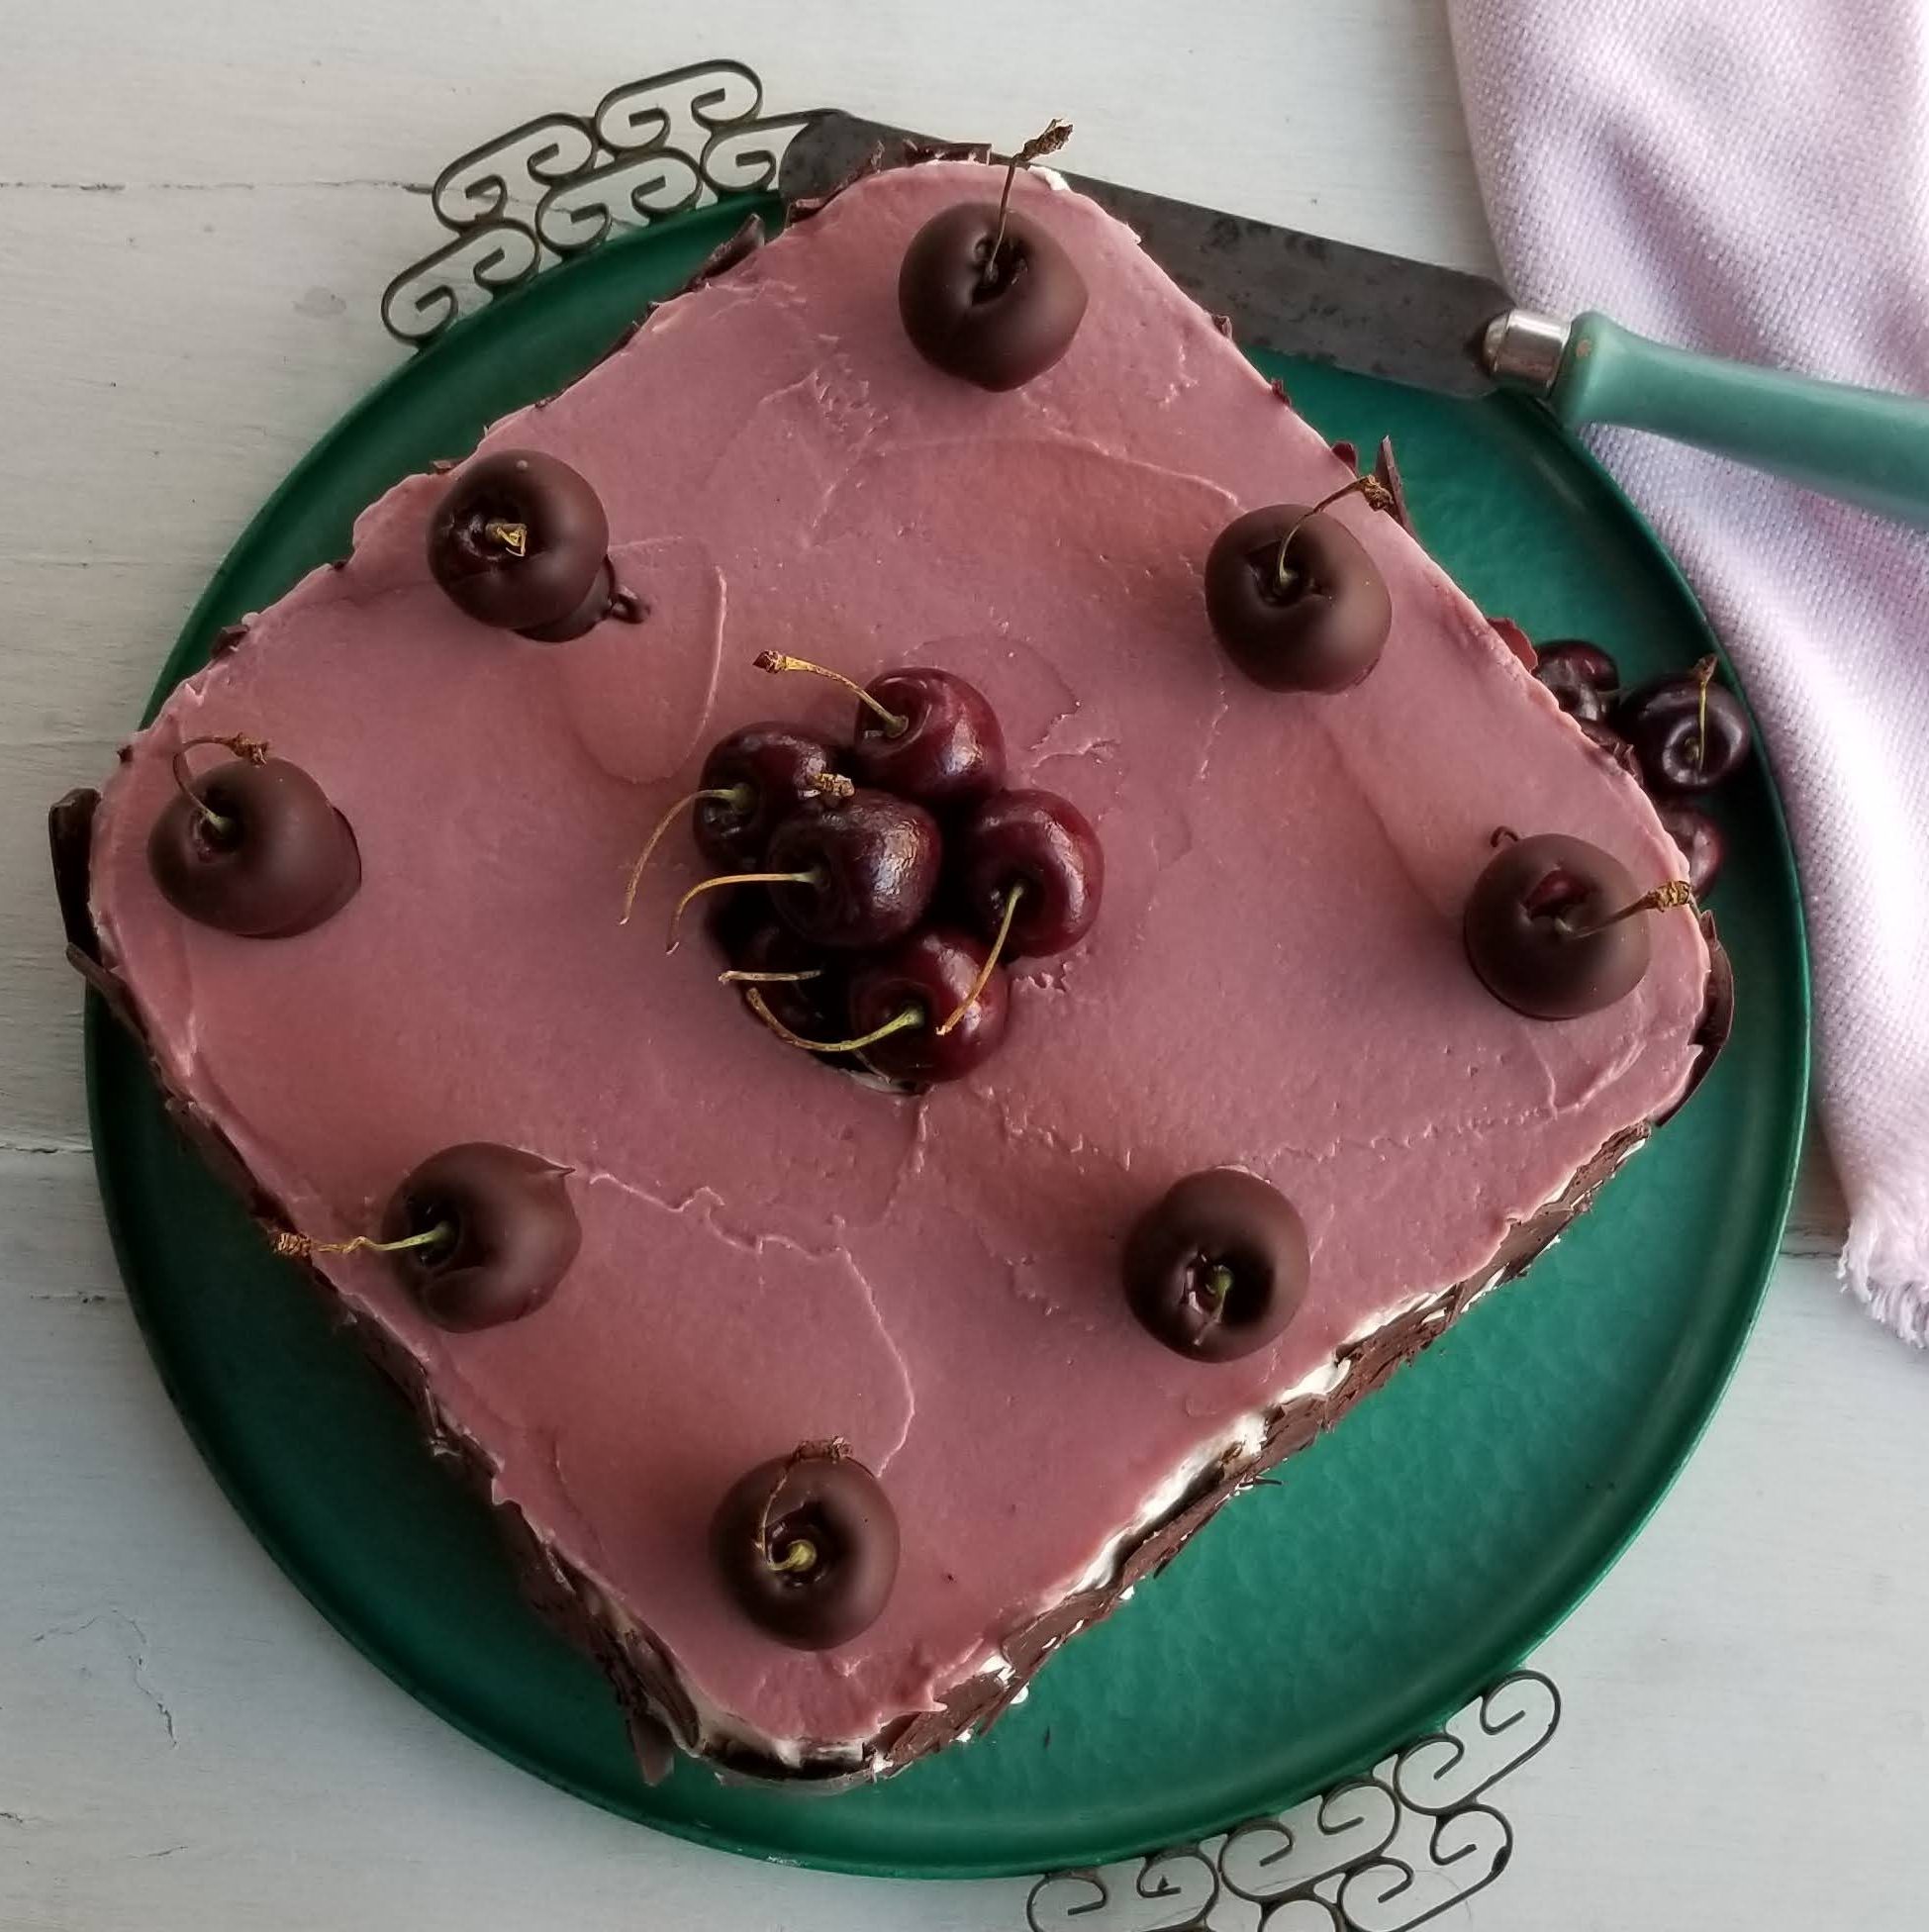
I thought my creation looked rather retro, which is fitting for a dessert that was popular in the 1970s, so I displayed it on a classic mid-century green metal tray I picked up at a flea market for a vintage cocktail party I hosted a few years back. The tray goes well with my mom’s 1950s-era turquoise and brown table linens. And to serve it, I used my vintage Hollywood-brand cake breaker, which is perfect for cutting angel food and chiffon cakes without squishing them. (It even came with instructions, as you can see in the photo!)

I really enjoy the combination of chocolate chiffon cake with cherries and whipped cream. The chiffon is so light it doesn’t feel like a heavy dessert. In future, I might try using sour cherries, or a combination of sweet and sour, to give more of a bite to it. Because this made such a large gâteau, I was able to spread the love for Valentine’s Day and share it with several friends and neighbors. Let’s just say I didn’t hear any complaints!

Black Forest Gâteau
Credit for the ruby chocolate ganache: SugarAndSparrow.com
For the cake:
- ½ c. natural (not Dutch-processed or alkalized) cocoa powder
- ¾ c. boiling cherry juice
- 3 oz. dark chocolate (at least 70% cacao, or unsweetened)
- 1¾ c. sugar, divided
- 2 t. baking powder
- ¼ t. baking soda
- ½ t. salt
- ½ c. sunflower oil (or another neutral-flavored oil; I used canola)
- 5 large egg yolks
- 1 t. vanilla extract
- 1¾ c. cake flour (sifted before measuring, or 177 g. without sifting)
- 1 c. egg whites (from 7-8 eggs, or 255 g.), room temperature
- ½ t. cream of tartar
For the cherry filling:
- 2 15-oz. cans dark cherries in syrup (reserve ¼ c. of syrup)
- 2 T. cornstarch
- 2 T. cherry juice
- 1-2 T. kirschwasser (to taste)
For decorations:
- 8 oz. dark chocolate, finely chopped, divided
- 10-20 bing cherries on stems
For the mascarpone cream:
- 2 c. whipping cream
- 8 oz. mascarpone cream
- ½ c. powdered sugar
- 1 T. kirschwasser (optional)
For the syrup:
For the ruby chocolate ganache:
- 6 oz. ruby chocolate, chopped into small bits
- ½ c. whipping cream
- 1 T. corn syrup (optional)
- 1-2 drops pink food color gel (optional)
Directions
- Position a rack in the lower third of the oven. Preheat oven to 325°F. Have ready a 10-12 cup tube pan with a removable bottom (ungreased).
- Put the cocoa powder in the large bowl of a stand mixer fitted with a whisk attachment. Whisk in the boiling water and set aside to cool for at least 10 minutes. While the cocoa is cooling, chop the chocolate into very fine shards and pieces — the largest pieces should be no more than ¼-inch thick. Leave chocolate on cutting board until needed.
- Set aside ¼ cup of sugar to stiffen egg whites later. Add all remaining sugar to cooled cocoa mixture with the baking powder, baking soda, salt, oil, egg yolks and vanilla. Whisk until ingredients are well blended. Add flour and whisk until blended and smooth. Set aside.
- In a clean mixer bowl with a clean whisk attachment, beat egg whites and cream of tartar on medium-high speed until the mixture is creamy white — no longer yellow or translucent — and holds soft peaks when the beaters are lifted. Gradually beat in reserved ¼ sugar, then increase speed to high and beat briefly until egg whites are stiff but not dry.
- Use a large silicone spatula to fold one quarter of the egg whites into the batter. Scrape the remaining egg whites into the bowl and scrape the chocolate from the cutting board over the top. Fold the egg whites and chocolate into the batter.
- Scrape batter into pan. Bake 55-60 minutes or until a toothpick inserted in a couple of places comes out clean and dry.
- Turn cake pan upside down and, if there are no “feet” on the pan to keep it above the surface of the cake, balance it on the edges of 2-3 cans or a bottle that fits inside the tube. When cool, remove from pan by turning cake right-side up and sliding a thin metal spatula around the sides, pressing against the pan to avoid tearing the cake. Detach the cake from the bottom of the pan by sliding the spatula between the cake and the pan, pressing against the pan bottom as you go.
- Place cake on large platter or cake board (right-side up or upside down). Wrap in plastic wrap and freeze for at least an hour or overnight before torting.
- To make the filling, drain cherries, reserving syrup. Chop cherries roughly. Reserve ¼ cup of the syrup for brushing on cake. Pour the remaining syrup into a saucepan with the chopped cherries and bring to a boil. Measure cornstarch into a small bowl and mix with the 5 tablespoons cherry juice. Slowly stir it into the boiling mixture. Continue to boil, stirring constantly, until mixture thickens. Add kirschwasser to taste. Remove from heat and allow to cool. Refrigerate until ready to use.
- To make the decorations, wash the bing cherries and dry with a paper towel. Place them in the fridge until ready to dip them. Temper the chocolate by warming 6 ounces of it in the microwave for 30-second intervals at 50% power, stirring between heating. When chocolate is almost all melted, add the reserved 2 ounces and stir until melted. If the last few bits don’t melt, microwave at 50% power for 5 seconds at a time, stirring after each time until completely melted.
- Spread two-thirds of the melted chocolate onto a sheet of acetate or parchment paper. Before the chocolate hardens completely, roll the acetate into a cylinder, chocolate side up, being careful not to let the chocolate touch itself or anything but the acetate or parchment. Clip the ends together with binder clips and leave to set. When the chocolate has set, unroll the cylinder and break or cut the chocolate into shards.
- Use the rest of the chocolate to dip 10 of the cherries. If it’s too hard, warm it gently over a pan of simmering water, but be careful not to get any water in the chocolate. Hold each cherry by the stem to dip it in the chocolate, shaking off any excess. Place dipped cherries on a piece of parchment or wax paper and refrigerate them until ready to use. Reserve remaining cherries.
- To make the mascarpone whipped cream, use a mixer fitted with the whisk attachment to whisk the mascarpone until it’s light and fluffy. Add powdered sugar and whisk until fully incorporated. Pour in cream and whisk, starting on low and gradually increasing speed until stiff peaks form. Transfer to a piping bag fitted with a ½-inch plain tip and refrigerate until ready to use.
- To make the syrup, combine reserved syrup and 1 tablespoon kirschwasser (or to taste). Set aside.
- To assemble the gâteau, remove cake from freezer and slice horizontally into three even layers. Place bottom layer on platter or cake board and brush lightly with syrup. Spread a thin layer of mascarpone cream over the top, then pipe a border around the inner and outer edges. Fill in with cherry filling. Place middle layer on top of bottom layer, brush with syrup, and repeat with cream and cherries. Place top layer on middle layer and brush with syrup. Spread a thin layer of mascarpone cream on top, then cover sides with a thin layer of cream. Refrigerate cake and leftover cream while making the ganache.
- To make ganache, place the chopped ruby chocolate into a glass or metal bowl and set aside. In a saucepan over medium-high heat, warm heavy cream and corn syrup (if using) to a simmer, then remove from heat, pour it over the chocolate and let it sit for about 20 seconds. Whisk it together until the chocolate is melted and it is uniform in consistency. Stir in a drop or two of pink food color gel if you want a brighter pink color. Cool ganache at room temperature for about 20 minutes or until it is close to room temperature.
- Remove cake and leftover mascarpone cream from fridge. Cover sides of cake with the rest of the cream. If ganache is too stiff, gently warm it in the microwave at 10-second intervals, stirring until it is of uniform consistency. Pour ganache over top of cake, spreading to cover smoothly, if necessary. Cover sides of cake with chocolate shards. Place chocolate-covered cherries on top of cake and pile remaining cherries in the hole in the middle. Refrigerate until ready to serve.
Up next: Biscotti
Discover more from Here's the Dish
Subscribe to get the latest posts sent to your email.

Marilyn, You may of made a mistake. I would say you recover very nicely. You learned a thing or two. Great job. Toya
LikeLiked by 1 person