
This was a pretty straightforward challenge — two dozen iced biscuits (or, as we in the U.S. call them, cookies). But it also entailed something I’ve been avoiding for awhile now. I’ve seen those fancy cookies decorated with royal icing all over Instagram, but I’ve been too intimidated to try it myself. All the bakers in the Great White Tent decorated their biscuits with royal icing, so I knew this would be my moment of truth.
That’s why it was with some trepidation that I approached this bake.
Mary Berry and Paul Hollywood were looking for 24 identical cookies. Mary said they should be “the same thickness, same texture, absolutely perfect!” She also offered some advice: Don’t be too ambitious when it comes to decorating them. That’s where some of the Bake-Off contestants ran into trouble. Jane and Val both ran out of time when icing their biscuits, and Kate and Rav were told theirs were a bit messy. Poor Candice chose to double her workload by making sandwich cookies, which Paul deemed hideous-looking (but admitted that they tasted “amazing”).
So coming up with a design element that was simple enough for a beginner (me!) but fancy enough to wow the judges (in my imagination, anyway) was the biggest hurdle I needed to surmount. Since it was the week before Valentine’s Day, I chose to go with a heart theme.

I knew what kind of cookies I wanted to make. Ever since I made this rhubarb ripple cheesecake with a speculoos (think Biscoff) cookie crust, I’ve been wanting to revisit those fabulous cookies. So I went back to the same recipe, which I had found on Gemma Stafford’s Bigger Bolder Baking website here.
Since I’ve never really used royal icing to decorate cookies before, I knew I needed the help of some experts. First, I turned to fellow blogger Sally Newton, who was a contestant on the Great American Baking Show and has a second blog dedicated solely to cookie decorating. She steered me toward this recipe on Hanielas.com because it uses meringue powder instead of fresh egg whites, ensuring that it’s safe to eat. I also like the recipe because it’s flavored with lemon juice and almond extract, resulting in a better flavor than most royal icings, which taste like, well, sugar.
Haniela has a helpful tutorial, including a video — although there’s no sound — on getting royal icing to the right consistency. In it, she explains how to judge the “flood consistency” of the icing, which is measured in seconds, by timing how long it takes the surface of the icing to become smooth after running a spatula through it. By stirring the icing in the bowl, and then using a stopwatch (or simply counting “one 1,000, two 1,000,” like we did when we were kids), you can figure out whether the icing has reached the consistency you’re looking for. The thicker the icing, the longer it will take to become smooth again. If it’s too thick, you just need to add more water. If it’s too thin, you may need to add more powdered sugar (or let it sit out until some of the moisture evaporates).
Different consistencies are used for different types of decorating. For example, a 10-second consistency can be used to dip cookies into the icing to create a mottled or tie-dye effect; 20-second consistency can be used to create puffy, textured designs. For flooding cookies and to create wet-on-wet designs, like I planned to do, you need a 15-second flood consistency.

So I followed her recipe, although I cut it in half, since the original makes enough for 6 dozen cookies. It makes a stiff icing, which you then add water to, a little at a time, until you get the consistency you need. Haniela recommends using a spray bottle to add the water to ensure you don’t add too much at once. I didn’t have one, so I used a medicine dropper instead. That way, I could measure exactly how many milliliters I added. Well, at least I thought I could, but I lost count after about 50 milliliters. But little by little, adding a few milliliters at a time, then mixing, then counting the seconds as the surface of the icing smoothed over, it finally reached that magic number — 15 seconds!
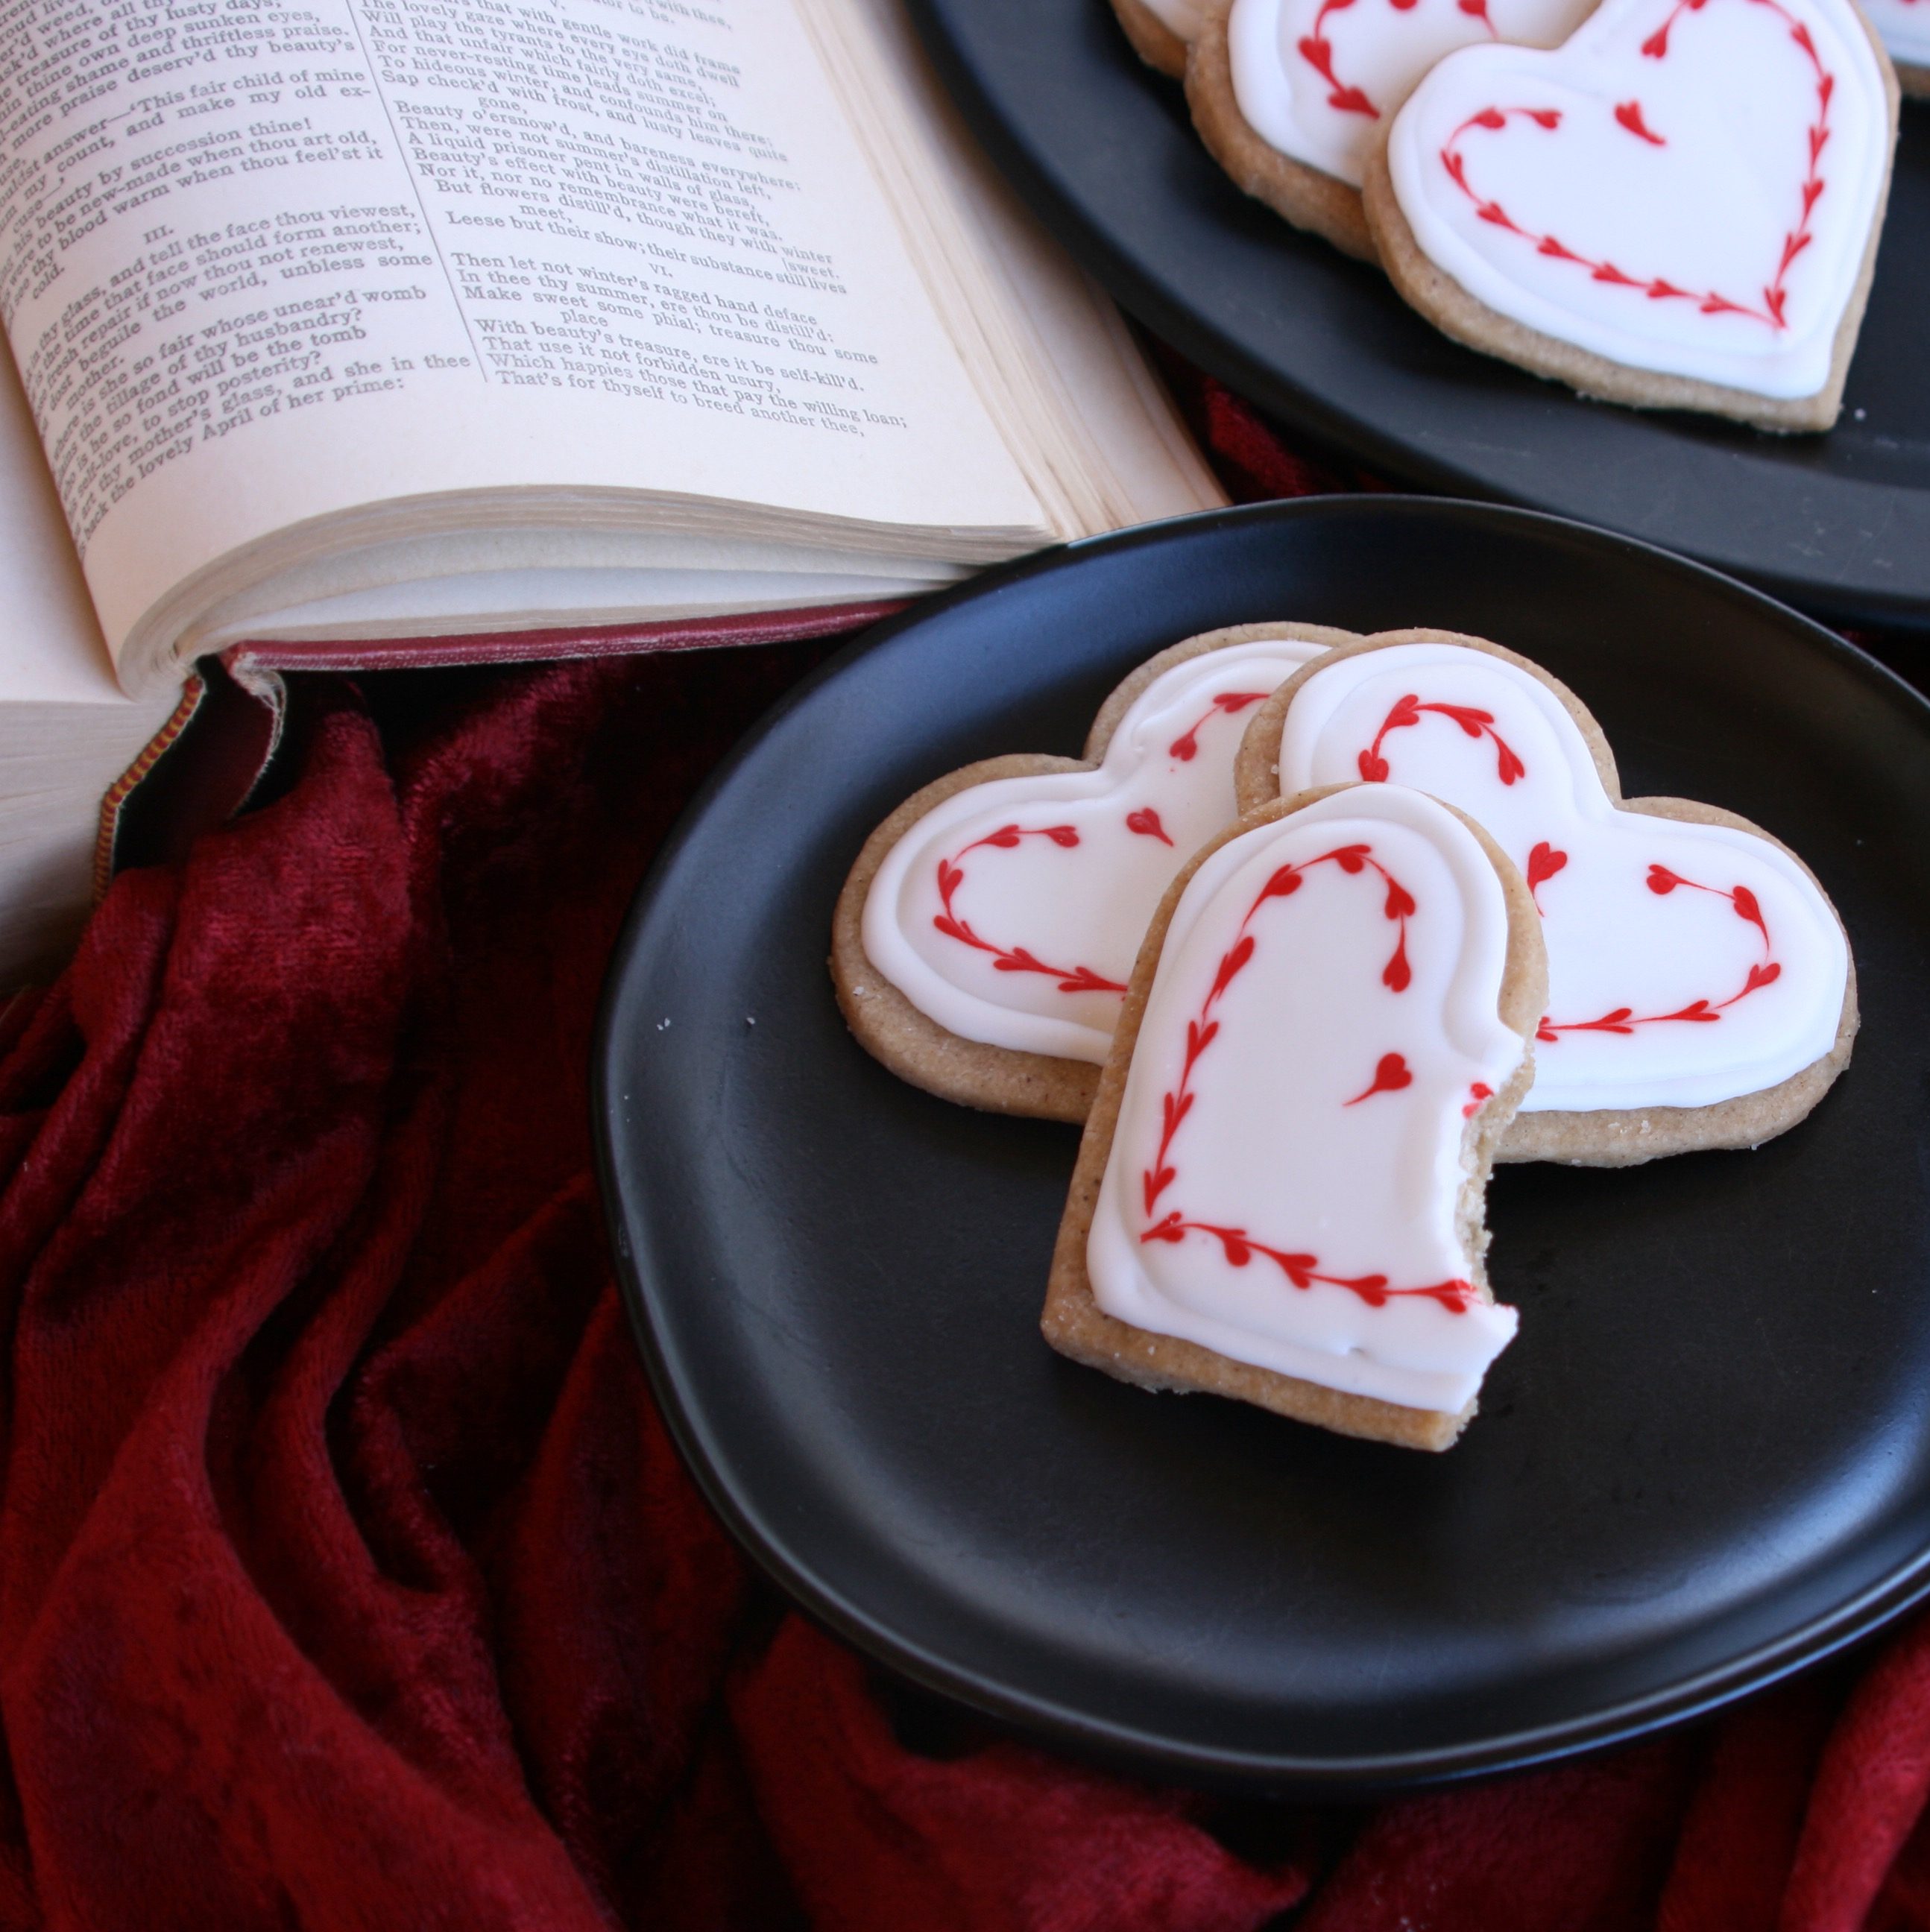
Ready to begin decorating, I put about half a cup of icing in a small bowl and tinted it red. Then I put the white icing in a large piping bag with a small round tip, and I put the red icing in a small piping bag with a smaller round tip. Starting with the white icing, I first outlined each of the cookies, then went back and filled them in, using a toothpick to distribute the icing evenly and help spread it into any remaining gaps. While that icing was still wet, I took the red icing and made little dots on top of the white icing all around the outside of the heart, about a quarter inch from the edge. While that was still wet, I took a sewing pin and dragged it through the red dots to create a line of little hearts outlining the shape of the cookie. It worked better than I had hoped!


Although the icing took awhile to make, once I achieved the right consistency, decorating the cookies was pretty simple. I was pleased with the flavor of the cookies, as well. While Biscoff cookies are great without frosting, this royal icing added a pleasant, tangy lemon flavor that enhanced the warm spices in the speculoos. These made a special treat to share with my family for Valentine’s Day!

(Even though the icing sets quickly, it takes a while to dry completely, so if you don’t plan to eat them right away, I recommend leaving them out overnight before stacking them or storing them in containers.)
Speculoos Cookies with Royal Icing
Icing recipe adapted from Hanielas.com
For the cookies:
- 1½ c. butter, room temperature
- ¾ c. granulated sugar
- 3/8 c. (6 T.) brown sugar
- 1½ t. vanilla extract
- 3 c. all-purpose flour
- 3 t. ground cinnamon
- 3/8 t. ground nutmeg
- 3/8 t. ground ginger
- 3/8 t. ground allspice
- 3/8 t. ground cloves
- 3/8 t. baking soda
- 3/8 t. baking powder
- ¾ t. salt
For the icing:
- Vinegar (for wiping bowls, beaters and spatulas)
- 1 lb. (3½-4 cups) powdered sugar
- 2 T. + ¾ t. meringue powder
- 2-4 T. lemon juice, strained
- 3-6 T. warm water
- ½ t. cream of tartar
- 1-2 t. almond extract, to taste
- Red gel food coloring
Directions
- To make the cookies, cream together butter, granulated sugar and brown sugar with an electric mixer on low speed. Add the vanilla and mix well.
- In a separate bowl, whisk together flour, spices, baking soda, baking powder and salt. Gradually add the flour mixture to the butter mixture, mixing well after each addition. (The dough may be dry and crumbly.) Form dough into a ball, cover and chill for at least an hour.
- Remove dough from refrigerator and divide into two portions. Rewrap half the dough and put it back in the fridge while rolling out the other half. Preheat oven to 350°F. Grease and line three cookie sheets with parchment paper. Roll out the dough to a thickness of ¼ inch. Using a heart-shaped cookie cutter, cut out cookies and transfer to the prepared baking sheets. Bake for 12-15 minutes until cookies are golden brown. Remove from oven and transfer to cooling racks. Repeat with other half of dough. Allow cookies to cool completely before decorating.
- To make the icing, first make sure bowls, beaters and spatulas are grease-free by wiping them down with a paper towel dampened with vinegar. Wipe them dry with a clean towel.
- If your powdered sugar is lumpy, sift it.
- In the large bowl of stand mixer, whisk the meringue powder with 2 tablespoons of lemon juice and 3 tablespoons of warm water until slightly foamy. Then add cream of tartar and whisk well. Add powdered sugar all at once and, using the paddle attachment on the mixer, mix on lowest setting for 3-4 minutes. Add almond extract to taste and continue mixing for 5 more minutes. Scrape the bowl once and mix again until stiff peaks form.
- Now add more water and lemon juice, a little at a time, until it reaches the desired consistency, which should be a “15-second flood.” This means that, when you run a spatula through the bowl of icing, it takes 15 seconds for the surface of the icing to become smooth again. [NOTE: You may want to start by adding a teaspoon of liquid at a time, but as you get closer to the 15-second flood consistency, you should only add a few milliliters at a time to avoid adding too much.] I alternated adding water and lemon juice, but you can use whatever ratio you like according to your own taste.
- When the icing reaches 15-second flood consistency, scoop about half a cup into a small bowl and stir in the food coloring, a few drops at a time, until it’s red enough for your liking. Transfer the red icing to a small piping bag with a small round tip (or use a disposable piping bag or ziplock bag and snip off a tiny piece in one corner). Transfer the white icing to a large piping bag with a small round tip (or a disposable piping bag with just the tip cut off).
- Outline all of the cookies with the white icing. Then go back and, working with one cookie at a time, first fill in the outline with white icing, using a toothpick or a scribe tool to evenly distribute the icing, filling in any gaps. Before going on to the next cookie, use the red icing to make small red dots about ¼ inch inside the outer edge of the white icing all around the cookie, creating an outline of a heart with red dots. Drag a clean sewing needle or pin (or a scribe tool) through each of the dots to create tiny red hearts.
- Leave the cookies out to dry overnight. They can be stored at room temperature in an airtight container for up to a week or frozen for up to three months.
Up next: Viennese Whirls
Discover more from Here's the Dish
Subscribe to get the latest posts sent to your email.
