
An amuse-bouche (French for amused mouth) is a bite-sized hors d’oeuvre served by chefs at the beginning of a meal, to whet diners’ appetites while they wait for their orders. A complimentary amenity at many fine restaurants, they are chosen by the chef to demonstrate new dishes, flavor combinations or cooking styles.

The tradition of serving amuse-bouches began in the 1970s when the nouvelle cuisine movement focused on small, bite-sized dishes that packed a lot of flavor. At that time, French chefs were becoming more competitive and experimental with their cooking styles and techniques. Today, you’ll likely encounter these tiny appetizers at Michelin-starred restaurants as well as many other restaurants, especially in Europe.
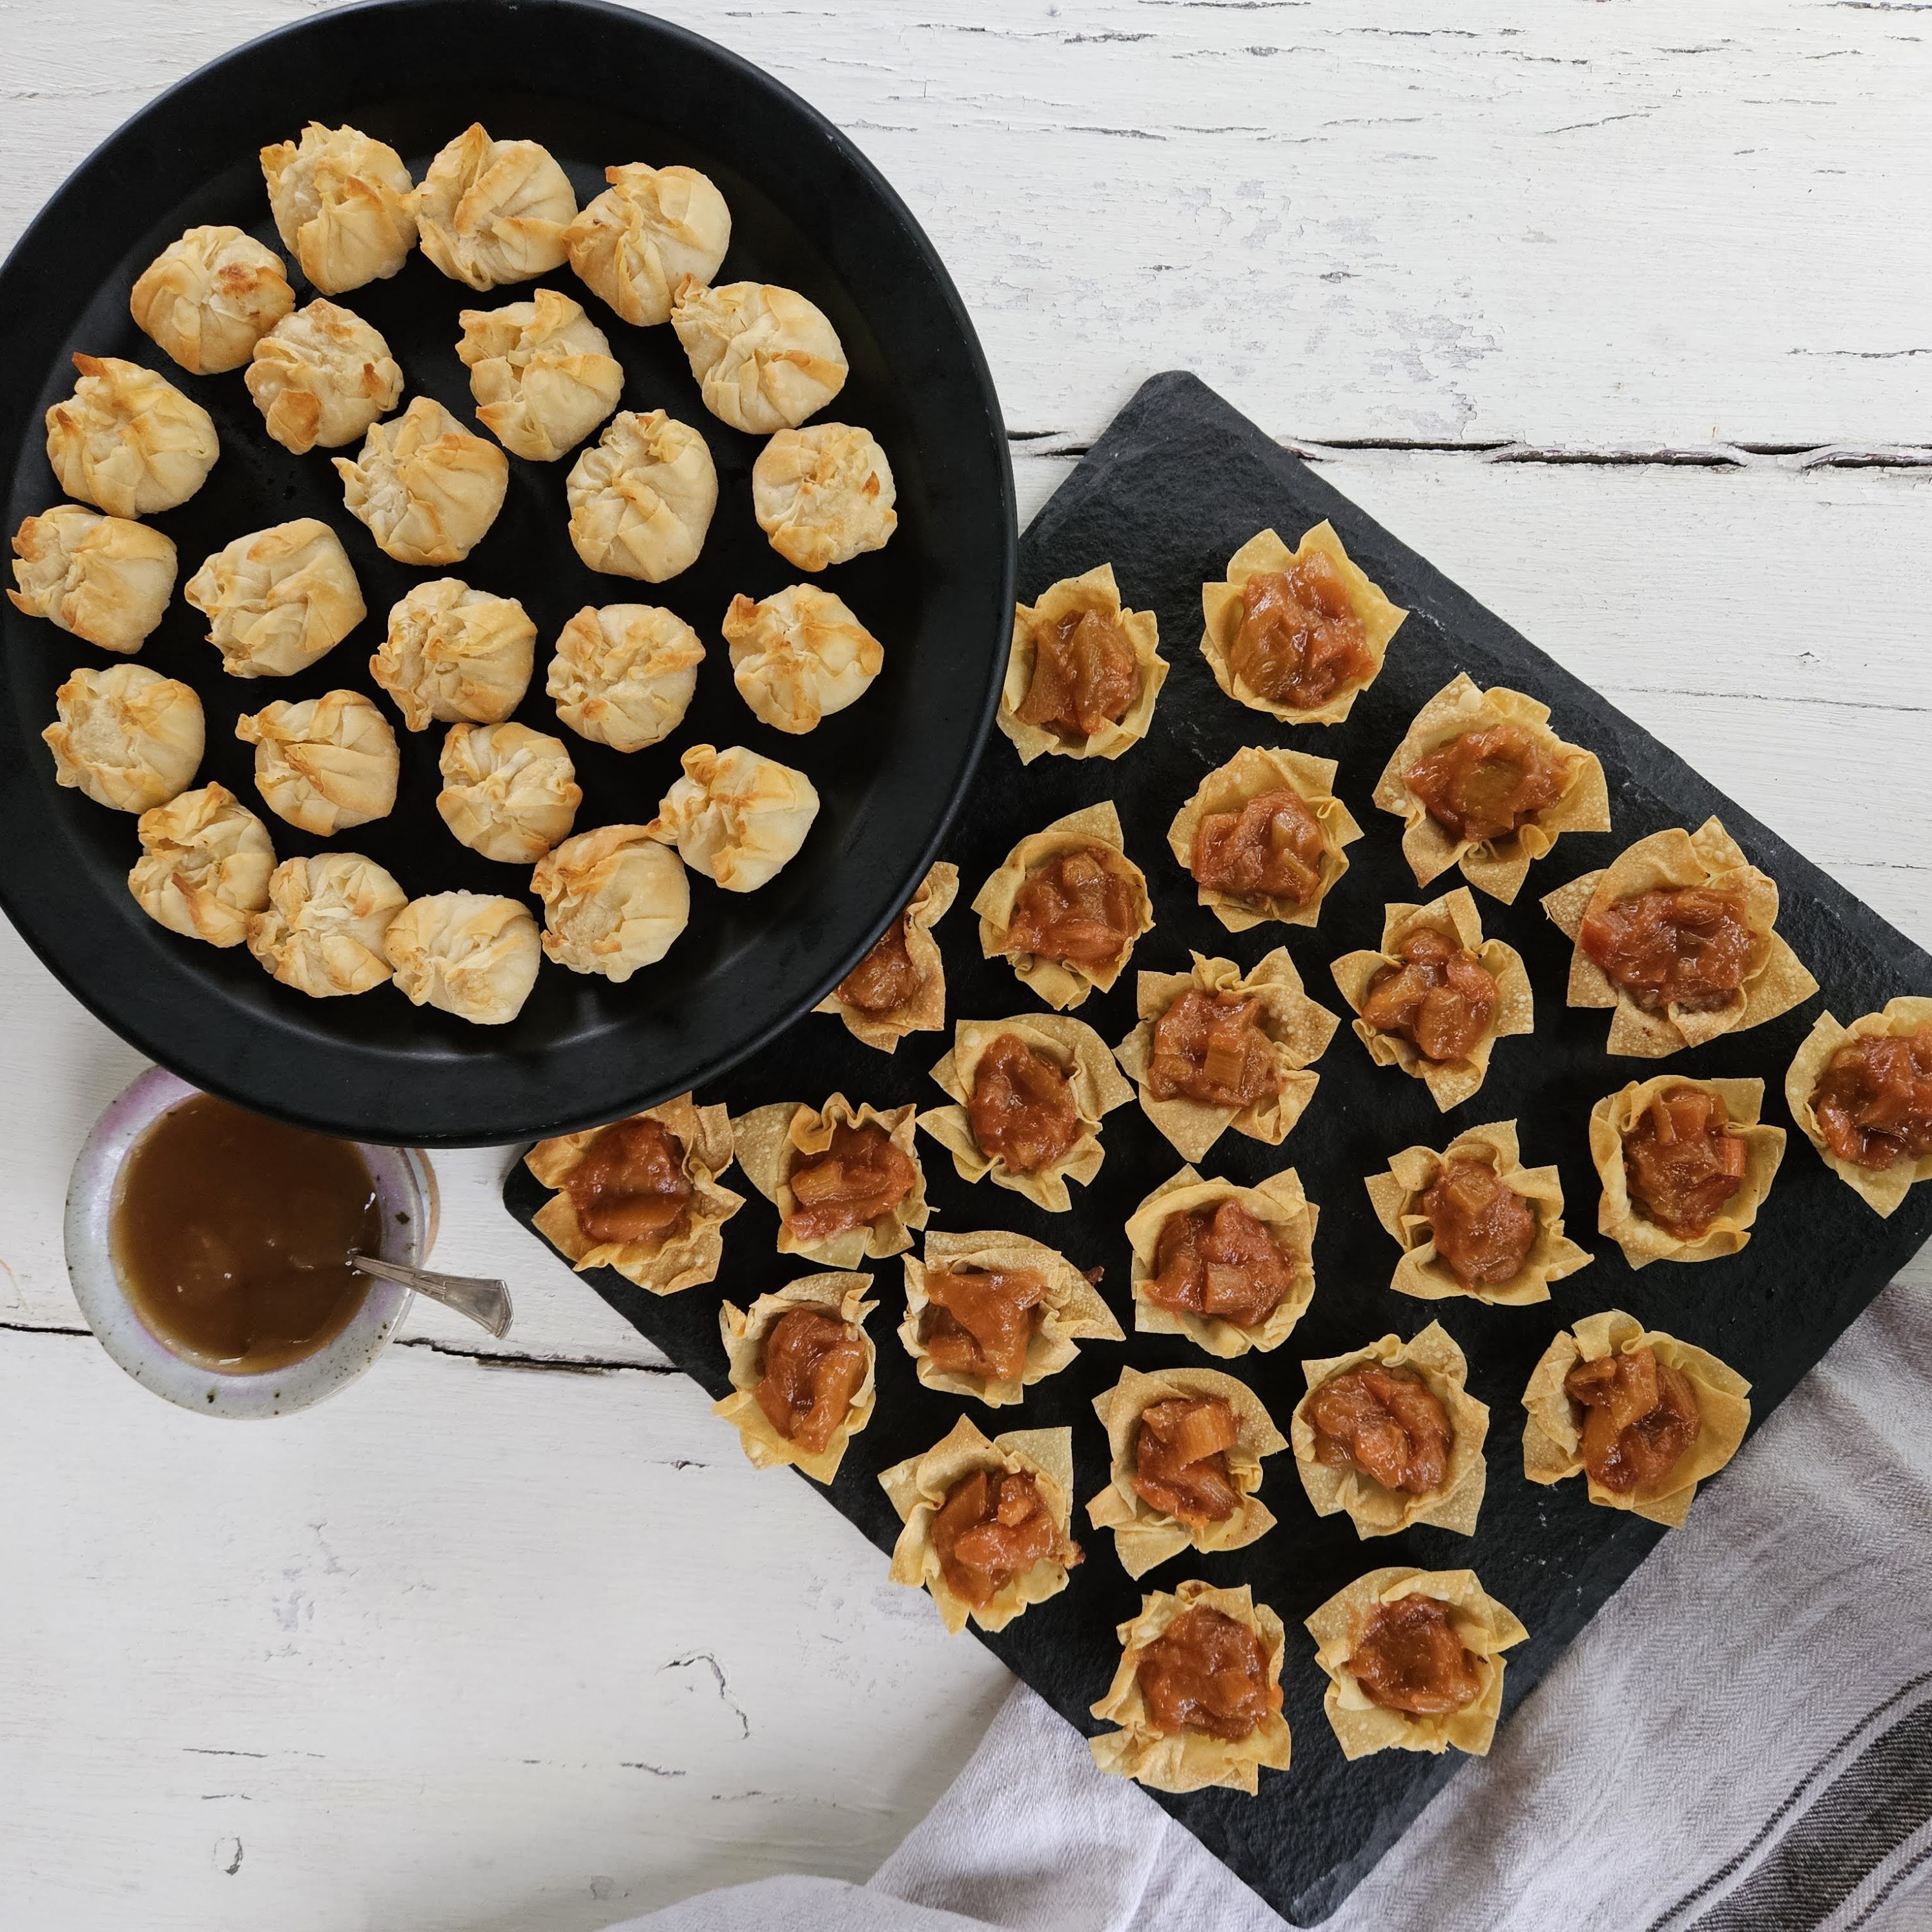
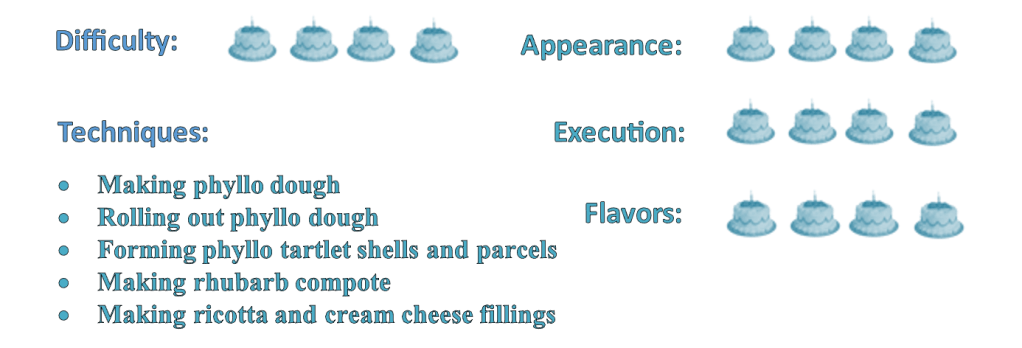
The brief for this showstopper challenge was to create 48 amuse-bouches, 24 sweet and 24 savory. But there was a catch: They had to be made with homemade phyllo (or filo) pastry.
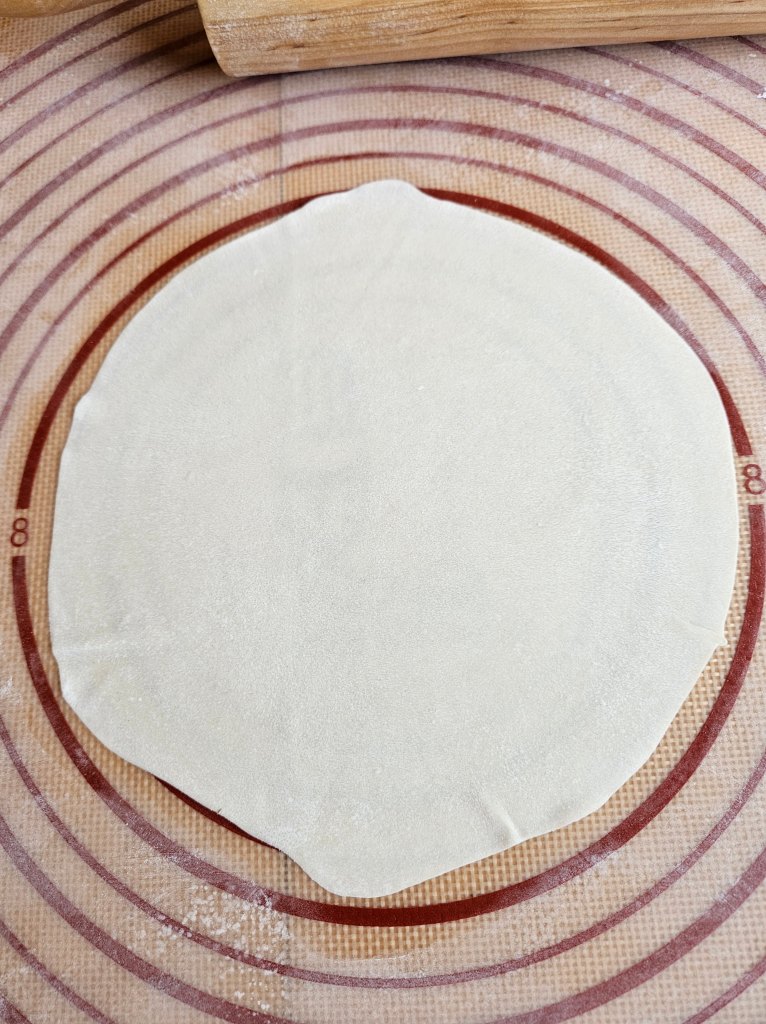
I dealt with the spelling differences in a previous post, so I won’t go into that here. I’ve made homemade phyllo twice before — three times if you count my strudel, which is slightly different because it contains egg yolks. The trick is to roll or stretch the dough as thin as possible; it should be so thin you can see through it. Through trial and error, and a little internet research, I believe I’ve come up with a method that I’m calling Practically Painless and Almost Perfect Phyllo.
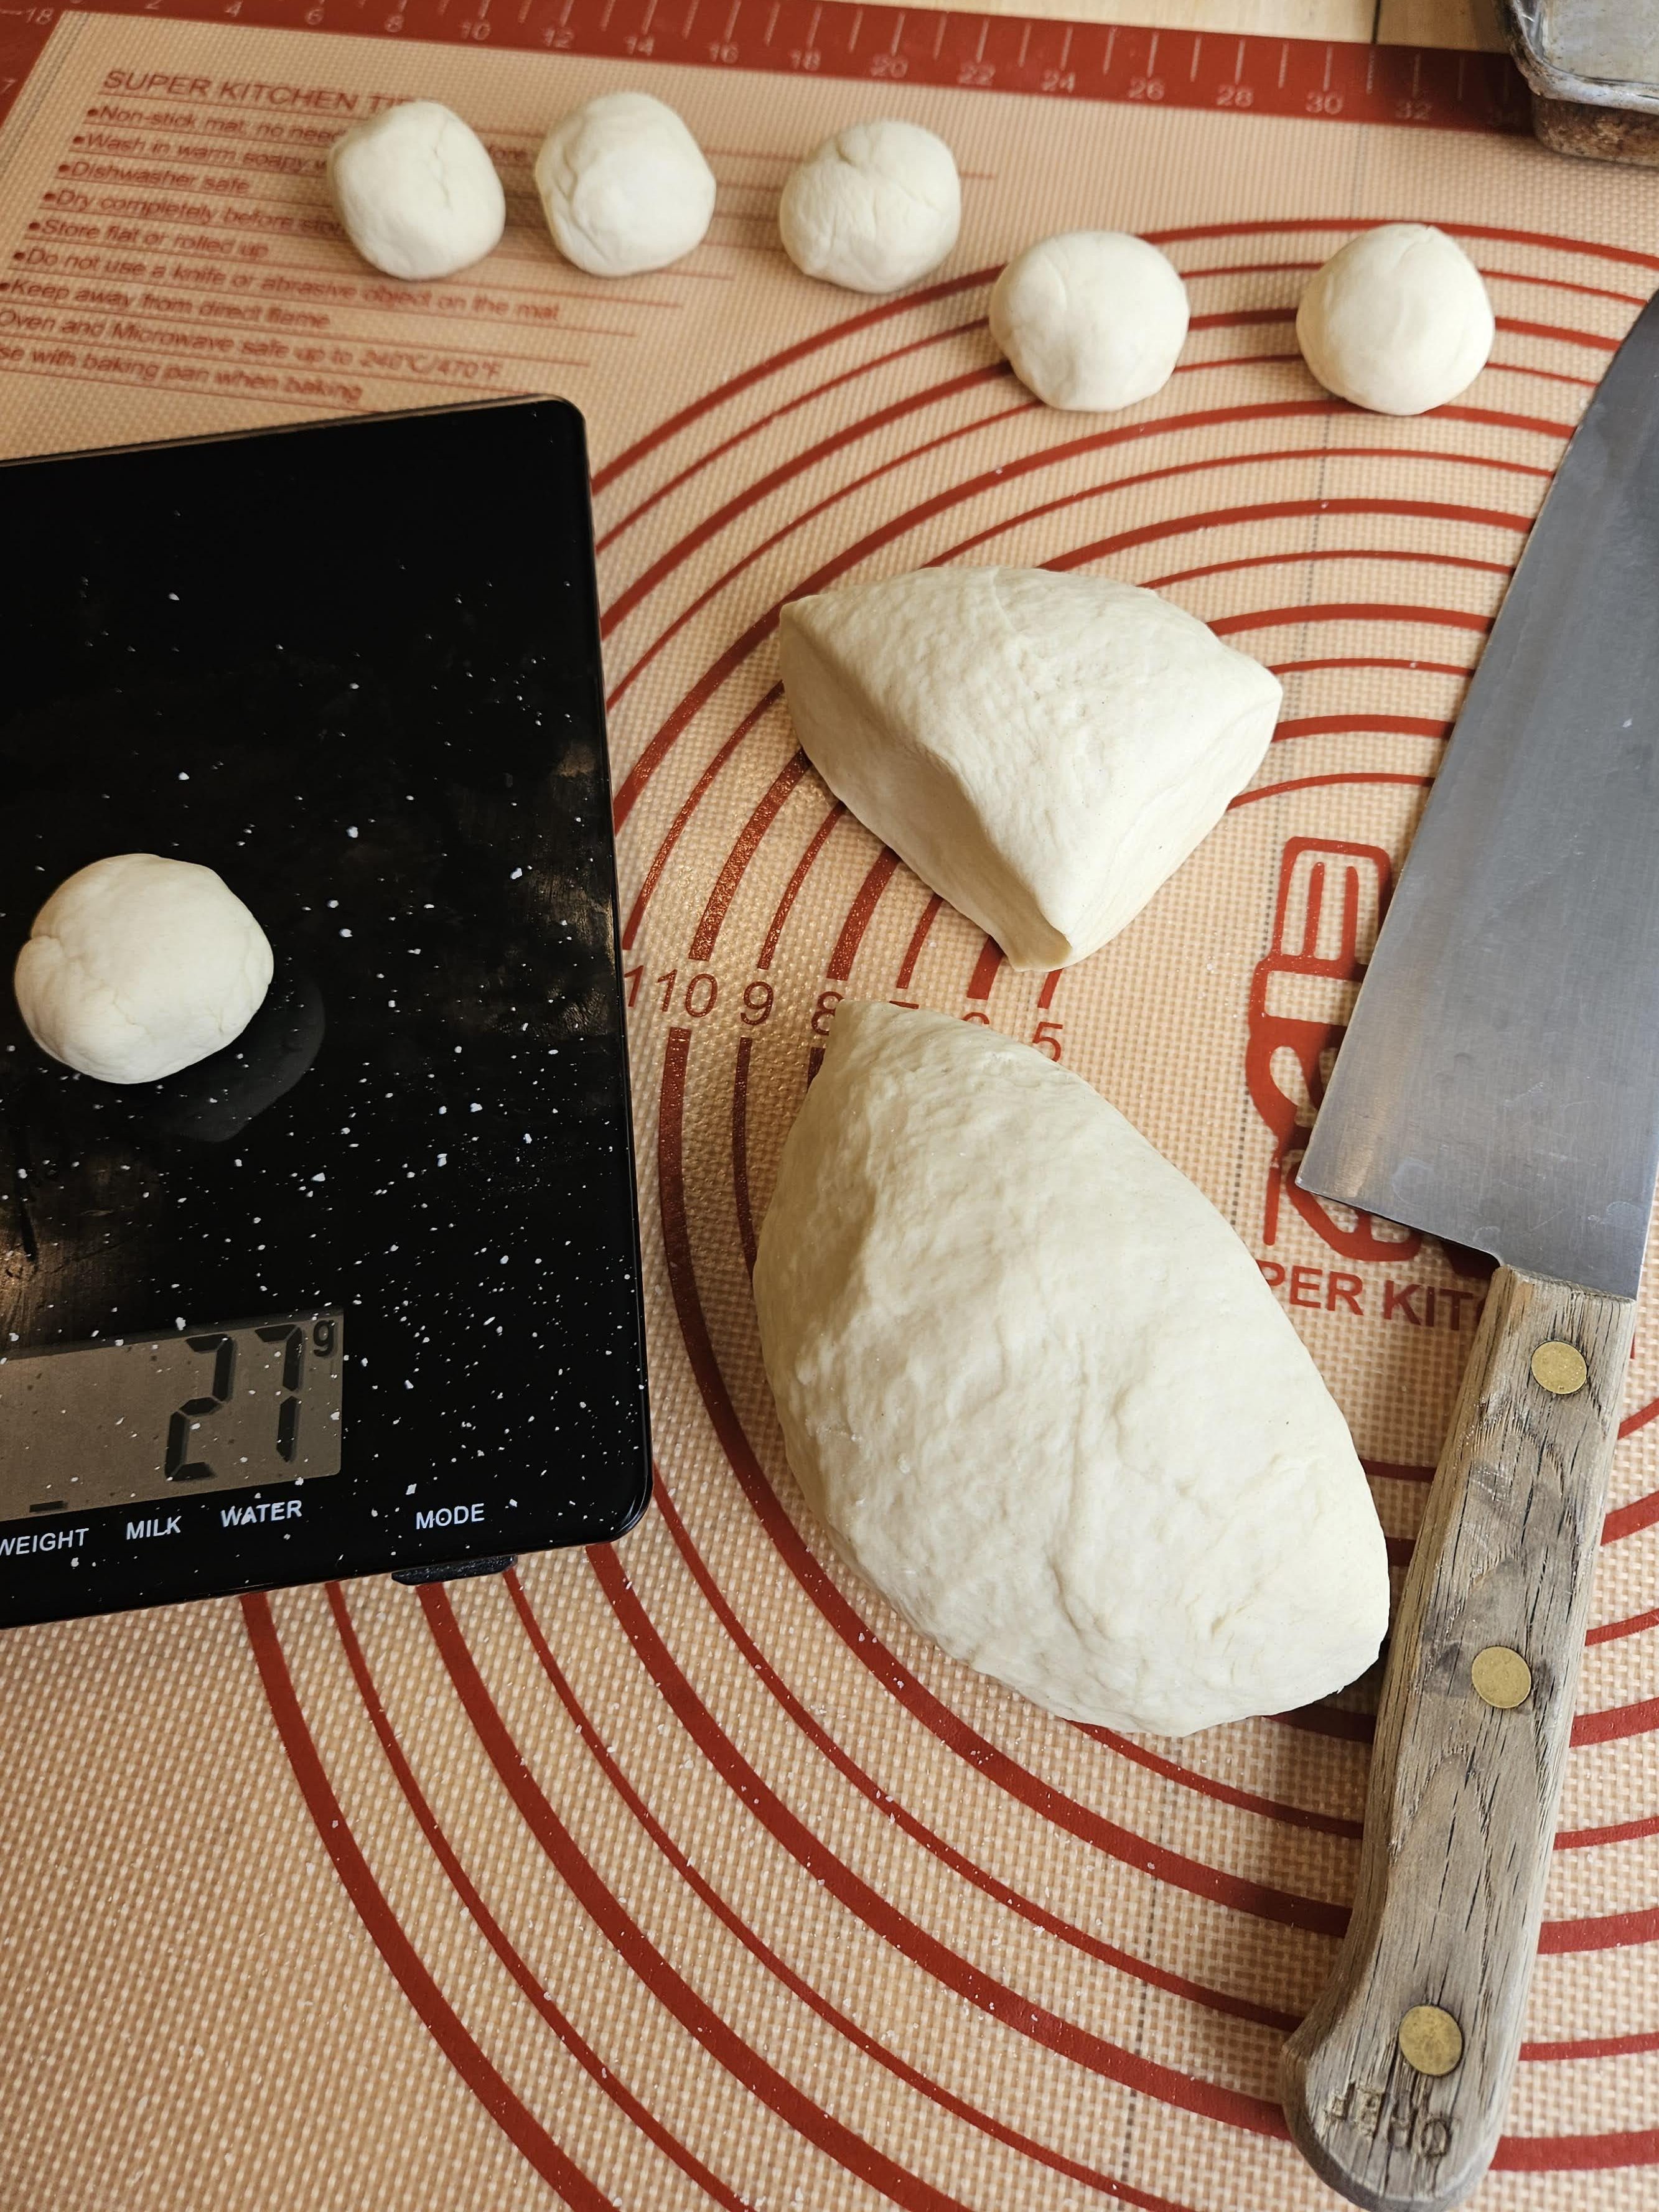
The first time I made it — the strudel anyway — I stretched it out in one large piece, filling my kitchen table with a micro-thin layer of pastry. The second time, for this phyllo pie, I made multiple smaller sheets and spread them out all over my kitchen and dining room. It was the third time, when I made baklava, that I discovered the technique of dividing the dough into smaller portions, rolling them out, stacking four or five together — with a liberal sprinkling of cornstarch in between — and rolling them out again while they are stacked together.

While it worked okay the first time I tried it, I tweaked the method a bit and was much happier with the results this time. For one thing, working with smaller portions of dough made it easier to roll them out thinner. Also, I realized that the kneading and resting stages are crucial for developing gluten, creating a stretchier dough that will roll out ultra thin without breaking. I also discovered that it’s not necessary to lay out the dough to dry after it’s been rolled out. I’m not even sure why that was included in the recipe I used for my phyllo pie (which I borrowed from one of the Bake Off bakers), since all other recipes I’ve seen say to cover the dough with plastic wrap when you’re not working with it to keep it from drying out.

(Plate designed by my daughte.)

So after incorporating these lessons learned the hard way, my phyllo dough came out nearly paper thin without tearing and baked up perfectly crispy.
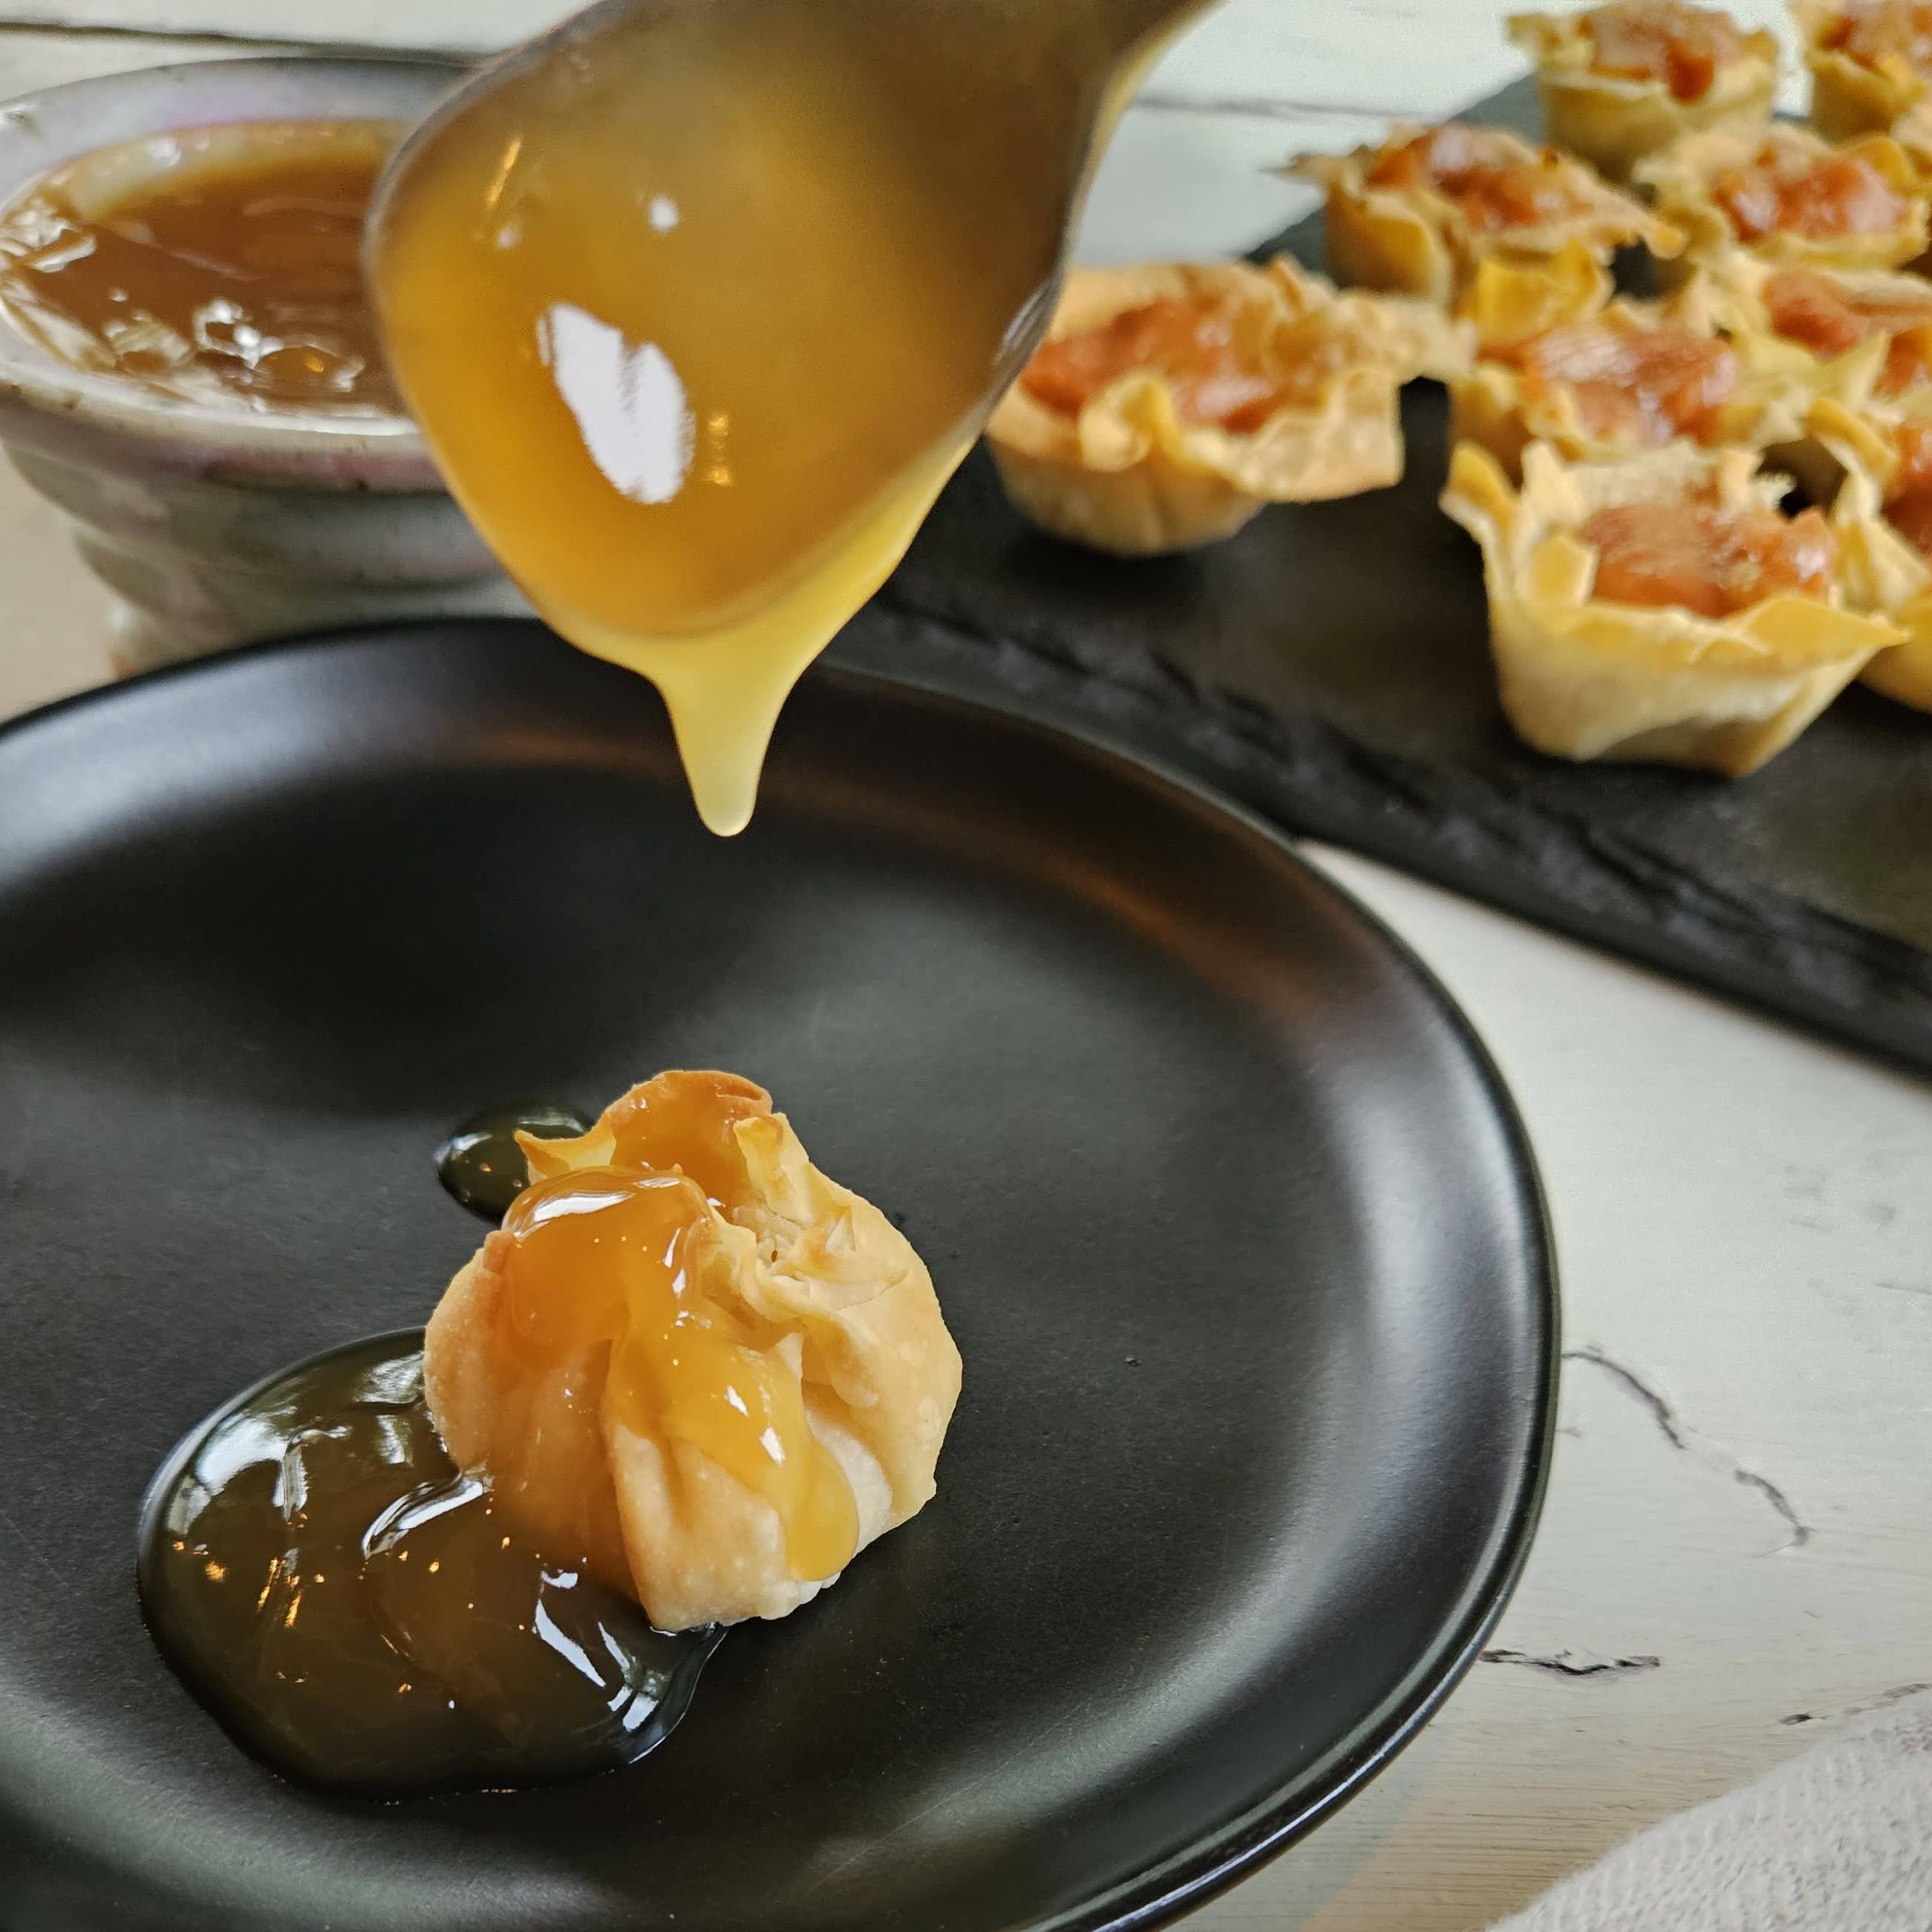
For my savory amuse-bouches, I decided to create a phyllo version of crab rangoon, using this recipe. Crab rangoon is a common appetizer offered at most (American) Chinese restaurants. Thought to have been invented by the founder of Trader Vic’s restaurant in Oakland, Calif., in the 1940s, crab rangoon features seasoned cream cheese and crabmeat wrapped in a wonton wrapper and deep fried until the wrapper is golden-brown and crisp and the interior is soft, creamy and burn-your-mouth hot. It is commonly served with that ubiquitous orange-colored sweet and sour sauce.
In almost every restaurant where I’ve ordered them, the crab is vastly overpowered by the cream cheese, so much so that the seafood flavor is barely noticeable. This recipe is different. With a whole can of crabmeat added to just 6 ounces of cream cheese, it is definitely a crab-forward flavor. The phyllo wrappers are light and delicate, so the overall effect is really more like crab puffs than the heavily fried crab rangoon. I made a simple sweet and sour sauce from this recipe, but it could just as well be served with a simple sprig of fresh dill.
My sweet amuse-bouches are rhubarb tartlets with a ricotta and macadamia nut filling topped with rhubarb compote. I adapted this recipe but borrowed the method for rhubarb compote from the New York Times Cooking app.
The compote recipe by Melissa Clark specifies cooking the rhubarb and sugar together just until the rhubarb releases its juices and the sugar dissolves. Then the slightly softened rhubarb is removed from the pan so it remains somewhat crisp while the liquid cooks down into a syrup. I added the zest and juice of an orange, as well as a teaspoon of orange blossom water, to give it a brighter flavor. I had quite a bit of compote left over, but no worries! It keeps in the fridge for at least a week and makes a great topping for ice cream, yogurt, waffles or oatmeal. (I wouldn’t judge you if you just ate it with a spoon, either!)

Both of these recipes make great hors d’oeuvres if you’re having friends over for drinks or just want a little nosh to serve before dinner. To make it easier on yourself, you can make and roll out the phyllo pastry two days before — roll it up in parchment paper and seal it in a ziplock bag in the fridge — then form and bake the amuse-bouches the day before you plan to serve them. Keep them in an airtight container in the fridge and crisp them in the oven for a few minutes before serving.
These go down a treat, so it would have been easy for my husband and I to polish them all off ourselves, but I saved a few to share with my neighbors down the street. They’re always quick to help us out, so it’s nice to be able to return the favor. Share the love!
Practically Painless and Almost Perfect Phyllo Pastry
Ingredients
Directions
- Combine 2¾ cup flour and the salt in the large bowl of a stand mixer fitted with the dough hook. With the mixer on low, add water gradually until the dough comes together in a ball. Add the olive oil and continue mixing with the dough hook until the dough is pliable, about 5 minutes. Remove dough to a lightly oiled surface and knead by hand until the dough passes the windowpane test (15-20 min.).
- Divide the dough into 24 equal-sized balls (mine were about 26 grams each), and place them on a rimmed baking sheet. Cover with plastic wrap and a dish towel and set aside to rest for two hours in a cool place (ideally 60°F). (I took mine to my basement, which is about 63°F in the summer.)
- In a small bowl, mix the cornstarch with the remaining 2 tablespoons flour. Use a fine-mesh strainer to dust the work surface with a little of the cornstarch mixture, and roll out one dough ball at a time, keeping the rest covered with plastic wrap to prevent them from drying out.
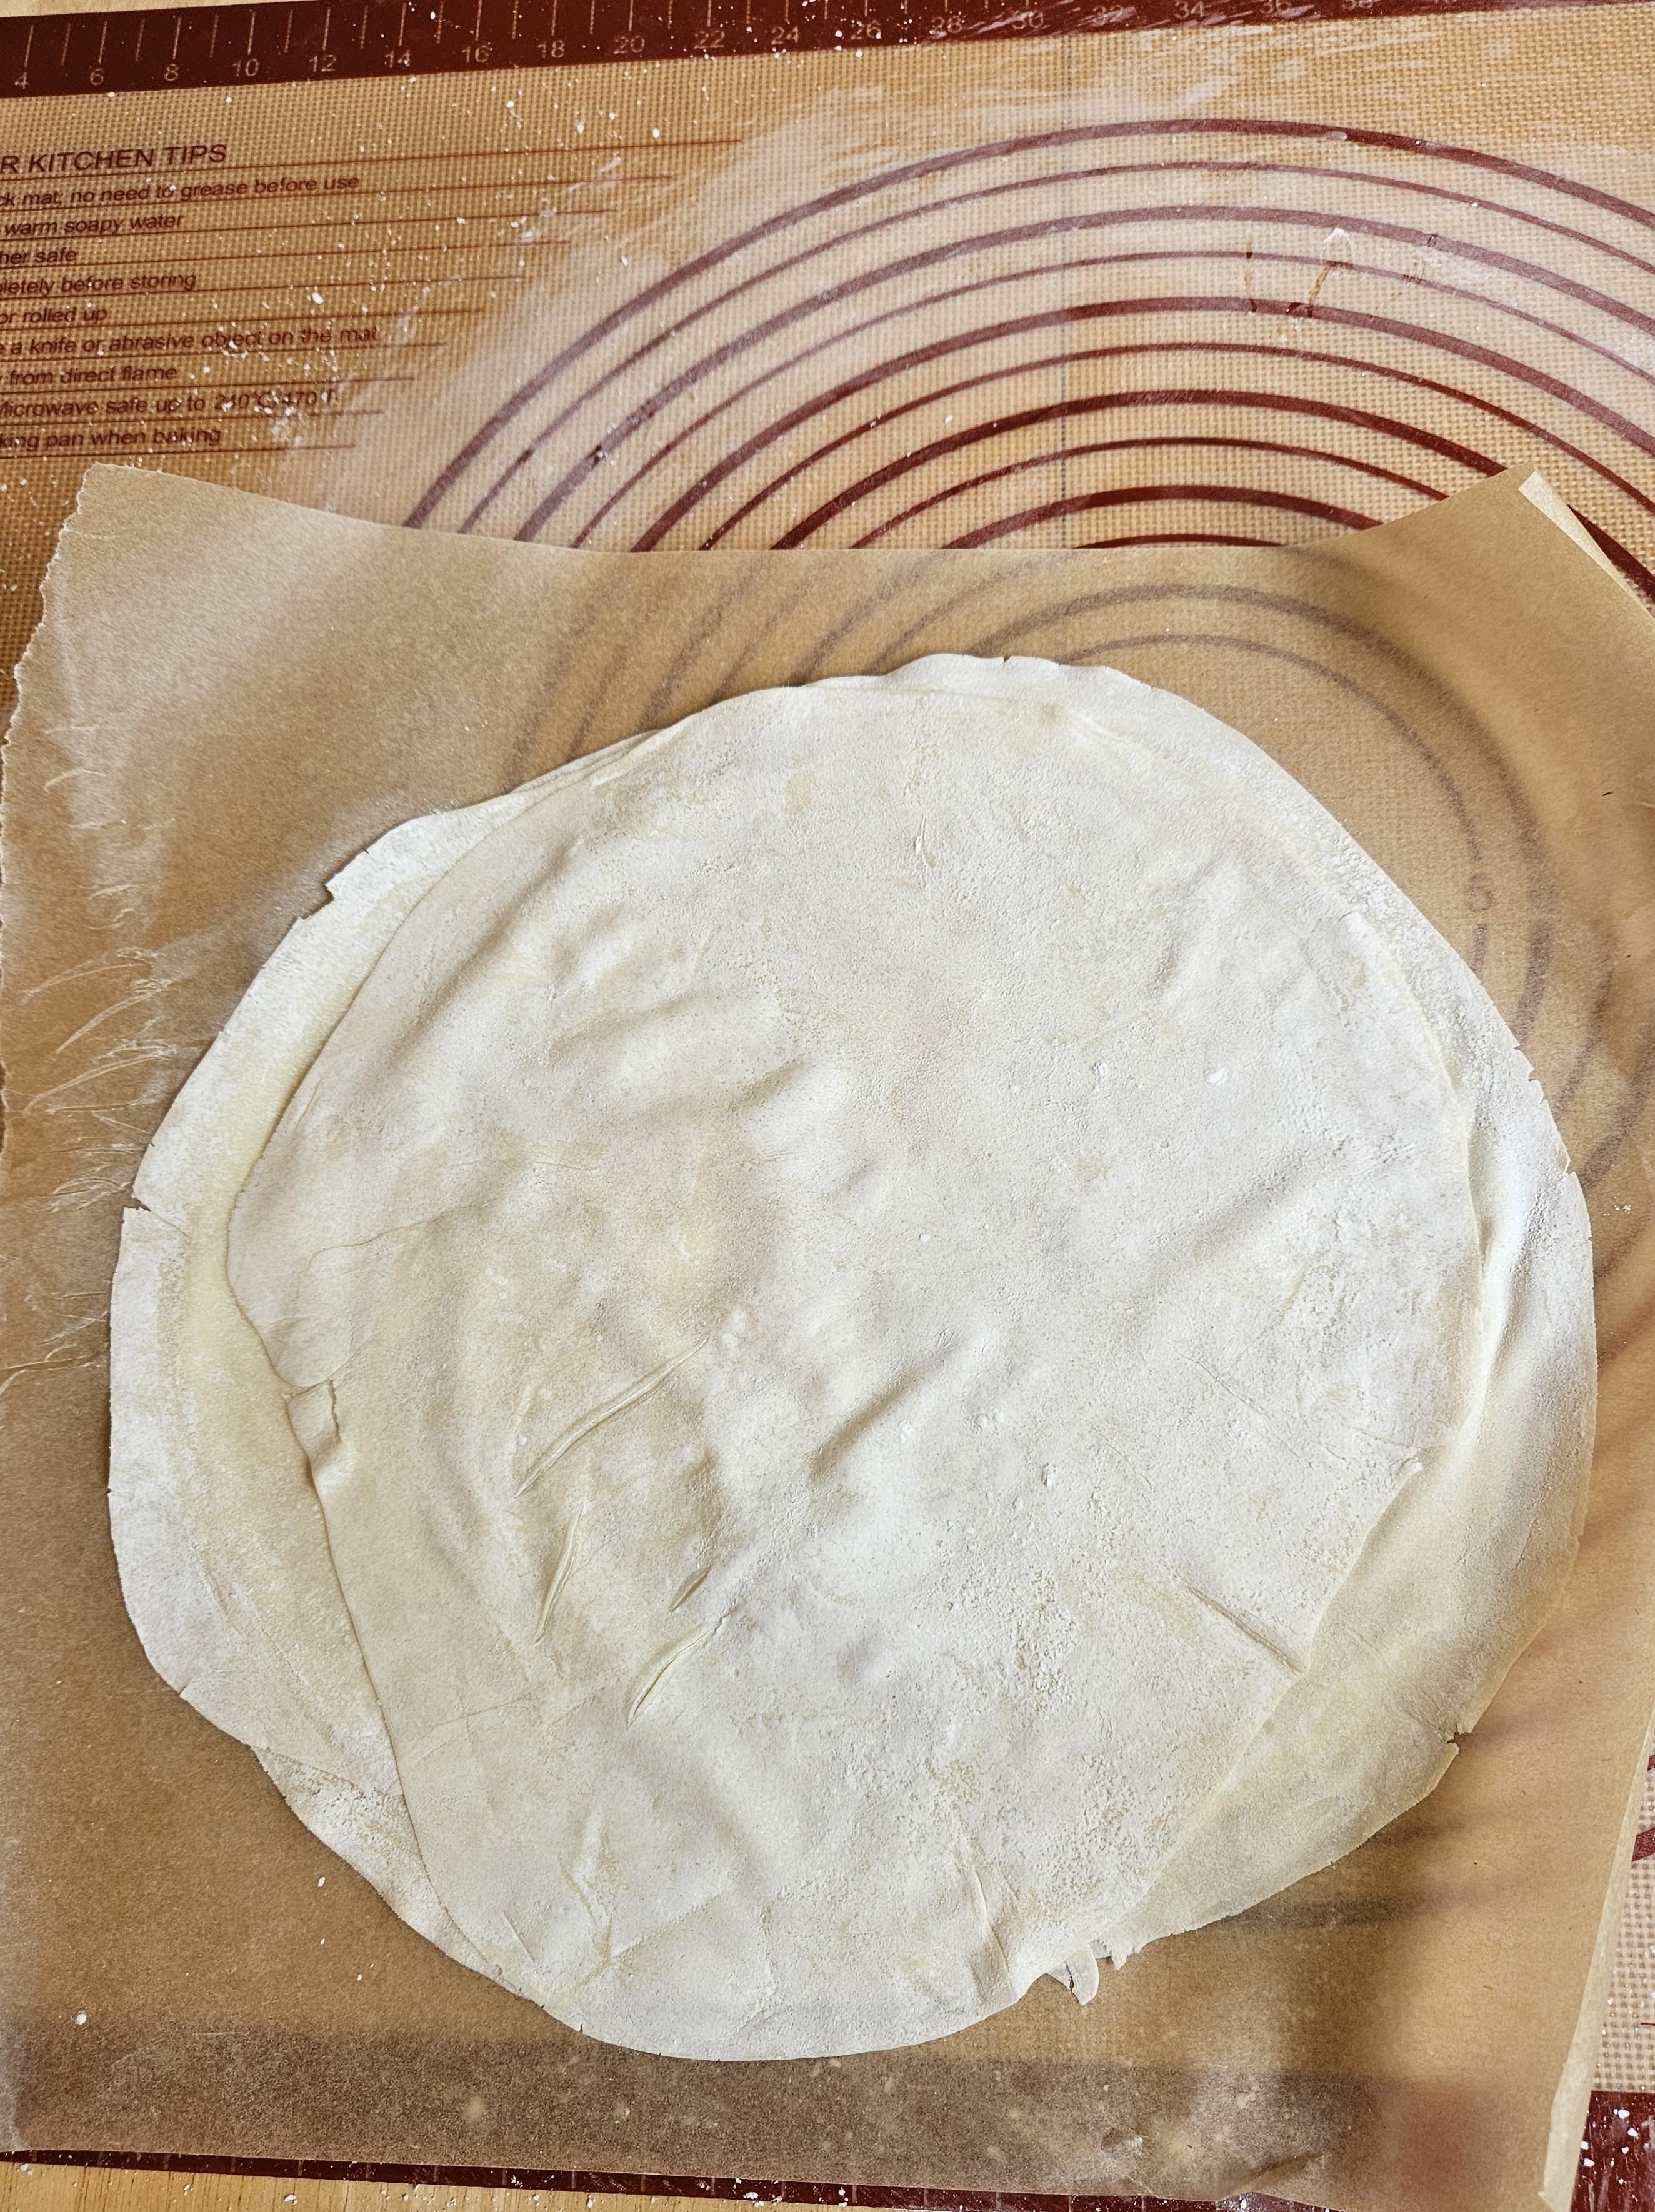
- Roll each ball as thin as you can, to about 8 inches in diameter. Sprinkle with a little more cornstarch mixture and set aside, placing it on a piece of parchment paper and covering it with plastic wrap while you work with the next dough ball. When the second ball is rolled out to about 8 inches, stack it on top of the first, sprinkling it with cornstarch mixture and covering the stack with plastic wrap while you work on the next ball. Repeat until you have a stack of four 8-inch circles.
- Once you have a stack of four, place the whole stack on the lightly dusted work surface. Unstack them to make sure they’re not sticking to each other, and add more cornstarch mixture if needed. Restack them and roll them out together until they are about 10 inches in diameter. Then unstack, sprinkle with more cornstarch mixture, restack, and roll one more time until they reach about 12 inches in diameter.
- Separate them one more time to make sure they’re not sticking together. Sprinkle with more cornstarch mixture if needed, then restack and place them back on the parchment paper. Top with another piece of parchment, roll up loosely (don’t press them together), place in a large ziplock bag and keep in the fridge for up to 24 hours. (Or you can freeze the dough for up to several months.)
- Repeat this process until all the dough balls have been rolled out and stacked in sets of four. If you had 24 balls, you should then have six rolls of four sheets of pastry each.

Crab Rangoon Phyllo Parcels
Ingredients
- 1 can (4-6 oz.) canned crabmeat, drained
- 6 oz. cream cheese, softened
- 1 green onion, finely sliced
- 1½ t. Worcestershire sauce
- 1 t. low-sodium soy sauce
- ½ t. garlic powder
- 12 sheets of phyllo pastry
- 5 T. unsalted butter, melted
Directions
- In a small bowl, gently stir together crabmeat, cream cheese, green onion, Worcestershire sauce, soy sauce and garlic powder. Preheat oven to 425°F, and line a large baking sheet with parchment paper.
- Working with four sheets of phyllo at a time, unroll them and cover them loosely with plastic wrap. Dust a work surface with cornstarch and lay out one sheet of phyllo, keeping the rest covered. Cut the sheet into 4-6 equal squares, about 2½ to 3 inches square. Cover them with plastic wrap and repeat with the other sheets until you have 48 squares of pastry.
- Take one square, brush both sides with melted butter and place on the baking sheet. Place another square on top of that at a 45-degree angle and brush more butter on the top. Spoon about 1½ teaspoons of filling mixture in the middle of the squares.
- Grab two opposite corners of the bottom square and bring them to the center, then grab the other two corners and bring them to the center. Pinch all four corners together to form a neat little parcel. Repeat to make 24 parcels.
- Bake for 10–15 minutes until golden-brown and crisp on the bottom. Transfer to a cooling rack. Serve warm with sweet and sour sauce or sprigs of fresh dill.
- The parcels can be stored in the fridge in an airtight container for 1-2 days. Reheat in the oven on a baking sheet for a few minutes to make the pastry crisp again.

Rhubarb-Ricotta Phyllo Tartlets
For the rhubarb compote:
- 4 c. rhubarb, cubed (about 1 lb.)
- Zest and juice of 1 orange
- ¼ c. sugar (or to taste)
- 1 t. orange blossom water (or to taste)
For the ricotta filling:
- ½ c. ricotta cheese
- ¼ c. macadamia nuts, roughly chopped (could substitute pistachios)
- ½ tsp. cinnamon
- 1½ t. sugar
For assembly:
- 12 sheets of filo pastry
- 5 T. unsalted butter, melted
Directions
- To make the compote, combine rhubarb and orange zest with sugar over low heat. After the rhubarb has released its juices and the sugar has dissolved, cook about 5 minutes more. Before the rhubarb completely falls apart, use a slotted spoon to transfer it to a bowl. Add orange juice to the liquid in the pan and cook until it thickens and turns syrupy. Add orange blossom water to taste, then pour the syrup over the rhubarb in the bowl and let cool. (You won’t need all of it for the tartlets. Leftover compote will keep for at least a week in the fridge.)
- Make the ricotta mixture by combining ricotta cheese with the nuts, cinnamon and sugar.
- Preheat the oven to 350°F. Grease a 24-hole mini-muffin tin with vegetable oil spray.
- Working with four sheets of phyllo at a time, unroll them and cover them loosely with plastic wrap. Dust a work surface with cornstarch and lay out one sheet of phyllo, keeping the rest covered. Cut the sheet into 4-6 equal squares, about 2½ inches square. Cover them with plastic wrap and repeat with the other sheets until you have 48 squares of pastry.
- Take one square, brush both sides with melted butter and place it over one of the cavities of the muffin pan. Place another square on top of that at a 45-degree angle and brush more butter on the top. Push the pastry squares down into the cavity, gently pressing them into the corners to line the entire cavity.
- Par-bake the tartlet shells for 10 minutes in the preheated oven. Remove from the oven and spoon about 1½ teaspoons of the ricotta mixture into each shell. Gently spread the filling with the back of the spoon to cover the bottom of the shell. Bake tarts for another 15-20 minutes or until the pastry is golden brown.
- Remove from oven and top each tart with a couple teaspoons of compote. Transfer tartlets from muffin tin to cooling racks. Serve warm or room temperature.
- Tartlets can be stored in the fridge in an airtight container for 1-2 days. Reheat in the oven on a baking sheet for a few minutes to make the pastry crisp again.
Up next: Fougasse
Discover more from Here's the Dish
Subscribe to get the latest posts sent to your email.

They look delicious
Sent from my iPhone
<
div dir=”ltr”>
<
blockquote type=”cite”>
LikeLiked by 1 person
Thank you!
LikeLike