
Three layers. Any filling. Caramel decorations.
That was the brief for the showstopper challenge during Caramel Week. (Apparently, the cake didn’t have to be caramel-flavored — the bakers in the Great White Tent offered various iterations, from red velvet to poppyseed.)
Oh, and the judges wanted to see spun sugar in the decorations.
Okay, I’ll admit it. I didn’t use spun sugar on this cake. I’ve done spun sugar before, even in my very first showstopper (although I didn’t get it dark enough that first time around). Spun sugar is messy. It gets all over the floor, even when you put newspapers down, and on your clothing. But I did incorporate caramel in other ways:
- The coffee French buttercream filling uses a coffee extract made by first making caramel and then stirring in a strong espresso concentrate until the caramel is dissolved.
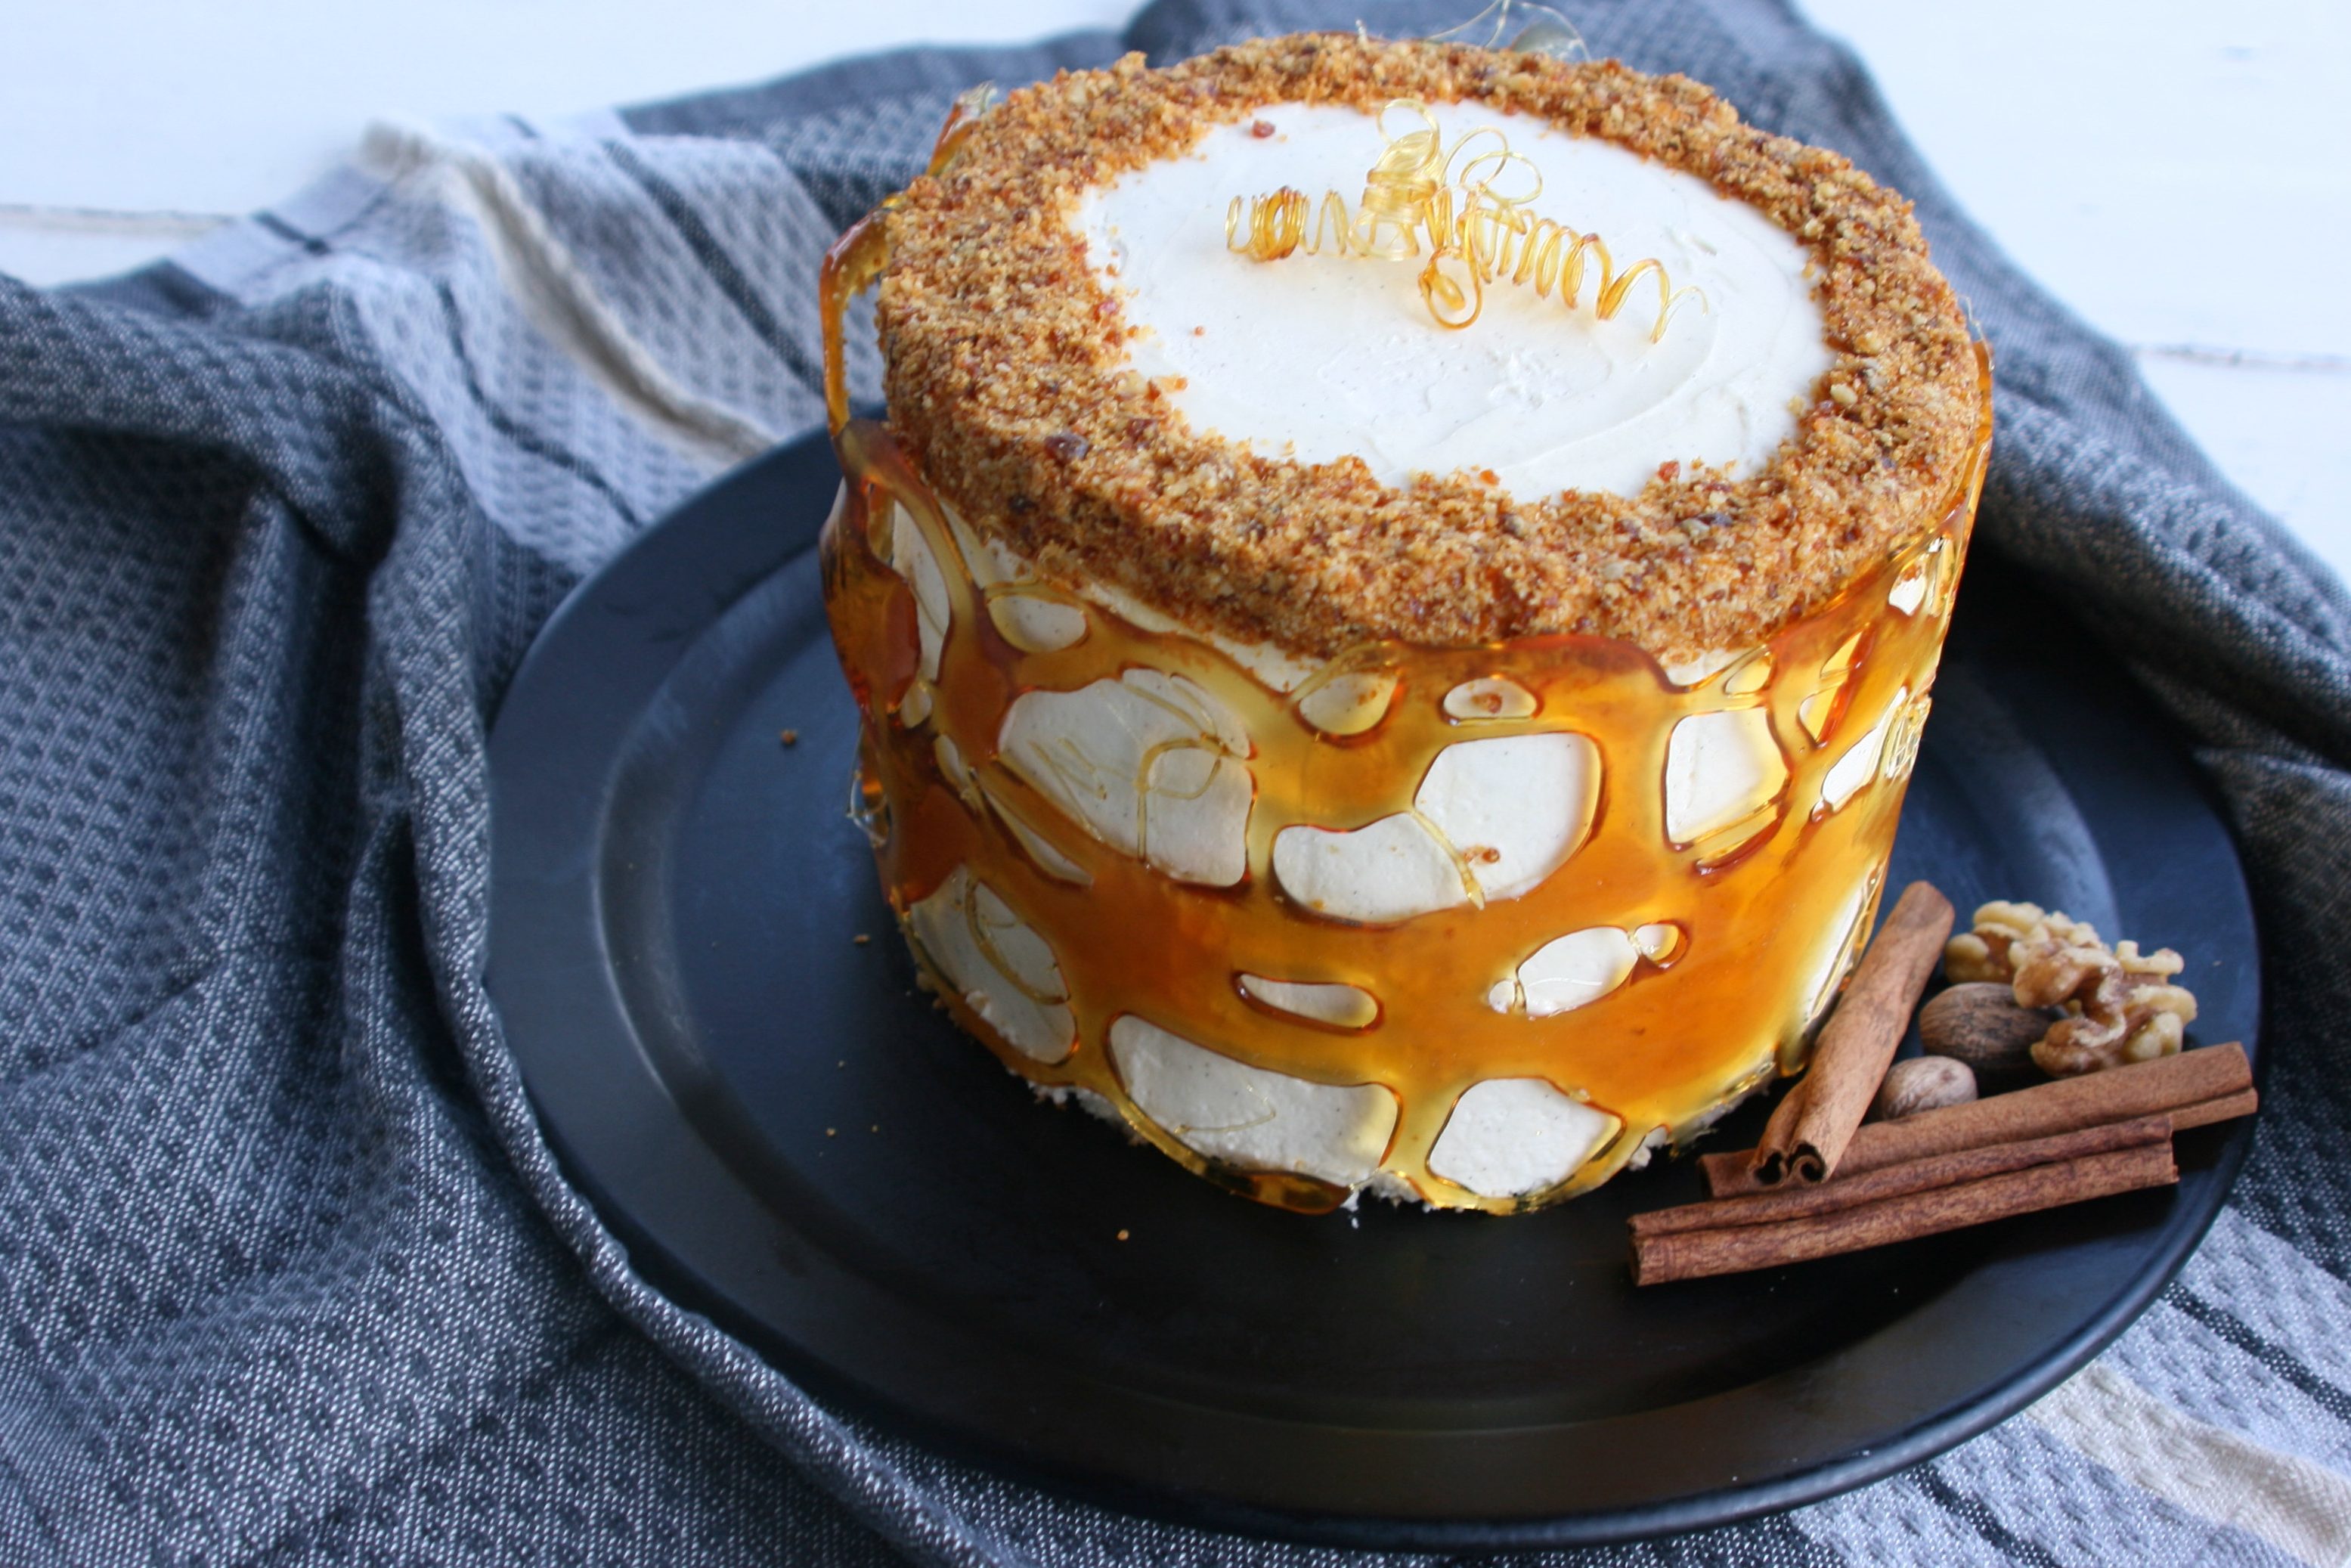
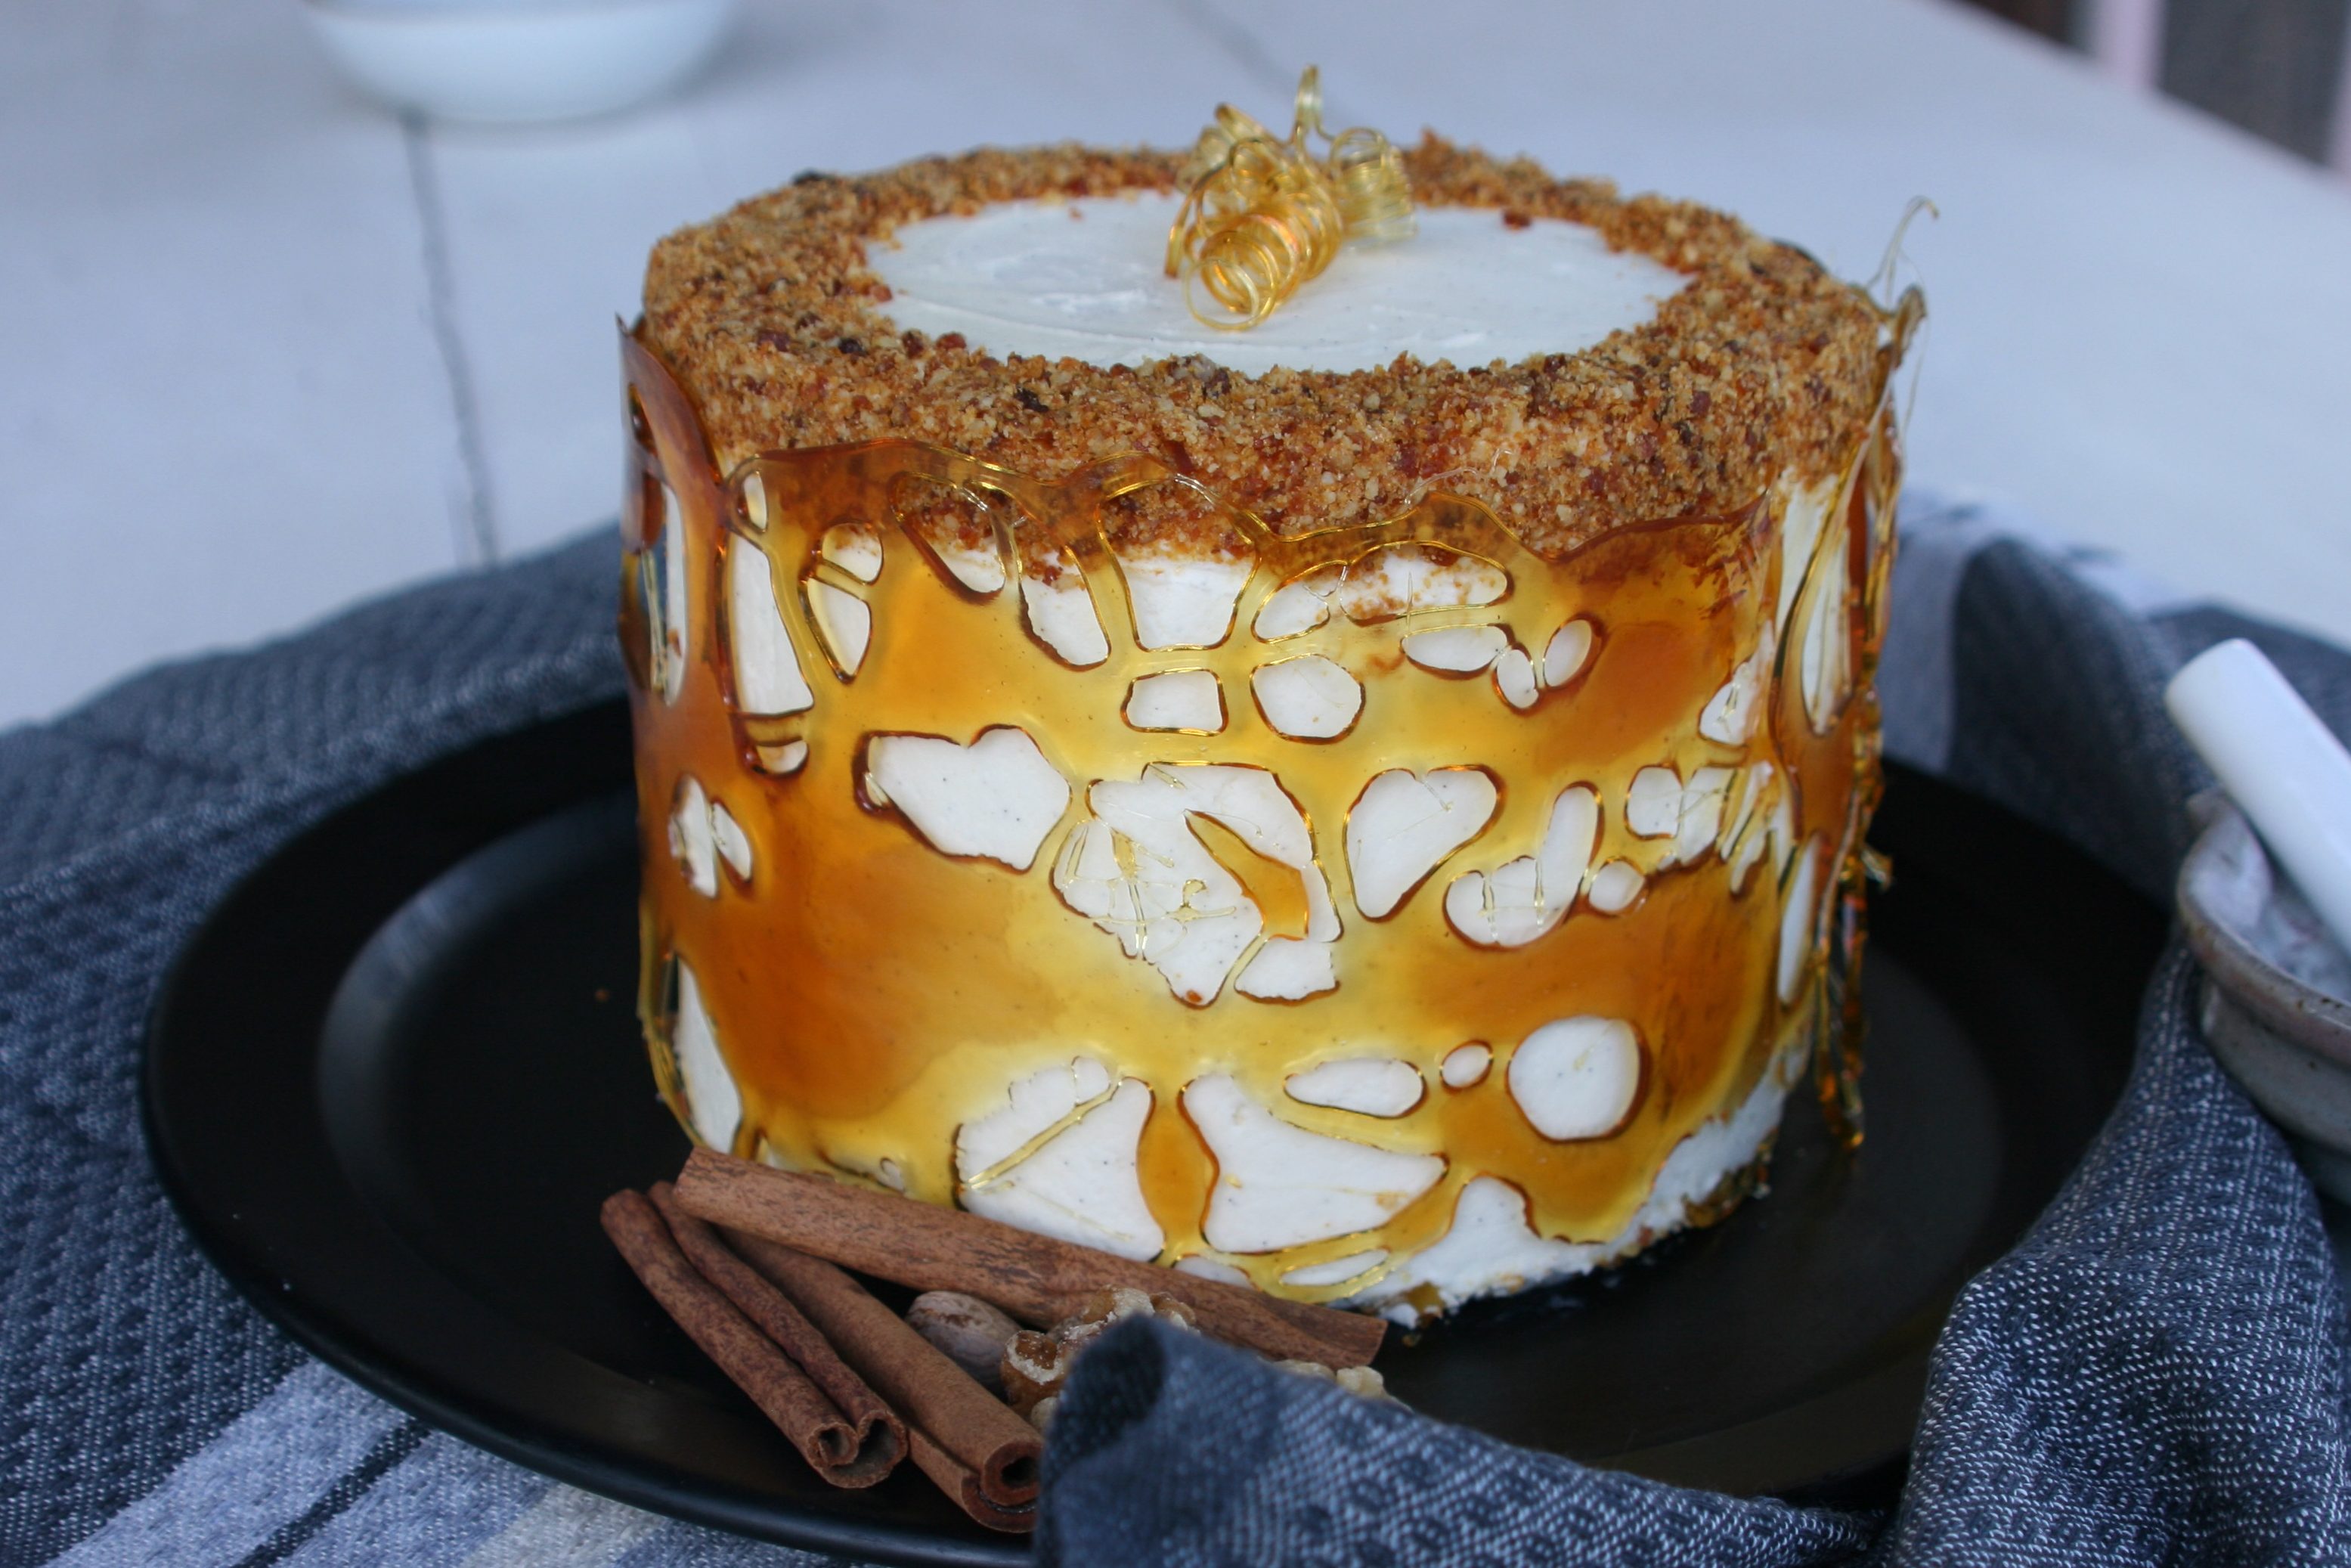
- I made walnut praline to sprinkle around the top edge of the cake.
- Lastly, I created a caramel collar to go around the cake.

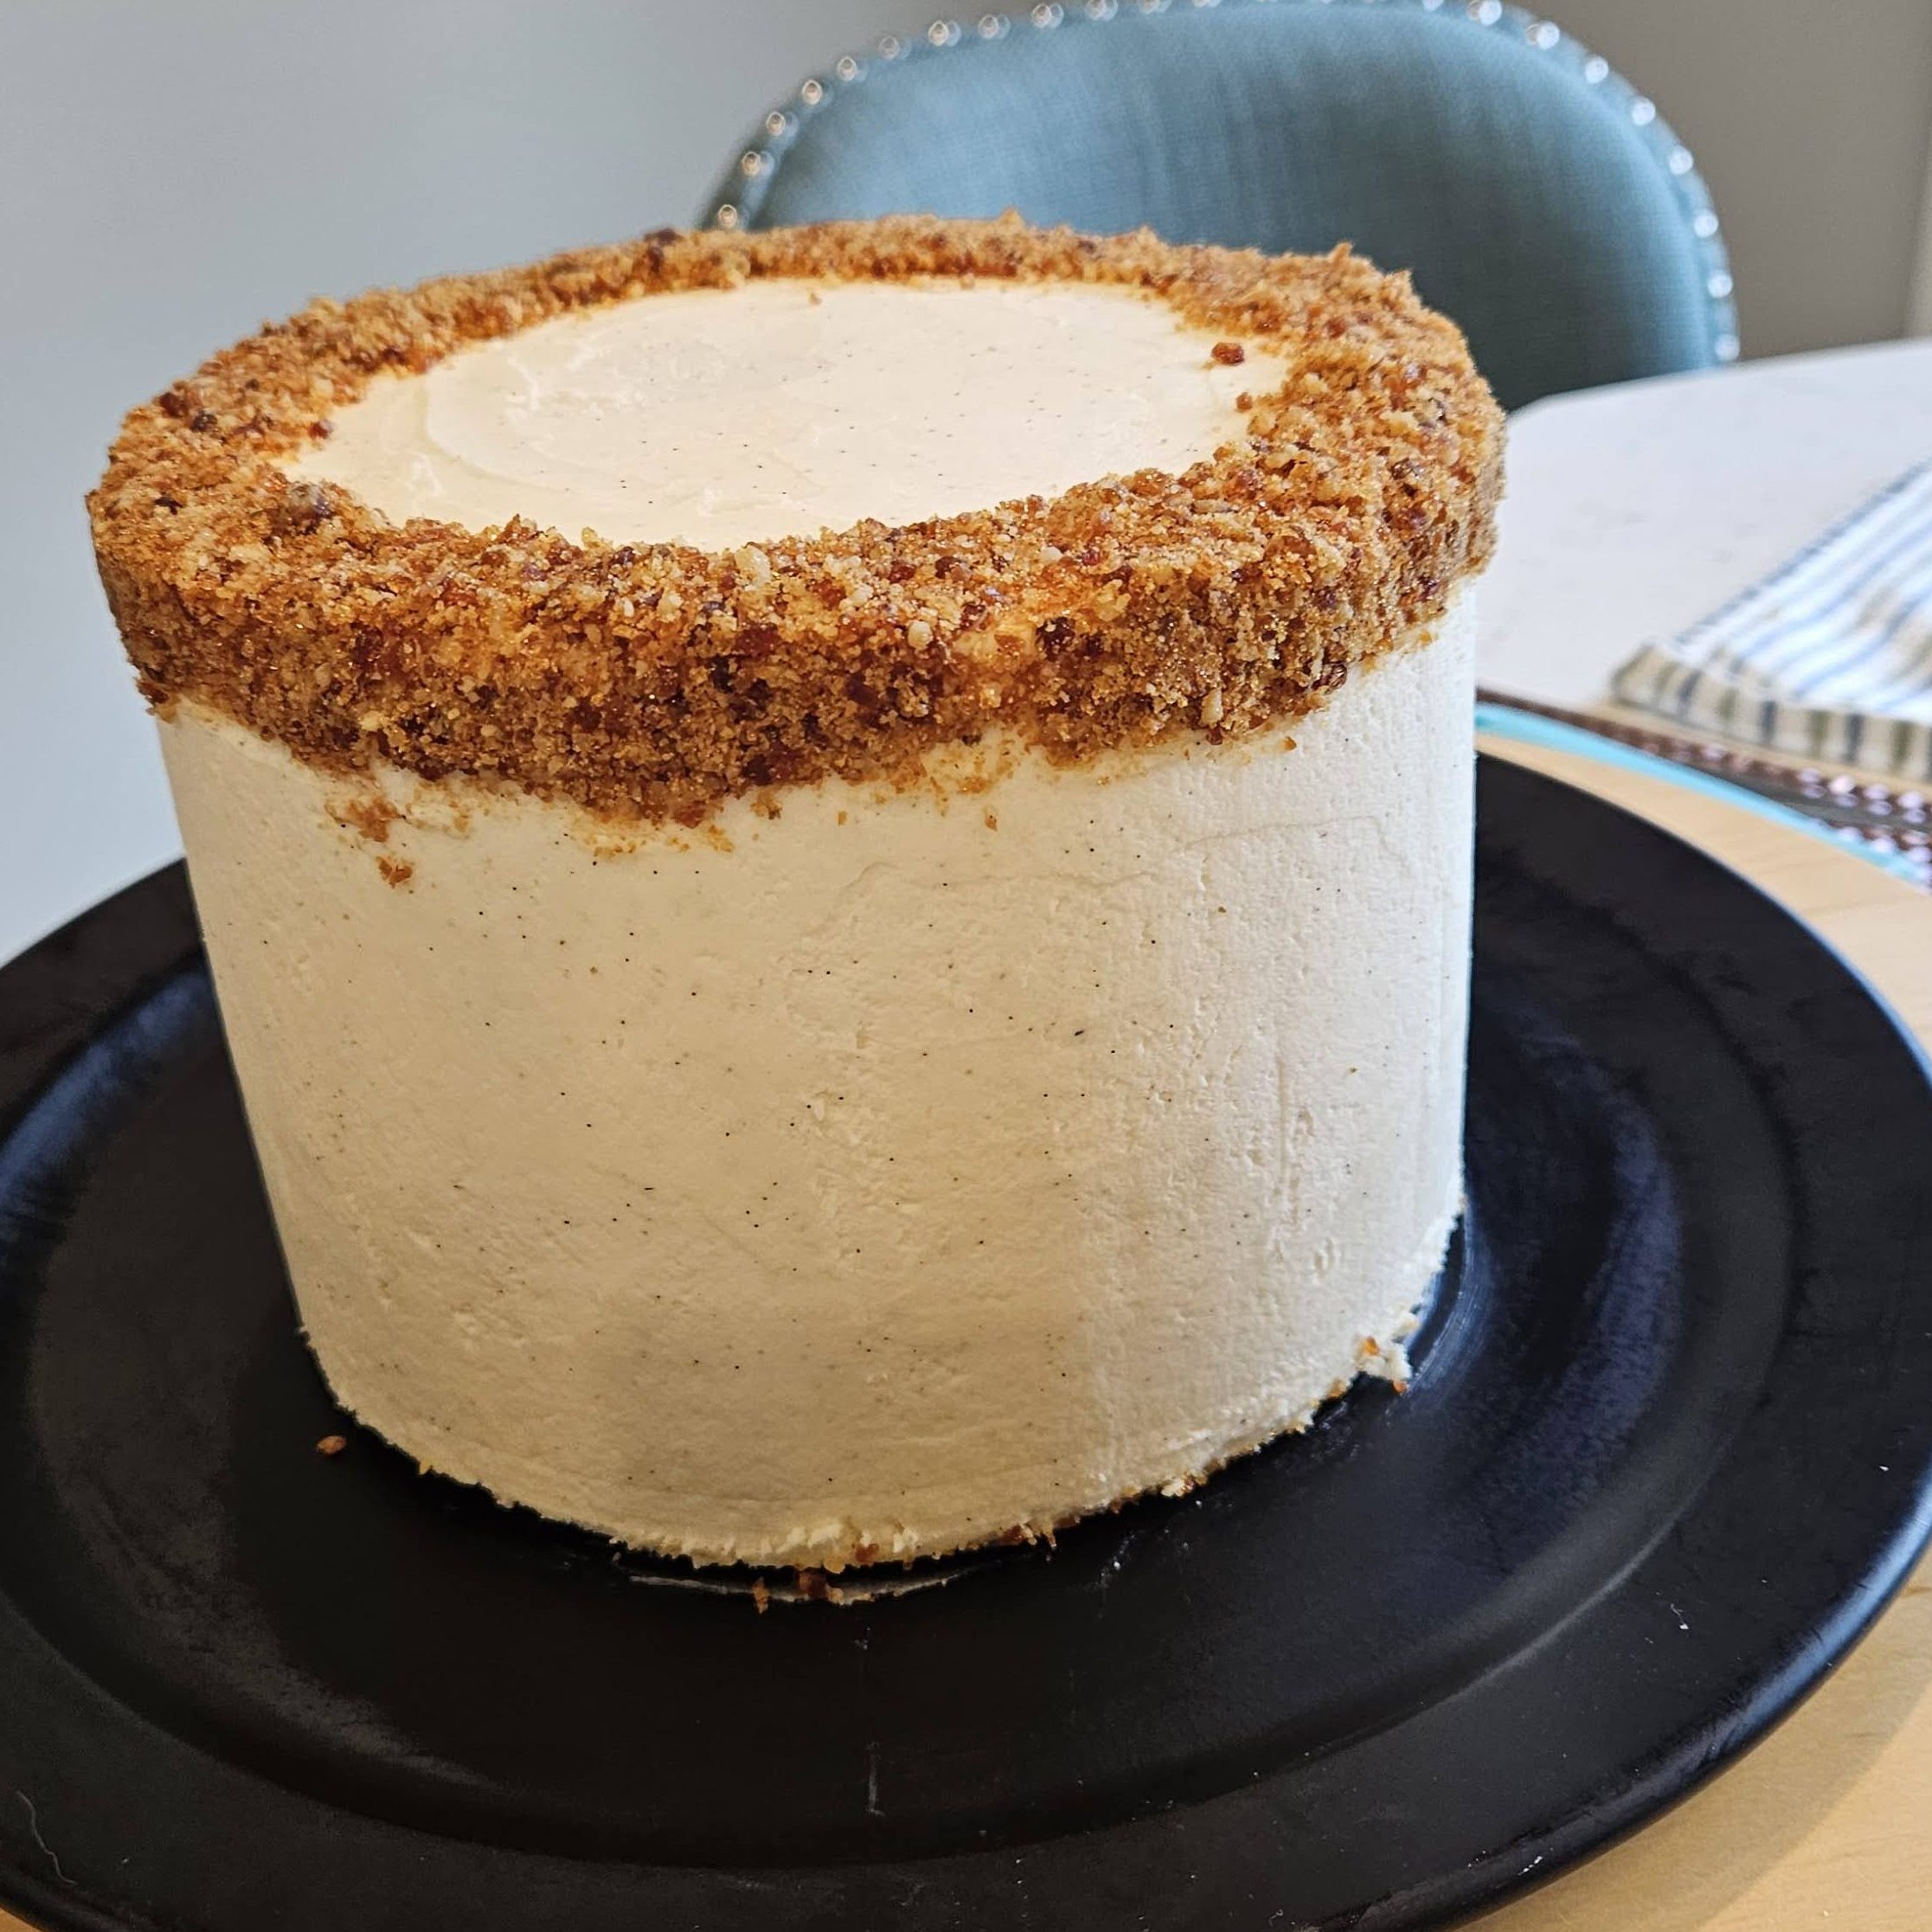
As for the flavor profile, I wanted the combination of cake, filling and frosting to complement the caramel while, at the same time, counteracting its sweetness. For the cake itself, I chose to use walnuts, which carry a slight bitterness, and aromatic spices, creating a perfect foil for the sweet caramel. Likewise, the coffee filling added its own counterbalance of flavor, and the cream cheese frosting provided a tangy, creamy finish to the overall profile of the cake.
I started with Mary Berry’s recipe for walnut cake that she used for the technical challenge in the 2015 season of The Great British Baking Show. I added my own combination of spices and increased the amount of walnuts to enhance the flavor.
For the coffee filling, I turned to this tried-and-true recipe that I’ve used numerous times, here, here and here.
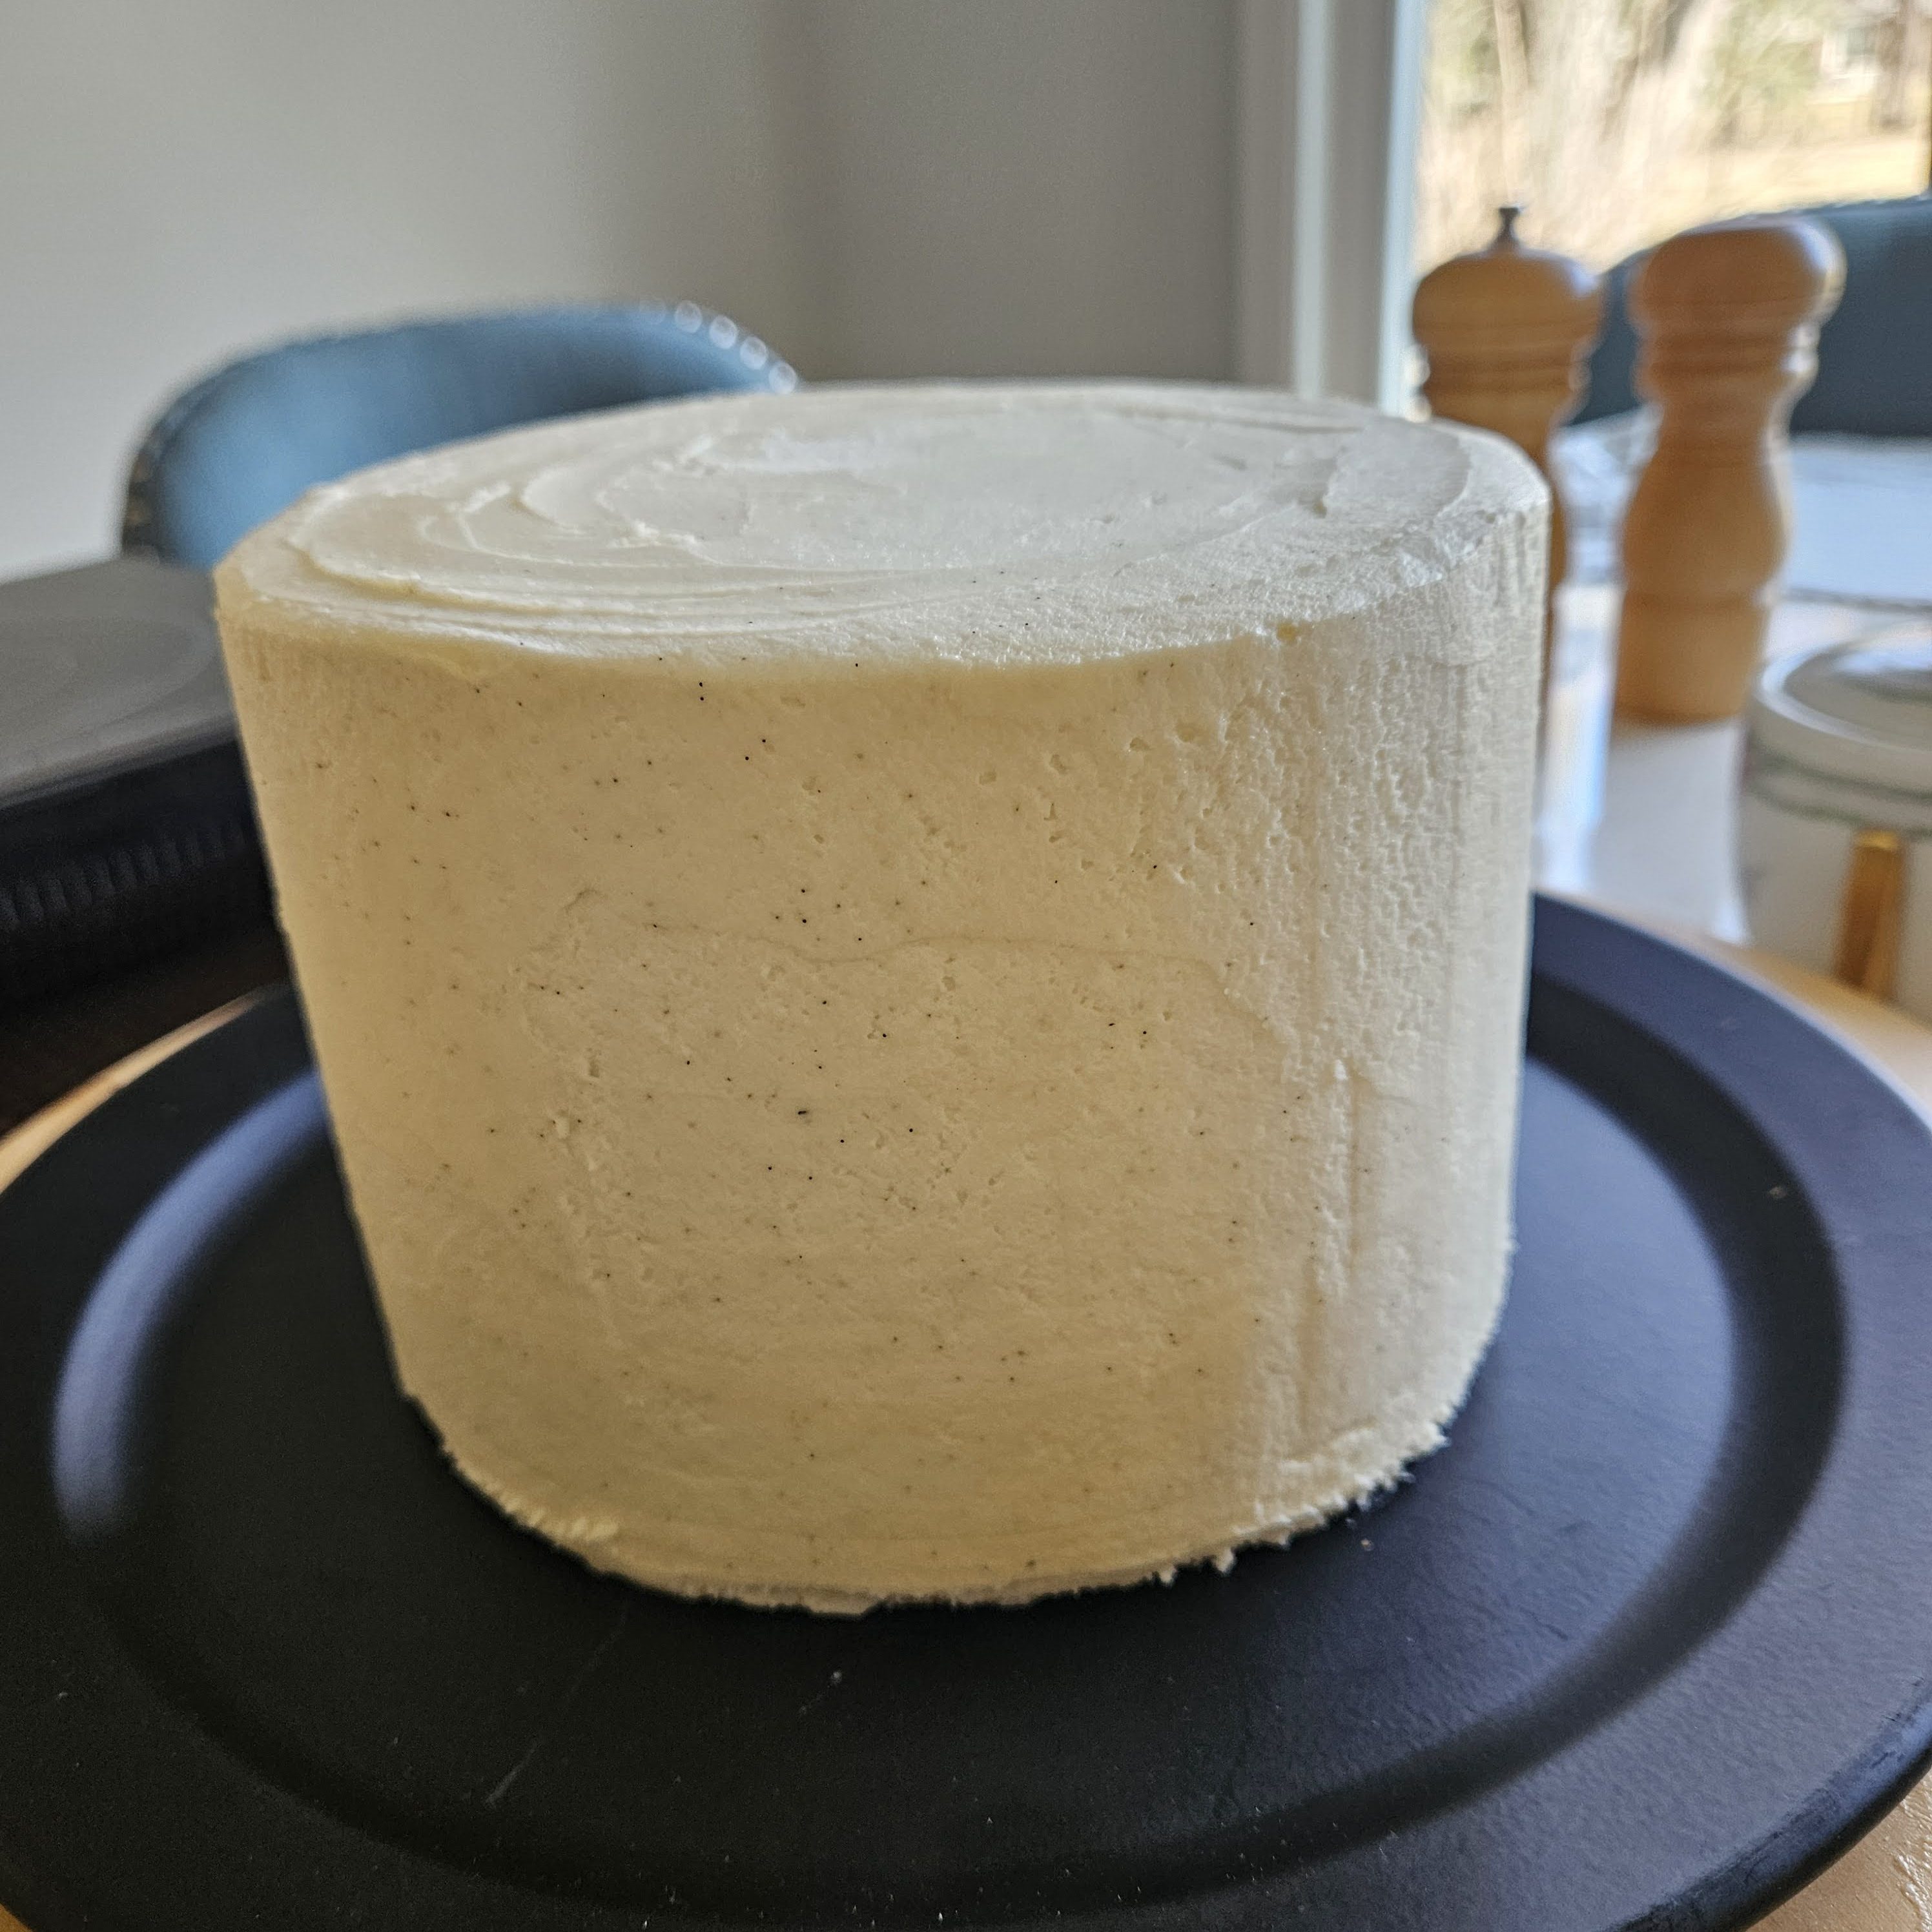
Cream Cheese Swiss Meringue Buttercream, a Revelation
When it came to the frosting, I wanted something more sophisticated than the American version of cream cheese frosting, which is simply a mixture of cream cheese, butter and powdered sugar. I searched for a way of combining Swiss meringue buttercream with cream cheese and found a few recipes that called for making a regular batch of Swiss meringue buttercream and combining a portion of it (usually around 10 oz.) with a block of softened cream cheese. But the recipe developers warned that adding any more than that would loosen the buttercream. Then I found this one by Claire Saffitz.
Claire discovered that the reason adding cream cheese to Swiss meringue buttercream turns it into a soupy mess is that cream cheese has a lot more moisture than butter. In order to counteract that, she used a natural cream cheese that doesn’t contain stabilizers (think guar gum, xanthan gum or carob bean gum), which prevent the liquids from separating from the solids. She then pressed the cream cheese between paper towels for a few hours so the liquid soaked into the paper towels. Her cream cheese lost about 28% of its weight in liquid. Once she reduced the liquid, Claire was able to substitute about half of the butter in her Swiss meringue buttercream recipe with cream cheese. She simply creamed the butter and cream cheese together before adding it to the meringue.

Following her lead, I used Tillamook brand cream cheese. Its contents, according to the package, include only cultured pasteurized milk and cream, pasteurized skim milk, and sea salt. After pressing the 8 oz. brick overnight between paper towels, weighed down with my cast iron Dutch oven, it lost 2.4 oz. of liquid, resulting in cream cheese with about 50% fat instead of its original 36% fat. (Butter, by comparison, is about 79% fat.)

When I added the butter/cream cheese mixture to my meringue, it seemed to curdle, so I followed the advice found on the internet and warmed it over a simmering water bath, just until the edges started to melt. After I transferred it back to the mixer, the buttercream came right back together again, all smooth and creamy, just the way it’s supposed to be.
Caramel — Wet or Dry?
Once my cake was filled and frosted. It was time for the caramel decorations.

I’ve learned a thing or two since the last time I made caramel. Mostly, I’ve learned that the addition of acid (e.g., lemon juice or cream of tartar) or corn syrup (or, alternatively, glucose syrup) will help to prevent the sugar from crystallizing as it melts. This is because the acid “inverts” the sucrose into glucose and fructose — simpler sugars that are less prone to crystallize. Corn syrup is already an invert sugar, mostly glucose, and these smaller sugar molecules come between the sucrose molecules, interfering with crystal formation.
For my walnut praline, I stuck with the traditional, dry method, borrowing this recipe from my Coffee and Walnut Dobos Torte. It is less prone to crystallization than the wet method, but it will burn quickly if you don’t keep a close eye on it. Learn from my mistakes and have a bowl of ice water ready to stick the pan into as soon as you take it off the heat to stop it from cooking longer.
For the caramel collar, I used this recipe, minus the red food coloring. (This was the only example I could find of a cake with a caramel collar that wasn’t simply spun sugar.) My first attempt failed, as I tried to create the lacy look I was after while the caramel was too hot and runny. The second try worked! I really like the artistic flair this gives my cake — a unique, professional finish that really takes it to the next level.

With the little bit of caramel I had left, I made a few curls for the top. This is less messy than “spinning” the sugar. As the caramel starts to harden, you dip a fork in it and wrap it around a dowel or a knife-sharpening steel that’s been coated with butter. It hardens almost instantly, so you can slide it off and make another one. Continue until the caramel is too cool to work with.
I was so pleased with how this cake turned out that I didn’t want to simply cut it up and distribute pieces to my friends, so I took the whole thing (after cutting a slice for me and my husband) to my local library to share it with the staff. They said it was fabulous!

I’ve divided this recipe into its individual parts so that you can decide which elements you want to make. The cake would be fabulous alone, perhaps baked in a 9-by-13-inch pan, as a breakfast cake with a mug of coffee. Or you could bake it in layers and spread the cream cheese frosting between the layers and on top for a “naked cake” look. Any way you stack it, or slice it, it’s going to be delicious!
Walnut Spice Cake with Coffee Filling and Cream Cheese Buttercream Frosting
Coffee buttercream recipe adapted from LittleFrenchBakery.com
Credit for cream cheese Swiss meringue buttercream: Claire Saffitz
Credit for caramel collar: Paarman.co.za
For the walnut cake:
- 1 c. (2 sticks) butter, softened
- 1 c. sugar
- 4 large eggs
- 1¾ c. sifted all-purpose flour
- 3 t. baking powder
- ½ t. salt
- ¾ t. cardamom
- ¾ t. cinnamon
- ½ t. ginger
- ¼ t. allspice
- ¼ t. cloves
- 1/8 t. nutmeg
- 1 c. walnuts, finely chopped
Directions
- Preheat oven to 325°F. Grease three, 6-inch round cake pans and line the base of each with parchment paper.
- In the bowl of a mixer fitted with the paddle attachment, cream the butter and sugar together until pale and fluffy (about 5 minutes). Beat in the eggs one at a time.
- Mix the flour, baking powder, salt, spices and walnuts together in a separate bowl. Then gently fold the flour mixture into the batter. Divide the mixture equally between the three pans and level the surfaces with a spatula.
- Bake for about 25-30 minutes or until the cakes are golden brown and a toothpick inserted in the center comes out clean. Leave to cool in the pans for a few minutes, then turn out, peel off the parchment and finish cooling on a wire rack.
For the coffee French buttercream filling:
- 4 oz. (scant 2 c.) instant espresso or coffee crystals
- ¾ c. water
- 1 3/8 c. sugar, divided
- 5 egg yolks
- 1 T. liquid (brandy is recommended, but coffee or even water will do)
- ¾ t. vanilla extract
- ¼ t. kosher salt
- 1 c. (2 sticks) unsalted butter, softened to room temperature (about 65°F
Directions
- To make the coffee buttercream, you must first make a French coffee extract. (NOTE: This will make more than you need for this recipe. It keeps well in the refrigerator, so you can use the leftovers in other recipes.) To do this, in a small saucepan, dissolve the instant espresso in the water and bring to a boil, then turn off the heat. In another saucepan, add 1 cup of sugar and heat until the sugar melts and turns a dark amber color. (Don’t stir it, but swirl the pan to heat the sugar evenly.) When the sugar is the right color, slowly pour in the hot coffee. It will bubble and sputter, so be careful to protect your hands and fingers. Stir until all of the caramel dissolves. Cool and store in the refrigerator.
- For the buttercream, combine egg yolks with 3/8 cup sugar, brandy (or other liquid), vanilla and salt in a heatproof mixer bowl. Use stand mixer fitted with whisk attachment to whisk until completely blended together.
- Find a saucepan that will hold about 1½ inches of water and will support the bowl without the bowl touching the surface of the water. (Alternatively, use a ring of crumpled aluminum foil in the bottom of the pan to keep the bowl above the water’s surface.) Place the pan of water over high heat until steaming; then adjust the heat to maintain a gentle simmer. Put the bowl of egg yolk mixture over the pan of simmering water, stirring and scraping the egg yolk syrup constantly with a flexible spatula until the mixture reaches 155°F. This should only take about 5 minutes; if it seems to be taking too long, simply turn up the heat.
- Transfer the bowl to the stand mixer again and whisk at high speed until mixture is fluffy and stiff and beginning to ball up around the whisk — about 8 minutes. By this time, the bottom of the bowl should be cool to the touch.
- With the mixer still running, add butter, 1-2 tablespoons at a time, waiting only a second or two between additions. This should result in a thick, creamy and spreadable texture. (If the mixture seems to break apart, keep mixing; it will come back together.)
- Add 1 tablespoon of the coffee extract and mix well. Taste to see if the coffee flavor is rich enough. If not, add half a tablespoon or more, to taste. The buttercream should be a creamy coffee color with a nice coffee flavor. (This can be made in advance and refrigerated for up to two weeks or frozen for up to two months. Bring to room temperature and rewhip before using.)
- Once the cake is completely cooled, divide the coffee buttercream into two equal portions. Spread one half on the bottom cake layer, then position the middle layer on top and spread the other half on it. Place the top layer on top of that. Refrigerate cake while making cream cheese buttercream.
For the cream cheese Swiss meringue buttercream:
- 8 oz. full-fat, stabilizer-free cream cheese, such as Tillamook brand, at room temperature
- 1 c. (2 sticks) unsalted butter, cut into tablespoon-sized pieces, at room temperature
- ½ c. (about 4) egg whites
- 1 c. granulated sugar
- ½ t. kosher salt
- Pinch of cream of tartar
- 2 t. vanilla paste
Directions
- Place cream cheese between 3-4 layers of paper towel on a plate and place a heavy pan on top. Leave for several hours or overnight to reduce water content. You may need to replace the paper towels after a couple hours if they become soaked. (The cream cheese should lose 2-3 oz. in weight.)
- In the bowl of an electric mixer fitted with the paddle attachment, cream the cream cheese until light and fluffy. Then add the butter, 1-2 tablespoons at a time, while mixing on low speed. Turn up the speed to medium until cream cheese and butter are well combined. (Do not whip.)
- In a clean mixer bowl, combine egg whites, sugar, salt and a small pinch of cream of tartar. Place the bowl over that same pan of simmering water used for the coffee buttercream, and stir the egg white mixture until the sugar is dissolved and it reaches 160°F (about 5 min.). To make sure the sugar is dissolved, rub a little bit between your thumb and forefinger to see if it’s smooth.
- Transfer the bowl to the stand mixer fitted with a whisk attachment. Whip on medium to high speed until firm peaks form. (By this time, the meringue should be thick and glossy and opaque, and the bowl should be cool to the touch.)
- With the mixer on low, add about half the cream cheese/butter mixture, a tablespoon at a time. Then switch to the paddle attachment and add the rest of the butter/cream cheese mixture. Continue mixing on low until buttercream is smooth and fluffy, around 15 minutes. Mix in the vanilla paste.
- Frost the top and sides of the cake. Refrigerate cake while making the praline.
For the praline:
- ½ c. walnuts, coarsely chopped
- 1 c. sugar
Directions
- Spread chopped nuts in a single layer on a parchment-lined, rimmed sheet pan. Fill a large metal bowl (or sink) with ice water.
- In a heavy saucepan, cook sugar over moderate heat without stirring until it begins to melt. Increase the heat and cook, stirring or swirling the sugar until it’s completely melted and turns a golden caramel color.
- Remove pan from heat and immediately stick the bottom of the pan into the bowl of ice water to stop the sugar from cooking further. Then pour the melted sugar over the chopped walnuts. Tip the sheet pan to spread the caramel, or flatten it using a greased palette knife.
- Let it cool completely, about 20 minutes, then carefully break the hardened caramel into shards. To make praline powder, break the shards into pieces and transfer to a food processor. Pulse until it is finely ground. (Store ground praline in an airtight container at cool room temperature. If it clumps, regrind it in food processor before using.)
- Spoon the praline powder around the top of the cake. Place cake on an open platter in refrigerator or freezer while making the collar.
For the caramel collar:
- 1 c. sugar
- ⅓ c. water
- 1 t. lemon juice
Directions
- Measure the circumference of the cake. Tear off a piece of parchment paper about 6 inches longer than the circumference. Mark the height of the cake on the paper, running its length. Turn the paper upside down onto several layers of newspaper to protect the work surface. Fill a large metal bowl (or sink) and a glass with ice water. Also have a small metal, glass or silicone pitcher handy. (If using glass, fill it with boiling water and place a metal spoon in it to conduct some of the heat.)
- In a small, heavy-bottomed saucepan, combine the sugar, water and lemon juice, and cook over medium-low heat, swirling the mixture to dissolve the sugar. When the sugar is dissolved, stop swirling and increase the heat. Bring to a boil without stirring.
- When the syrup thickens and takes on a darker shade, dip a metal teaspoon into the mixture and then immediately dip it into the ice water. Keep it in the water for a count of 10. Then lift the spoon out of the water and feel the caramel. It must be hard. If it’s still soft, cook a little longer, testing at regular intervals. (If you have a thermometer, heat to hard-ball stage, which is 250-265°F.)
- Once it reaches the correct stage, immediately remove the pan from the heat and stick the bottom of the pan into the bowl of ice water to stop the sugar from cooking further. Wait for the caramel to cool slightly (and empty the water out of your pitcher first), then pour the caramel into the small pitcher. As it begins to thicken, drizzle a little onto the parchment to see if it pools. If it maintains its shape and doesn’t flow together, begin drizzling the caramel in a zigzag or swirly pattern between the lines on the parchment. If you have any leftover caramel, you can make curls or spun sugar.
- When the caramel is set but still pliable, wrap the parchment around the cake. Trim off any overlapping caramel with a pair of kitchen shears. Right before serving, peel away the parchment.
Discover more from Here's the Dish
Subscribe to get the latest posts sent to your email.
