
When I hear the words petits fours, I think of tiny frosted cakes, often with a layer of jam inside, decorated with icing flowers, leaves or ribbons. Those were the only kind of petits fours I ever encountered as I was growing up, and they were only served on special occasions.
It turns out petits fours encompass a much wider range of pastries than that. The name comes from the French words for “small oven.” Back in the 18th and 19th centuries, bakers used large brick ovens to make bread, and these ovens took a long time to heat up and cool down. During the cooling process, the bakers would take advantage of the stored heat by baking smaller, more delicate pastries. The lower temperature was referred to as à petit four, or “at small oven.”
So in a French patisserie, petit four can refer to any bite-sized pastry, either sweet or savory.
This challenge for the bakers in the Great White Tent was to make 24 petits fours: 12 sponge-based and 12 biscuit-based. I’m calling this one Take 2 because this is the second petits fours challenge I’ve tackled. You can read about my petits fours from last season here.
Because we are currently in the middle of the 2020 coronavirus stay-at-home order, some ingredients are harder to come by, and it seems foolish to make anything too extravagant, so some of the components I’m using I already had on hand from previous bakes. But I will still include the recipes here, for your convenience.
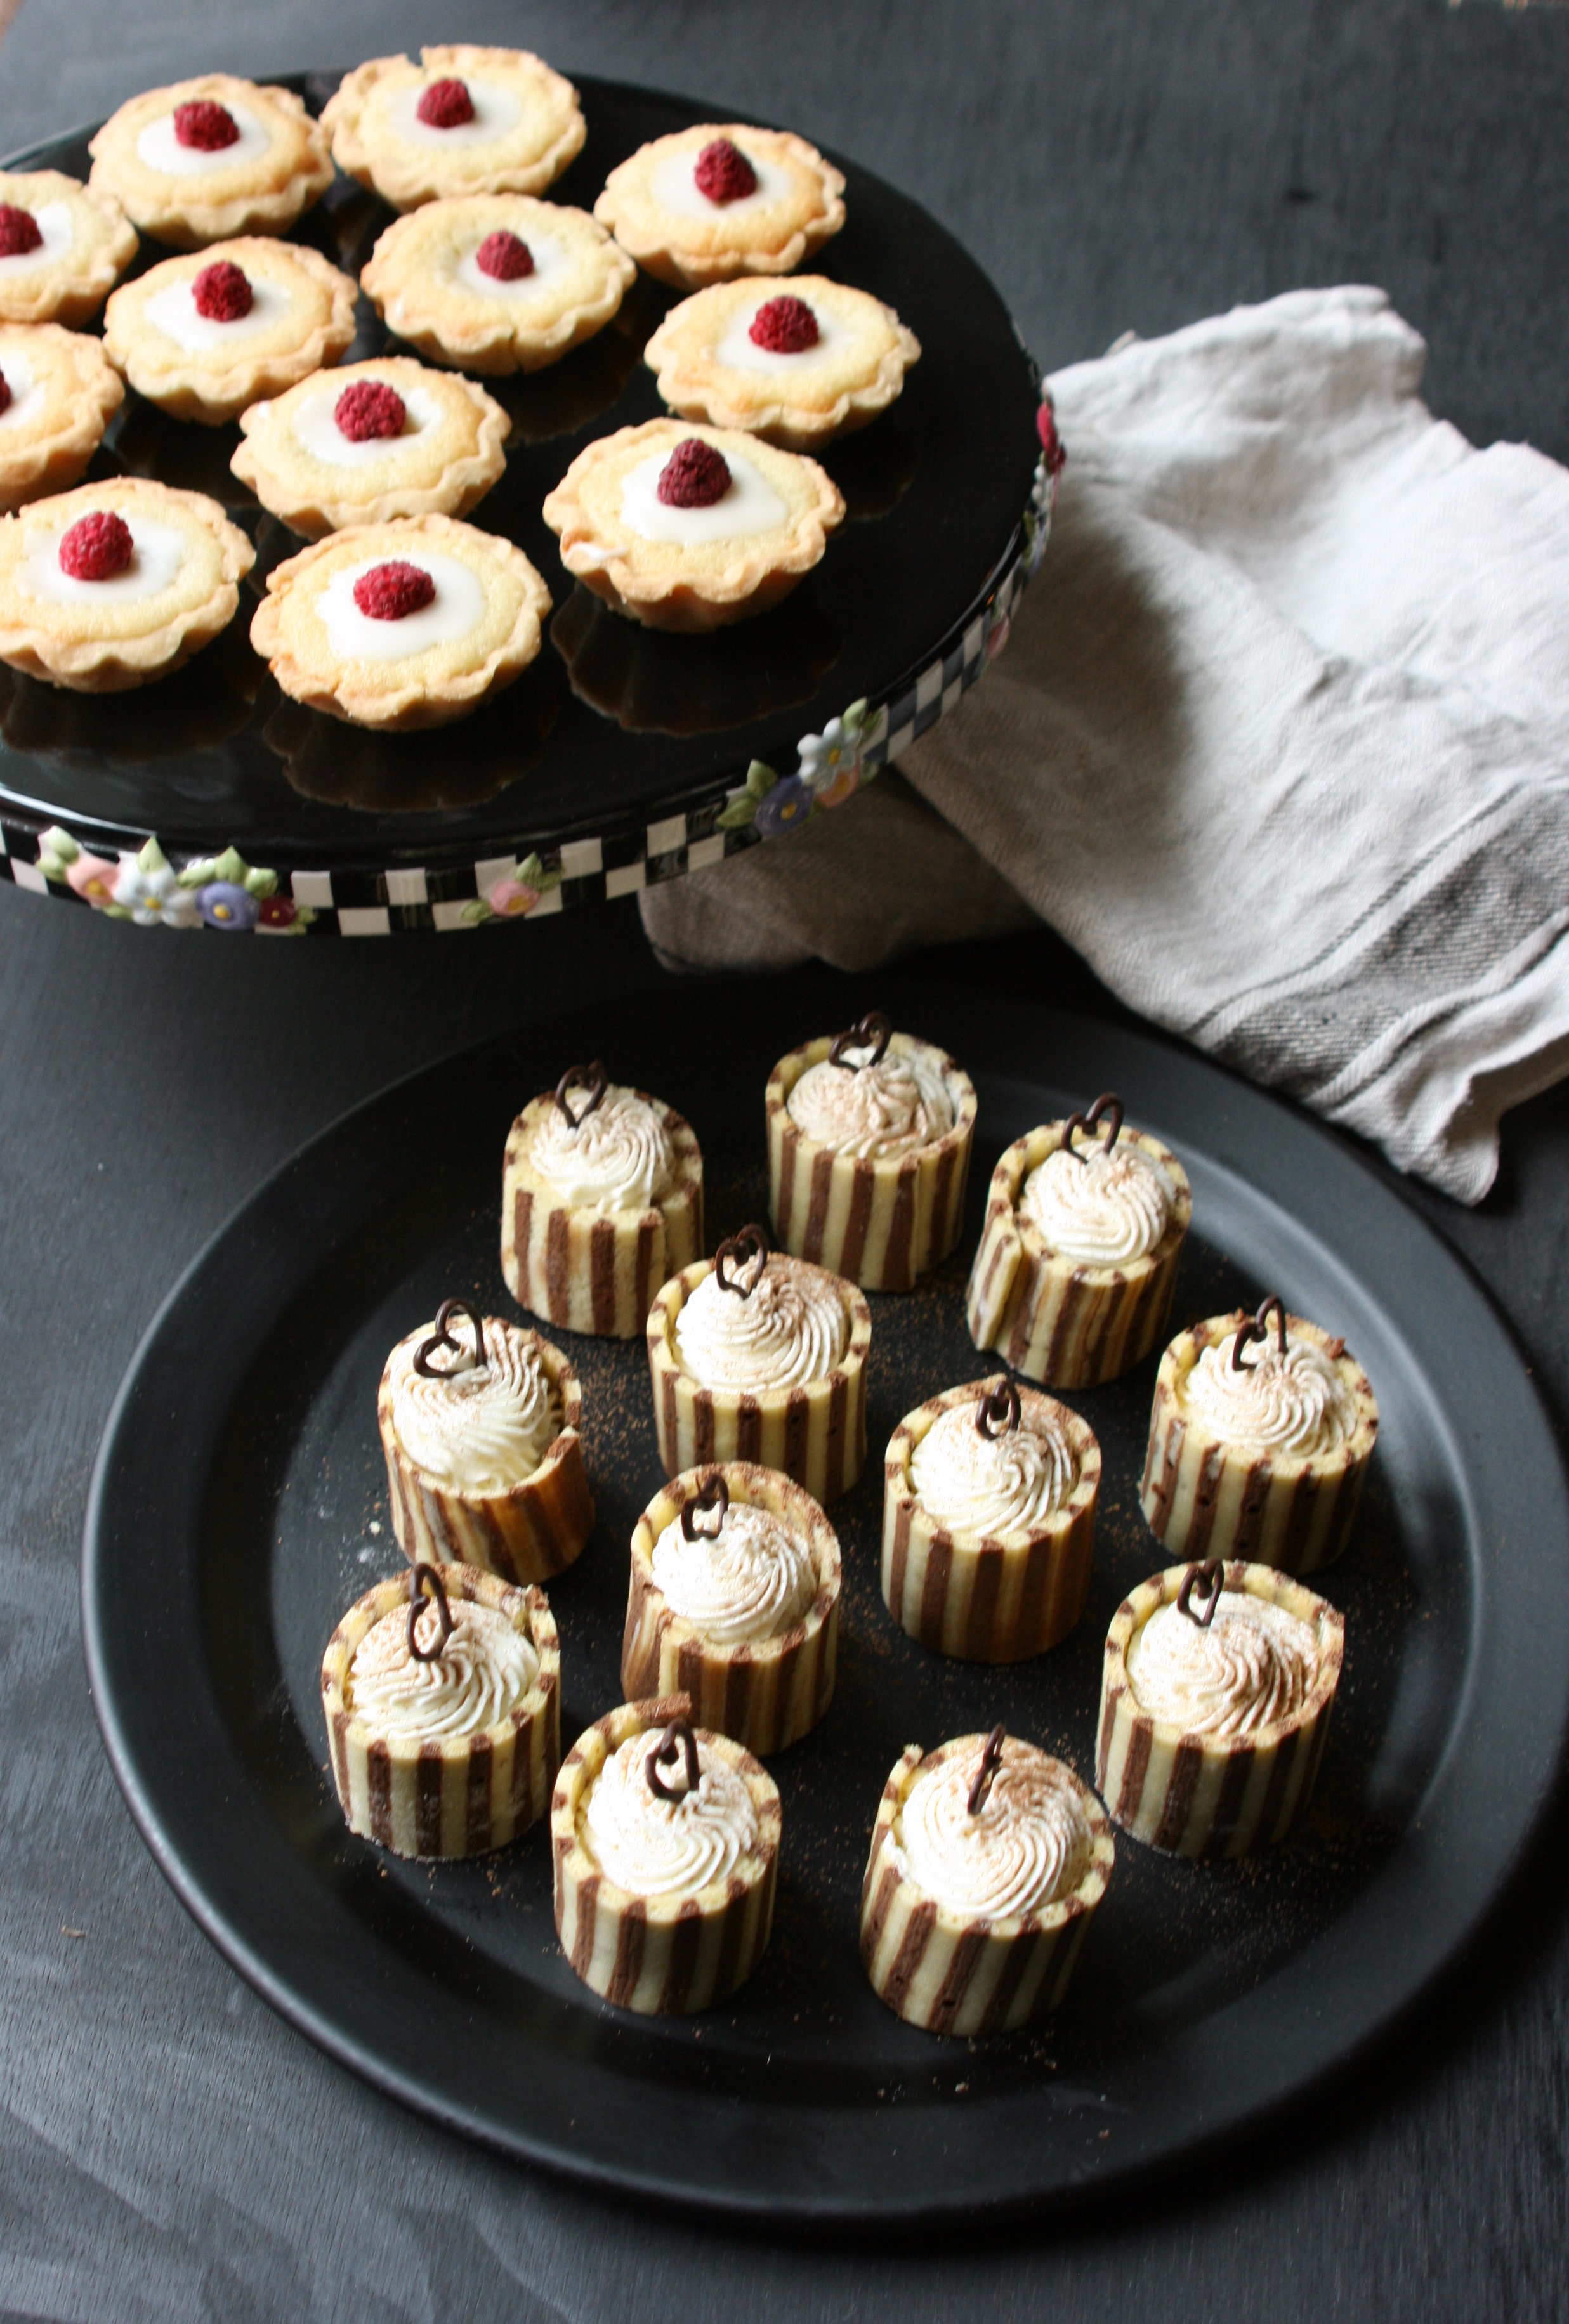
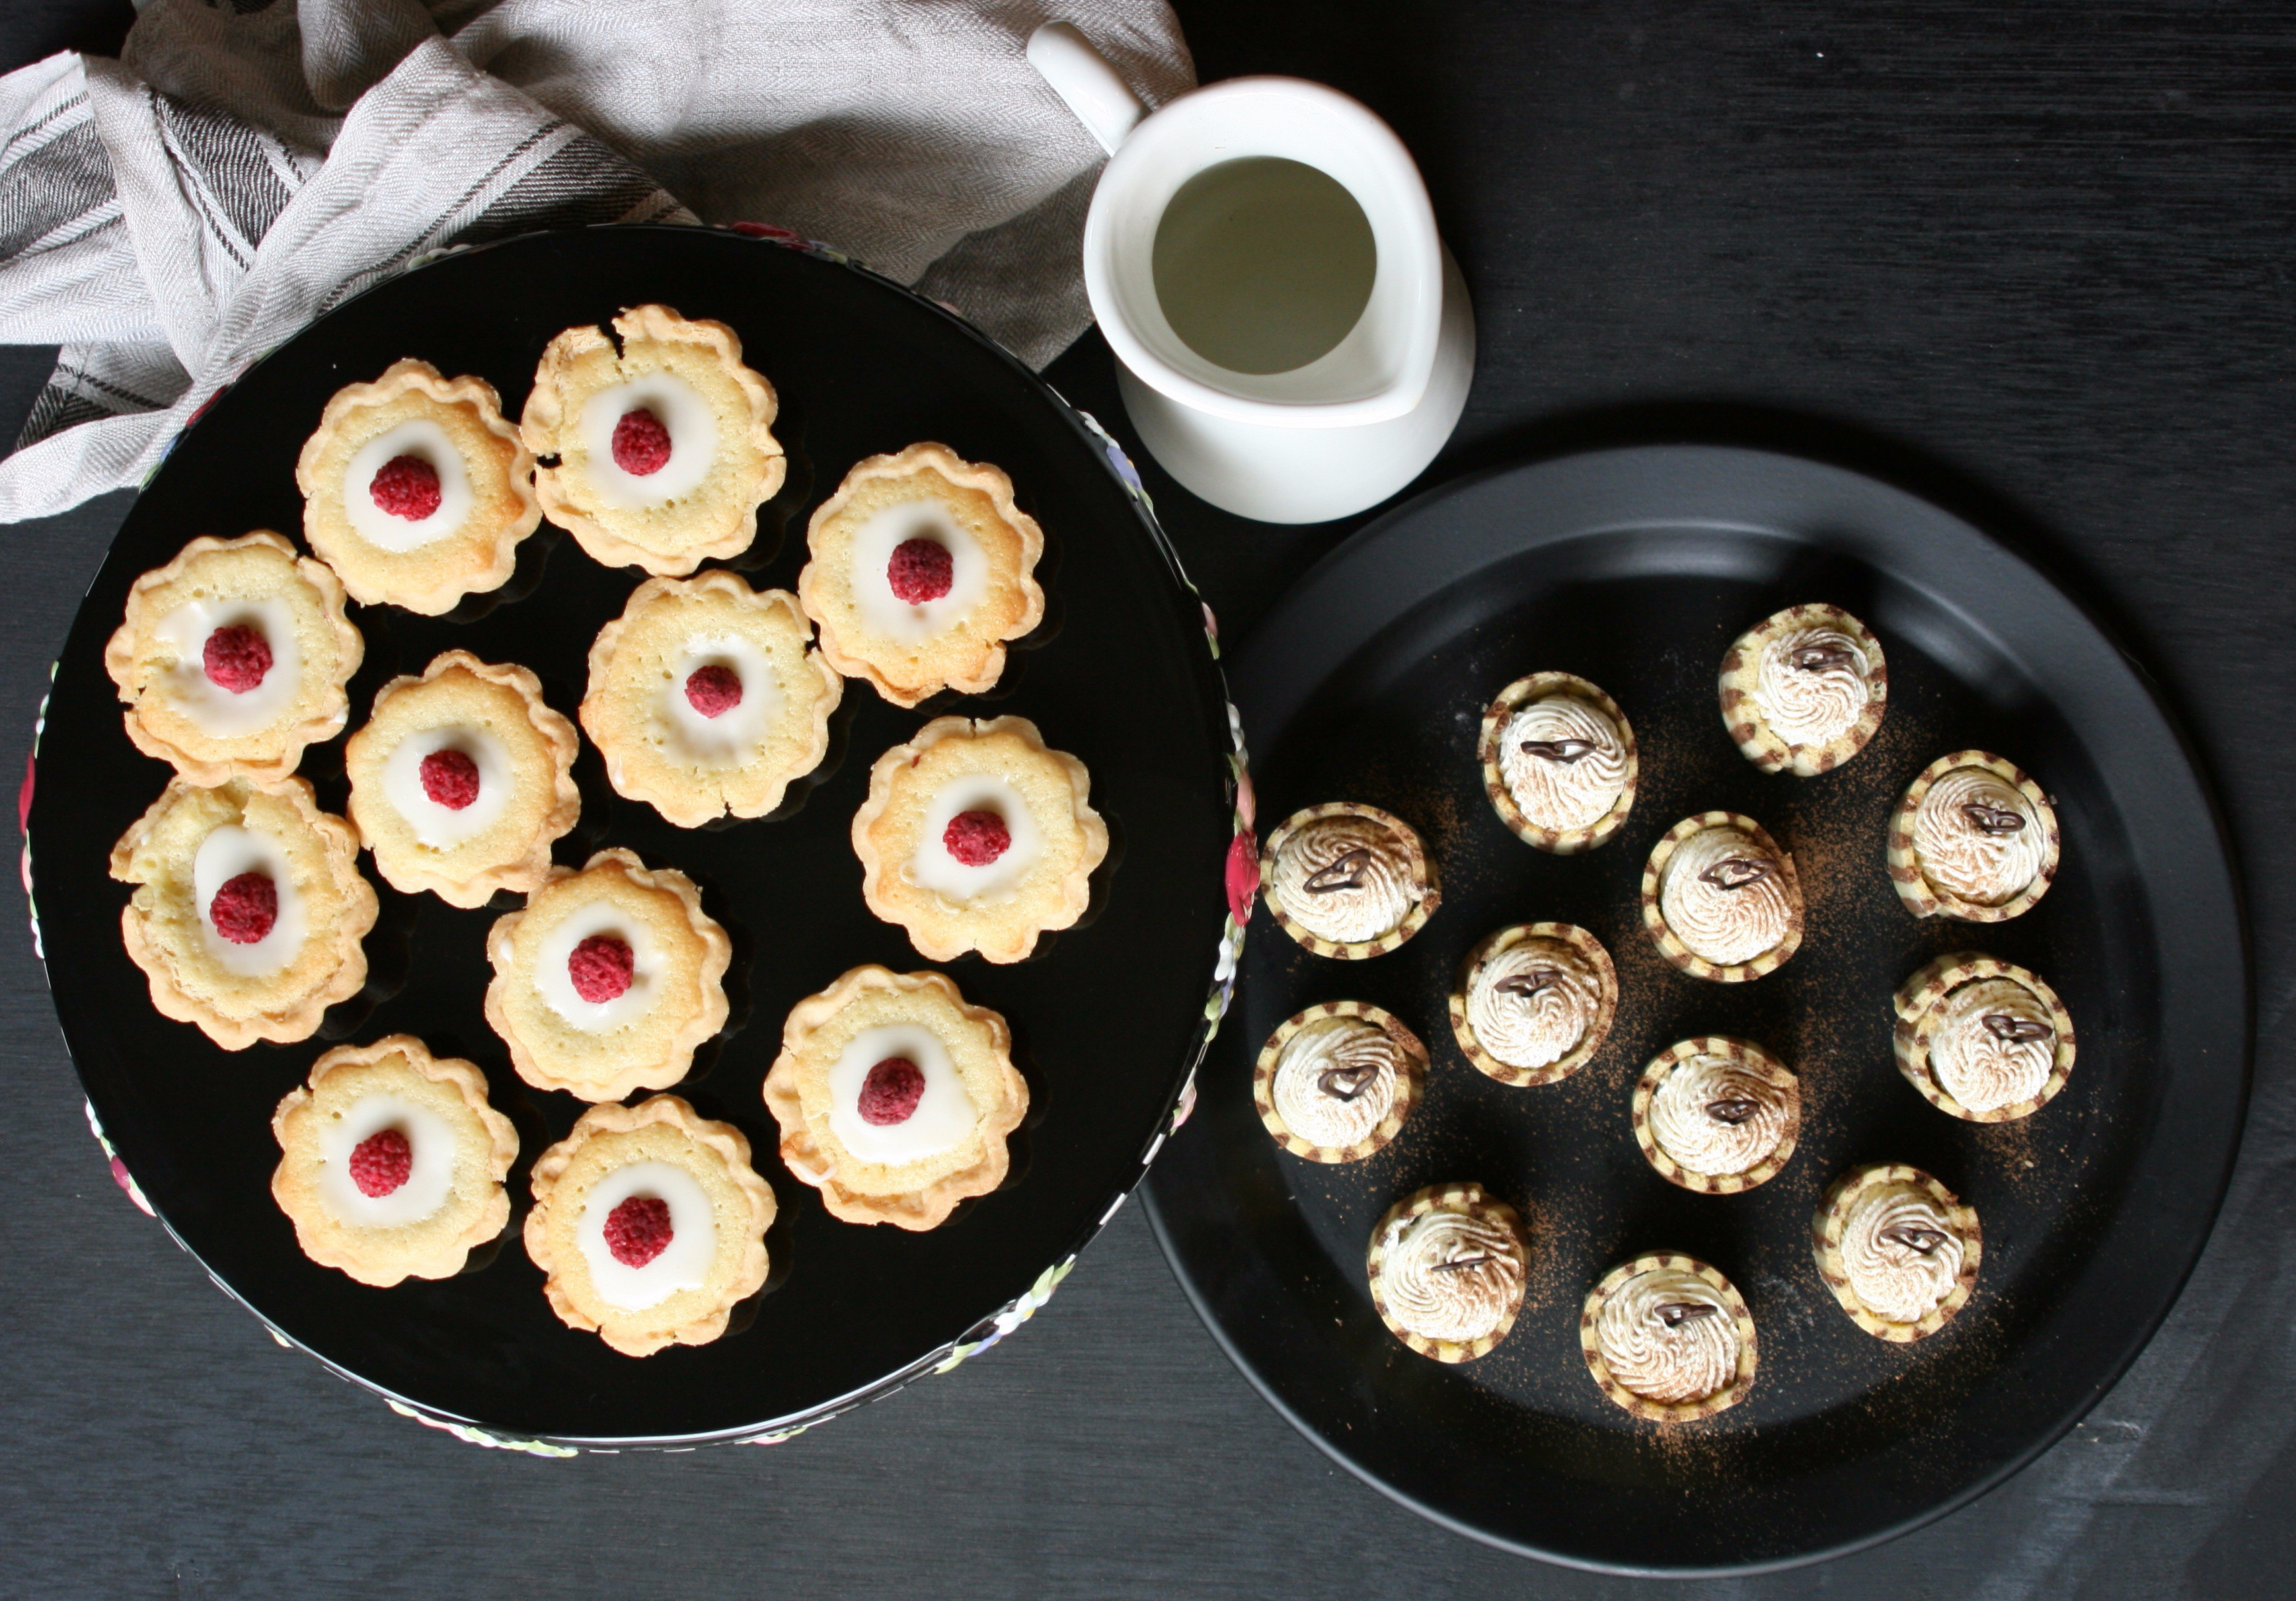
I decided to make mini Bakewell tarts, utilizing some raspberry filling left over from my chocolate-raspberry star loaf, and tiny tiramisu cakes to use up some coffee buttercream I had in the freezer.
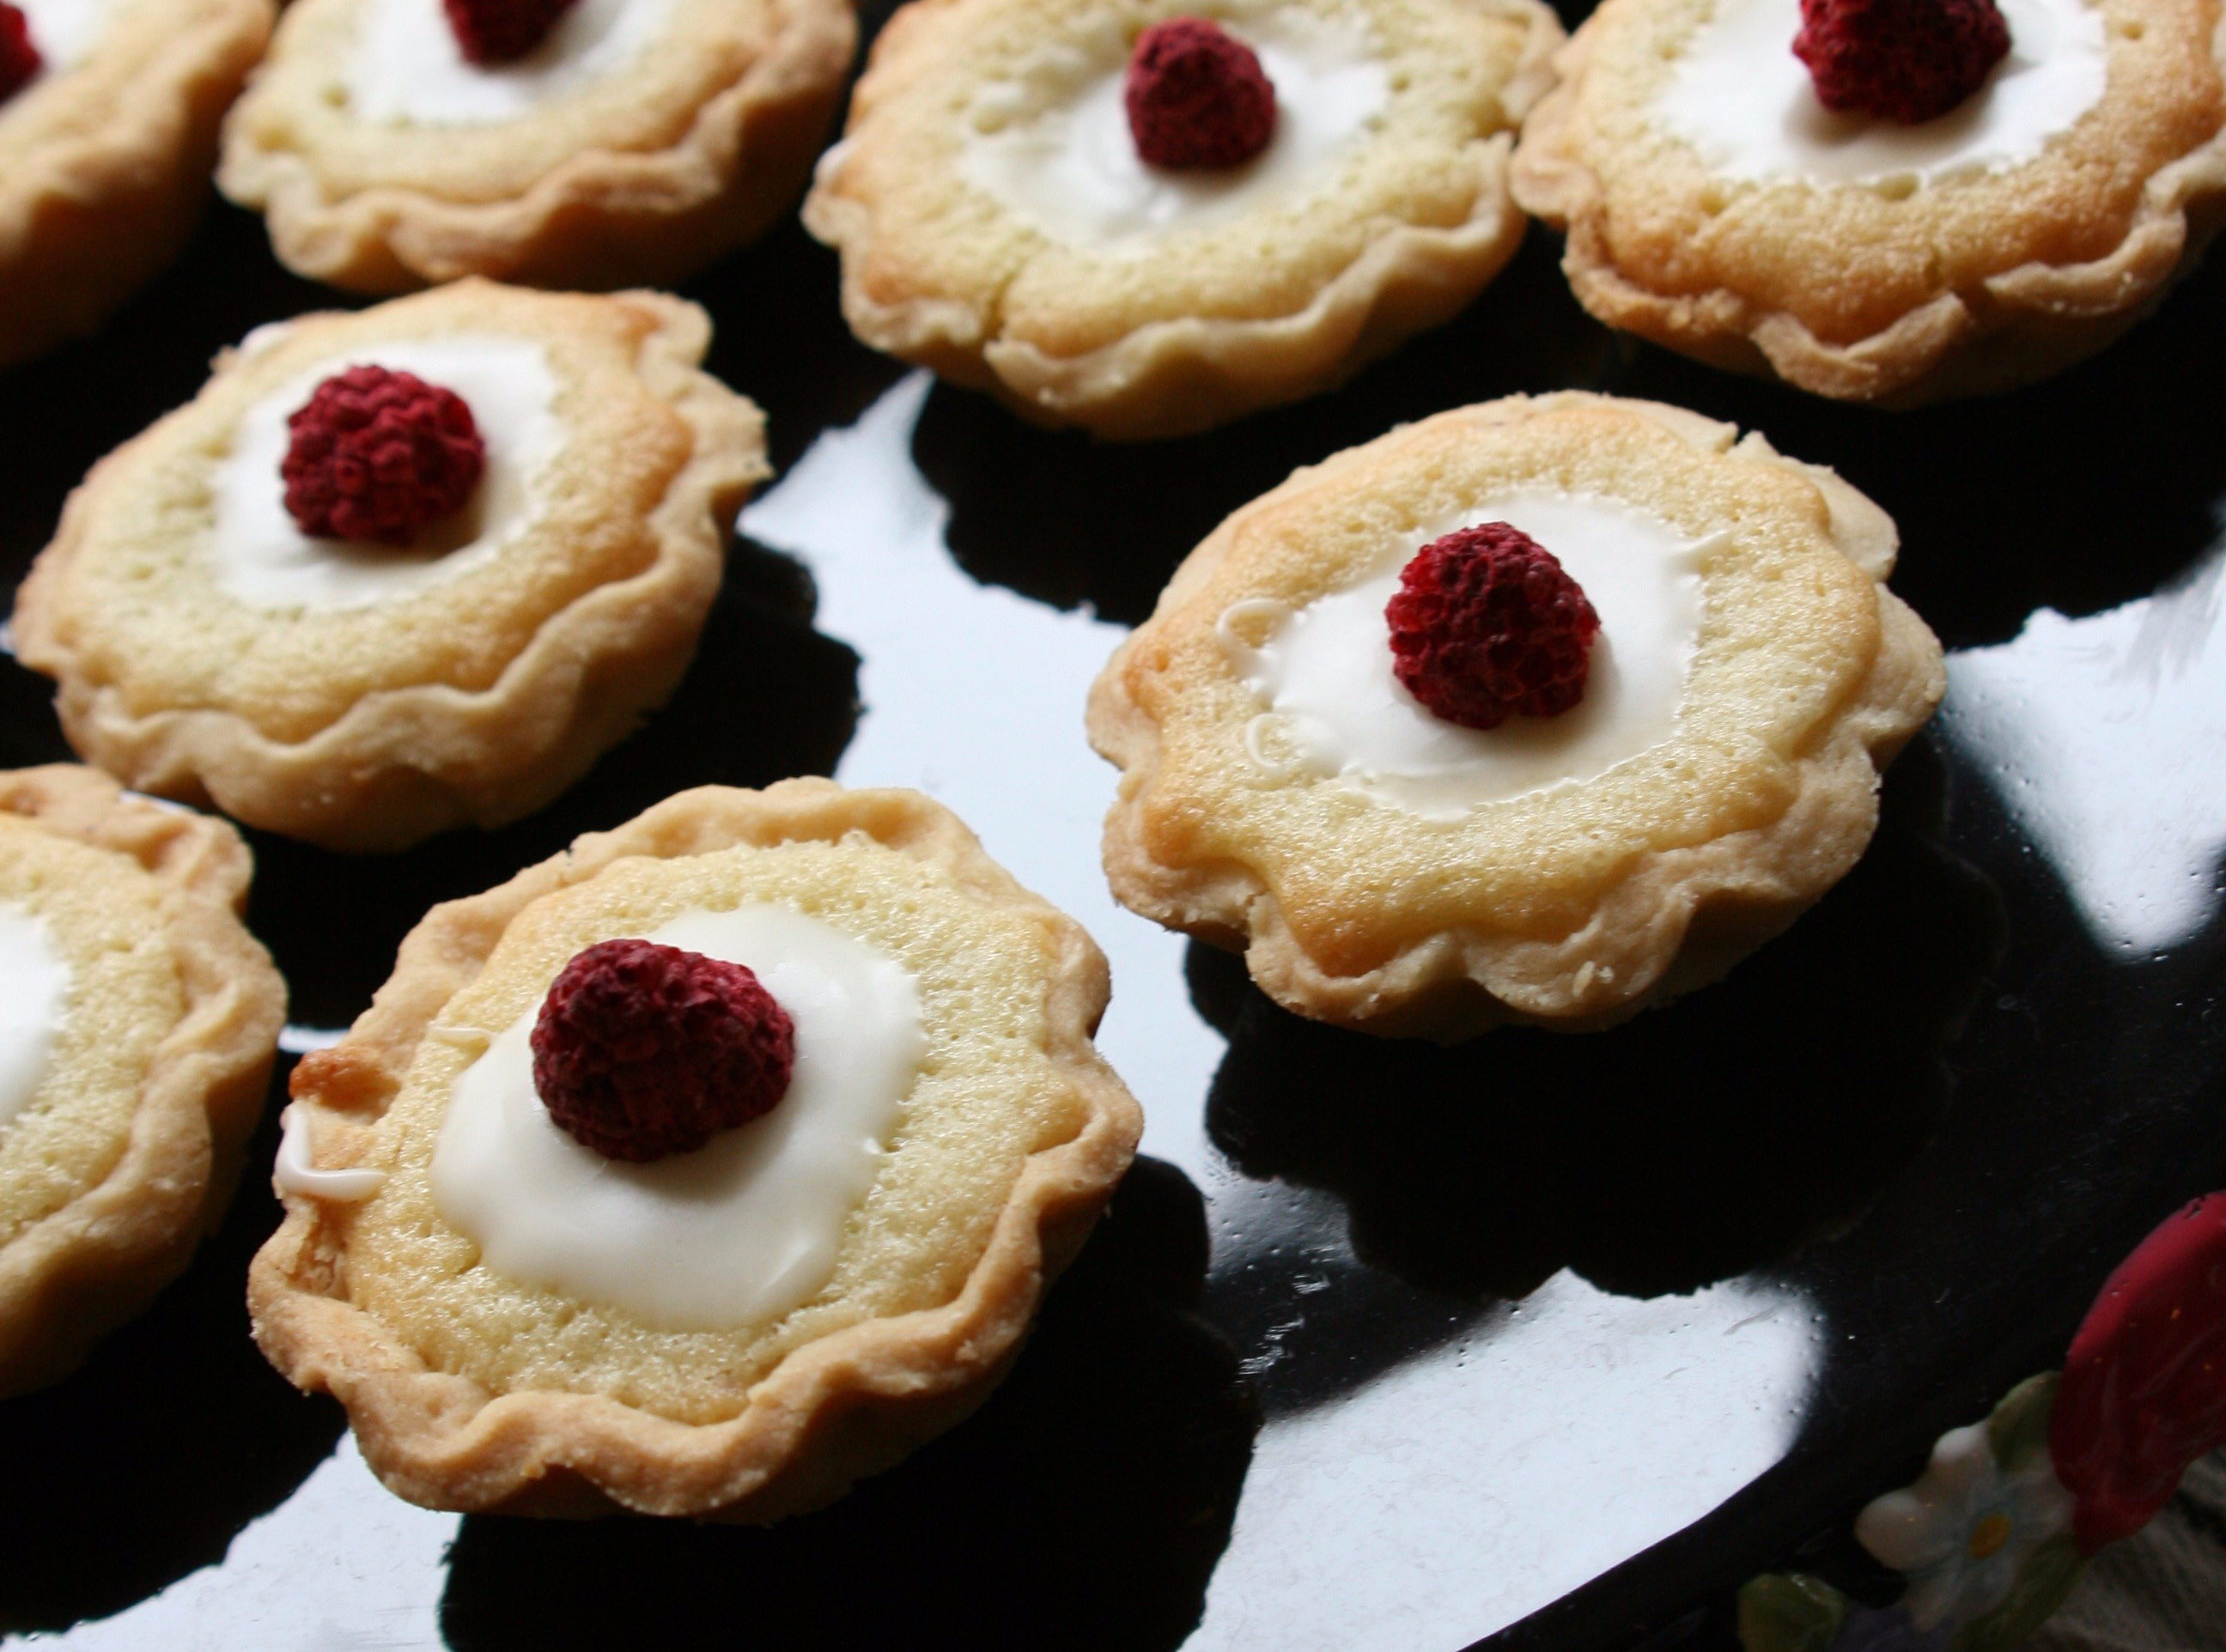
Petit Four No. 1 — Bakewell Tarts
For the Bakewell tarts, I started with a shortbread cookie crust from TheFlavorBender.com. I blind-baked them, added a dollop of raspberry filling and then filled them with frangipane.
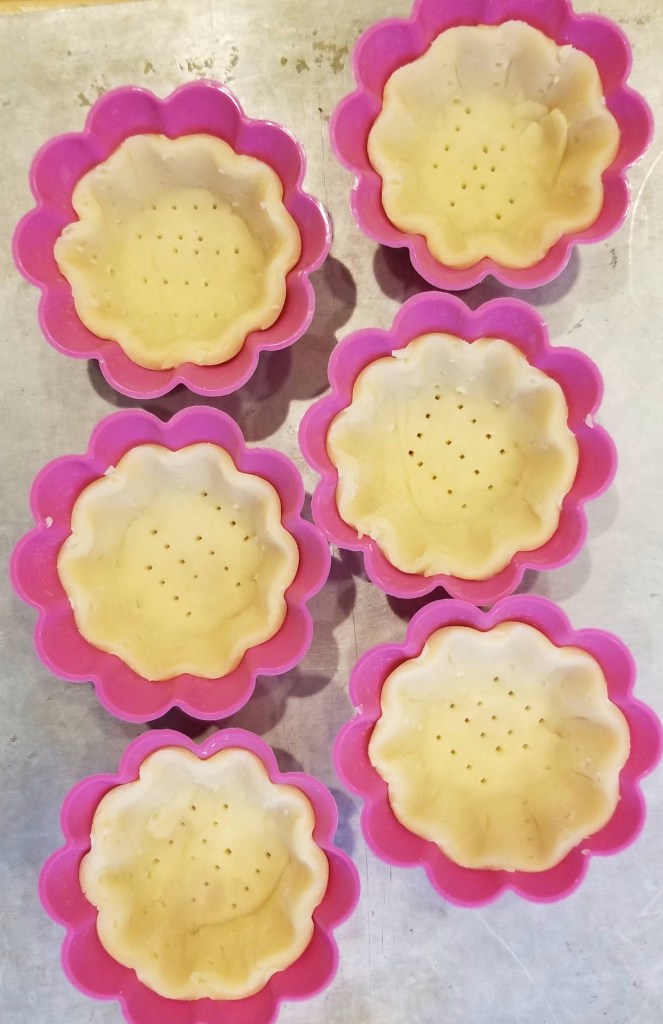
Dock the pastry before baking 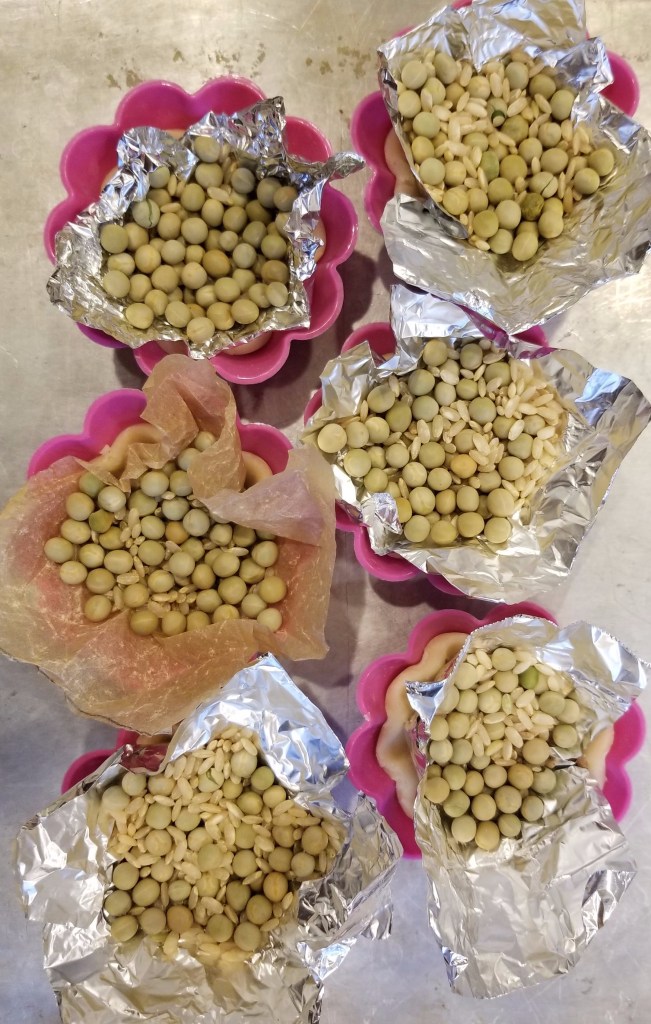
Blind bake the pastry shells 
Add a dollop of raspberry filling
I ran into a bit of a problem because I only have six miniature tart molds. After blind-baking the first six shells, I had to decide if I should fill the shells and bake them in the molds, or take them out of the molds and then fill and bake them.
I chose the latter.
I chose wrong.
I thought the baked shells would be sturdy enough to hold the filling while it baked, but a few of the tarts expanded so much that the shells split and some of the frangipane spilled out.
Once they were baked and cooled, I topped the tarts with a little bit of almond-flavored icing and a freeze-dried raspberry (because I already had them on hand, too).
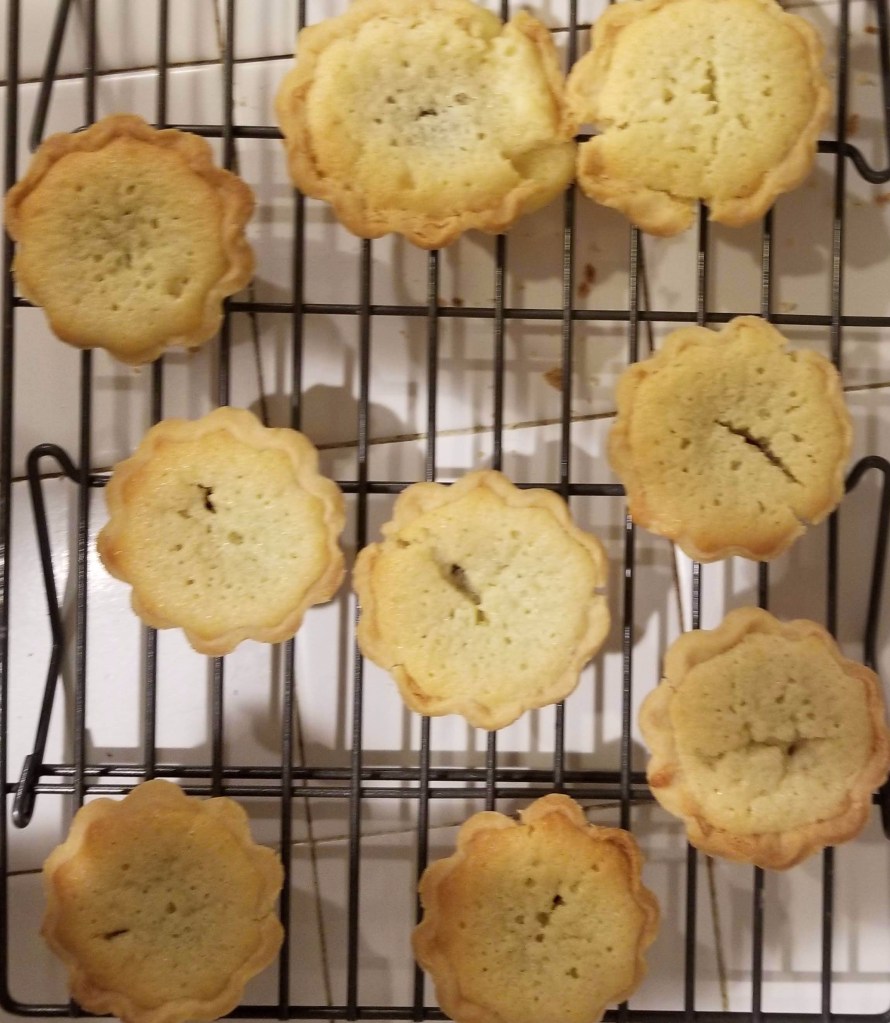
Some of the shells split during baking. 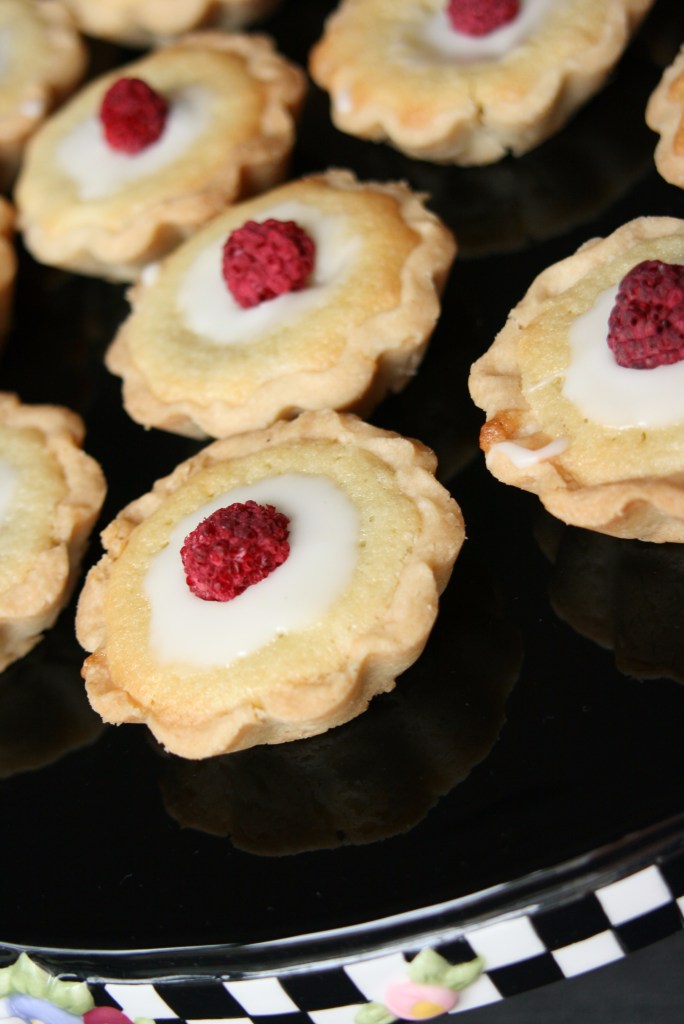
But once they were iced you could hardly notice.
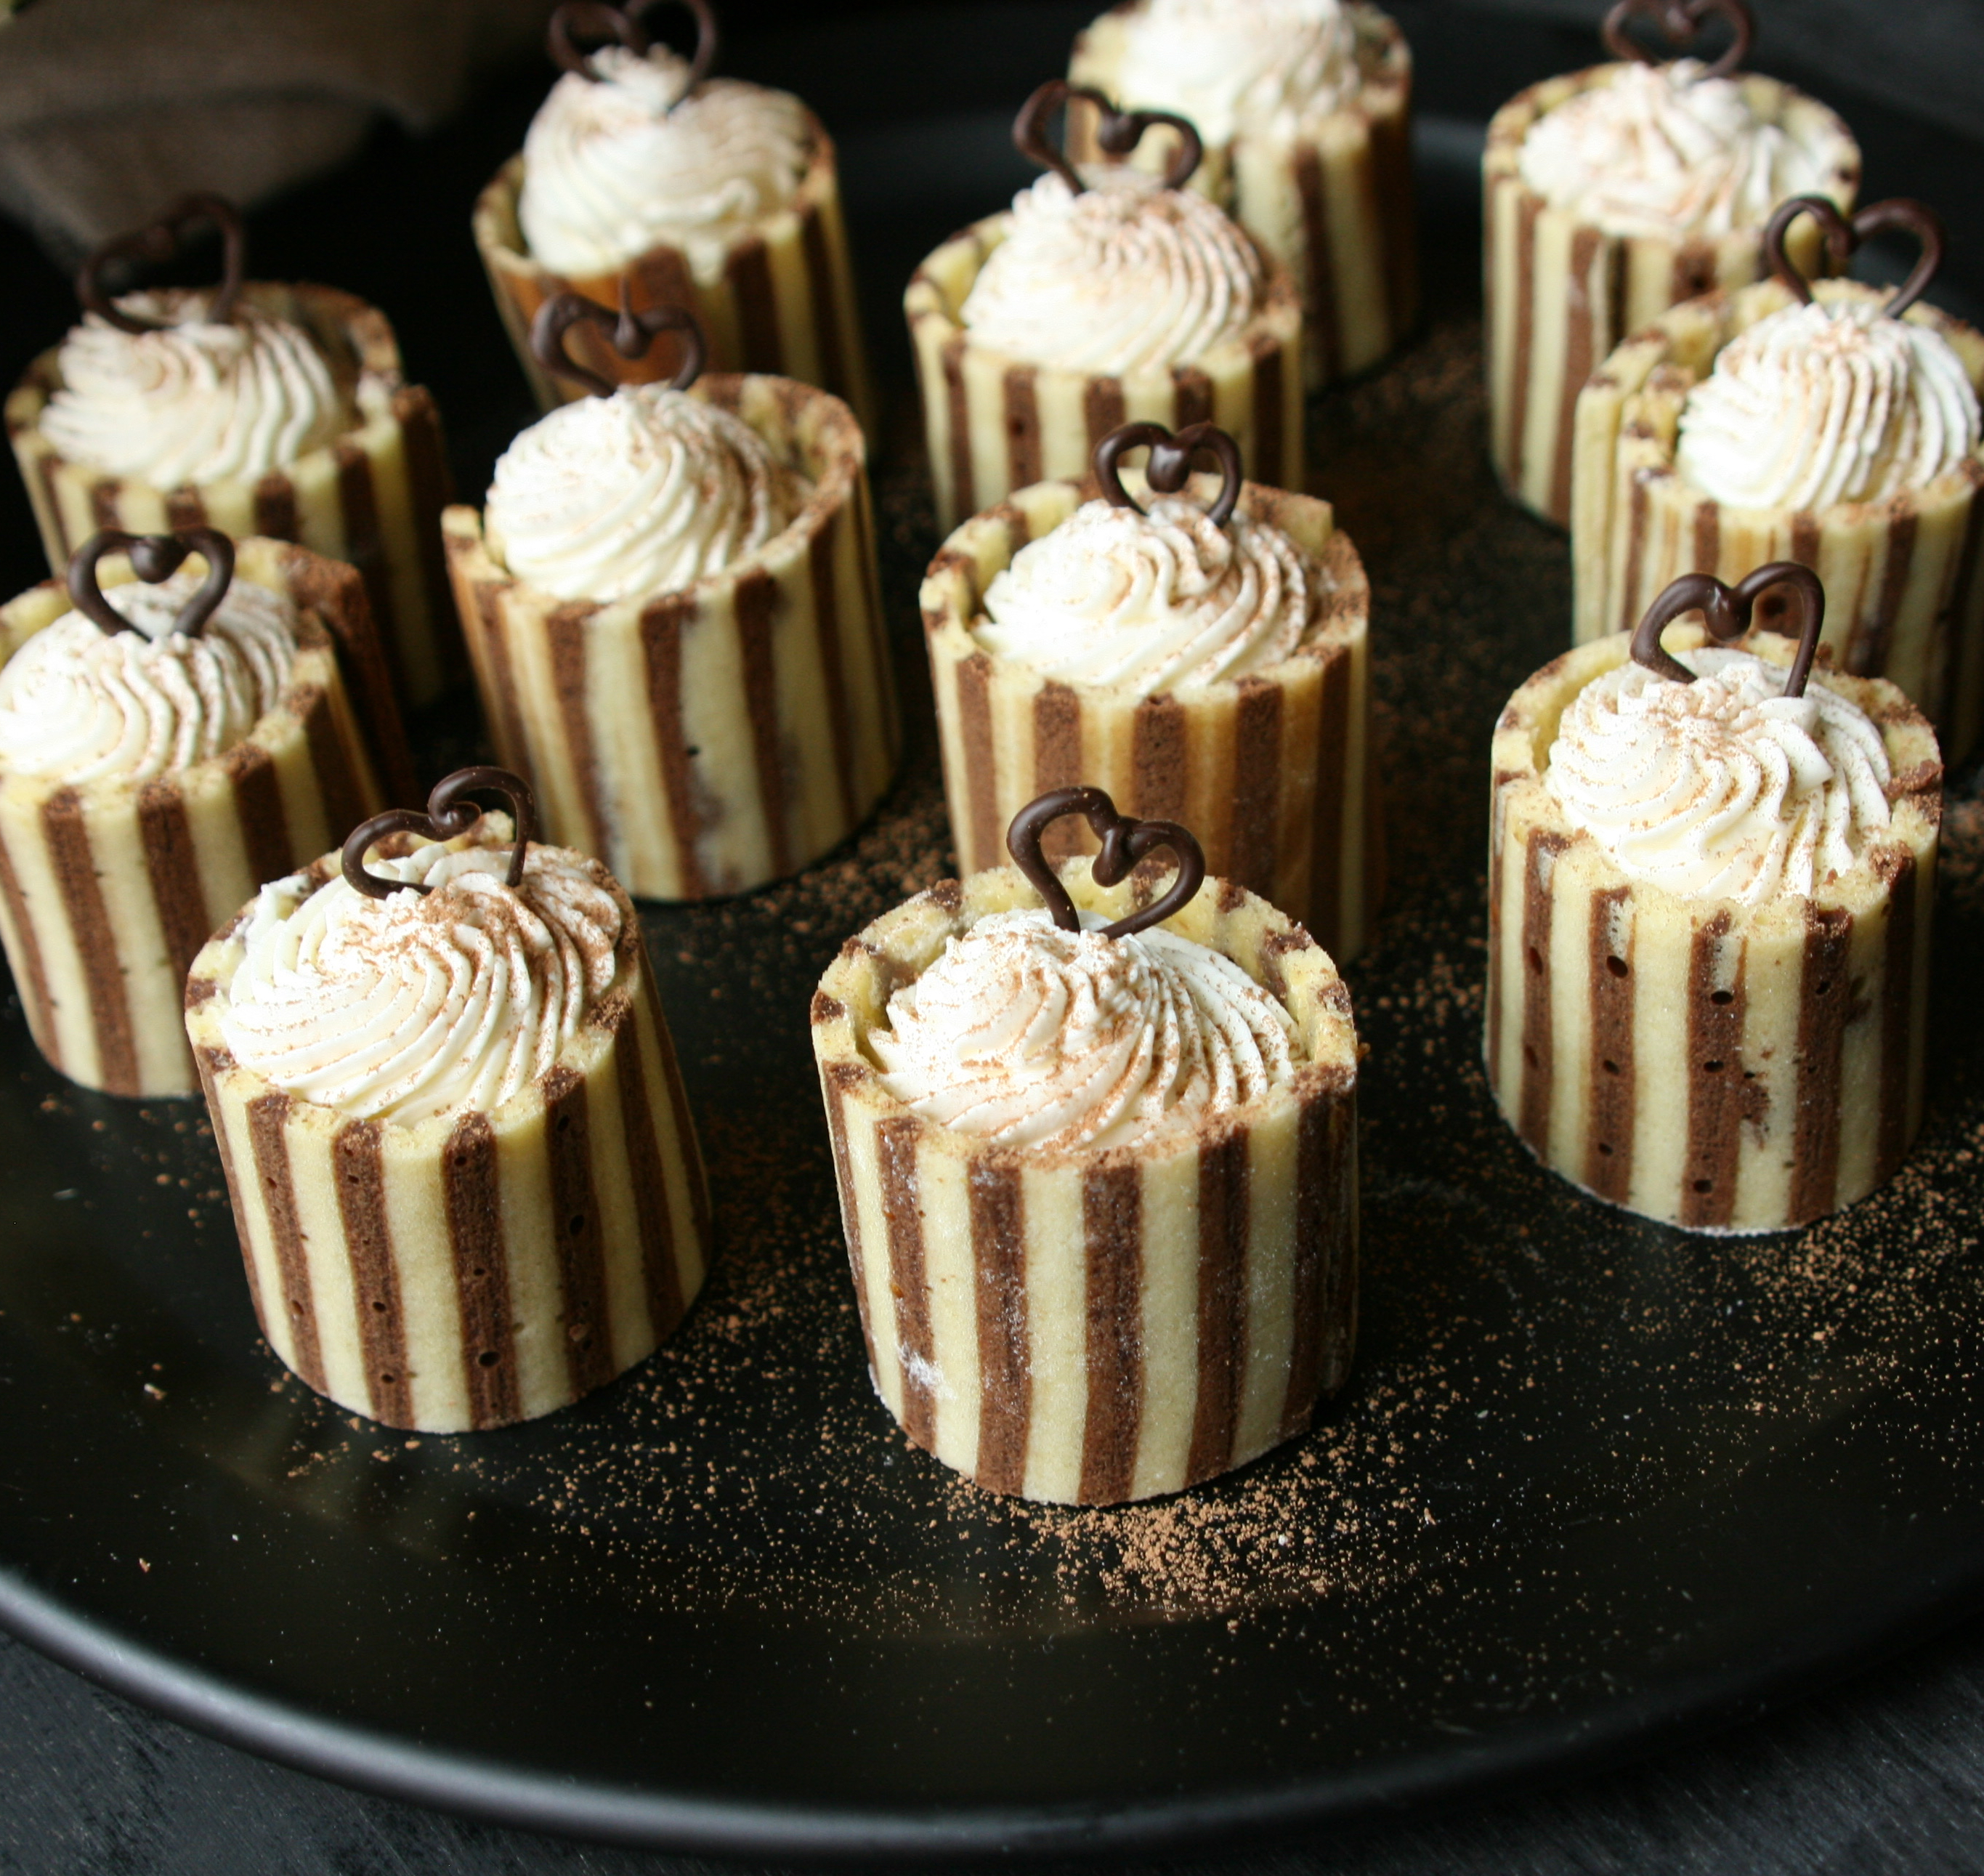
Petit Four No. 2 — Tiramisu Cakes
For my tiramisu cakes, I wanted to experiment with a joconde imprimé, or as I like to call it, a striped sponge! Actually an imprimé (French for “imprint”) can be any pattern that is baked into a joconde sponge, but since I’d never made one before, I figured I better start with something simple like a stripe. Besides, I found a pretty straightforward tutorial on how to make it here.
A joconde is a simple, fatless sponge that, because of its versatility, is used as a base for many desserts. It can be layered between buttercream and ganache to form the famous opera cake, or wrapped like a collar around mousse or custard for any number of different entremets. Apparently, it is held in such high esteem by pastry chefs in France that it was named after La Joconde, the French term of endearment for the Mona Lisa, da Vinci’s famous painting of Madam Lisa Giocondo, or La Gioconda in Italian.
I like the description given to this plain yet oh-so-adaptable sponge by Hannah on MilkAndHoneyTheBakery.com: “The Joconde serves as the wind beneath the wings of countless desserts and as such deserves the recognition and the appreciation of anyone who enjoys something sweet now and again.”
The basic method for a joconde imprimé is to start with what’s called a tuile paste made with flour, butter, powdered sugar and, in this case anyway, cocoa powder. It has the consistency of buttercream frosting so it can be piped or spread onto a baking sheet and then frozen before the joconde sponge batter is spread thinly over it. In so doing, the pattern created by the tuile paste remains intact underneath the sponge batter, so that once it’s baked and turned out of the pan, the pattern shows up on the top surface of the cake.
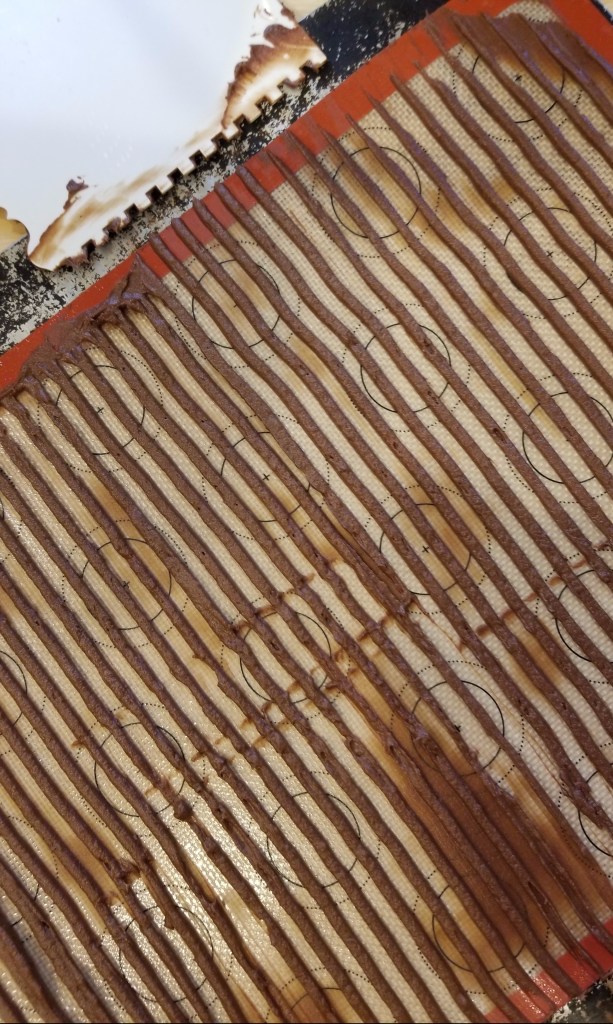
Use a cake decorating comb to create pattern on tuile paste. 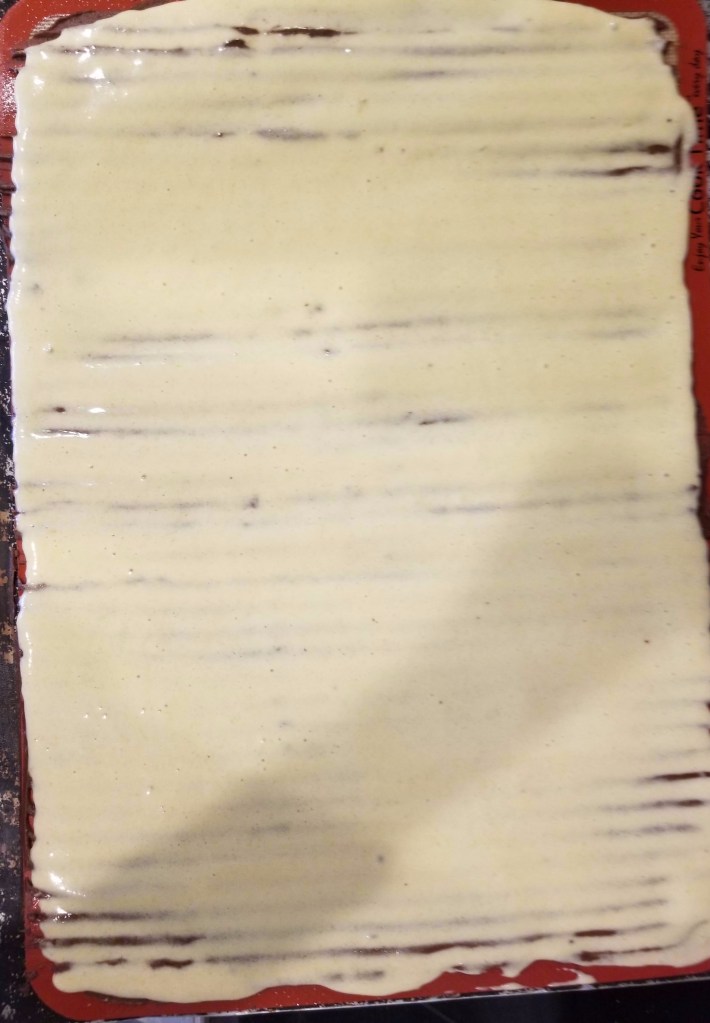
Spread joconde sponge batter over frozen tuile paste. 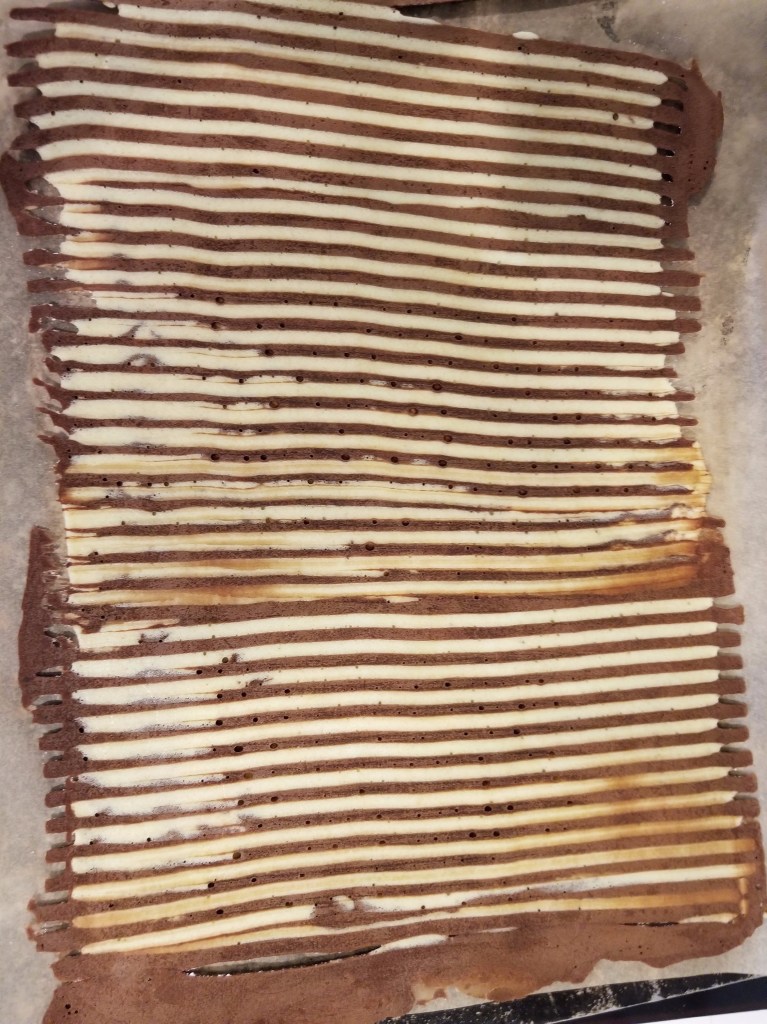
Once baked and overturned, the pattern appears on top.
For my tiramisu petits fours, I used a cake decorating comb and scraped it through the thin layer of tuile paste that I had spread onto a silicone baking mat on a cookie sheet to create a stripe pattern. After freezing it, I spread the joconde batter over the chocolate tuile stripes and baked it at 450°F for 5-7 minutes, just until it started to change color and bounced back when touched.
After removing it from the oven, I sprinkled the warm cake with flour and turned it over onto another cookie sheet lined with parchment paper, then carefully peeled back the silicone baking mat to reveal the pattern. It worked!
Because I had enough tuile paste and batter left over, I actually filled and baked two cookie sheets with the striped joconde, and another, smaller cookie sheet with just the chocolate paste, which I ended up cutting into round shapes to form the bottoms of my tiny cakes.
Through this process, I learned some important lessons: (1) When using a cake decorating comb to make stripes, make sure the cookie sheet you use is perfectly flat. The first batch I made was on a very old baking sheet that was somewhat warped, so I had to push down on the comb very hard to make sure the teeth of the comb went all the way through, leaving blank “stripes” where the sponge batter would fill in. (2) For very small cakes, like I was making, the thinner the sponge the better. My second batch came out thinner, so that’s the one I used to form my cakes.
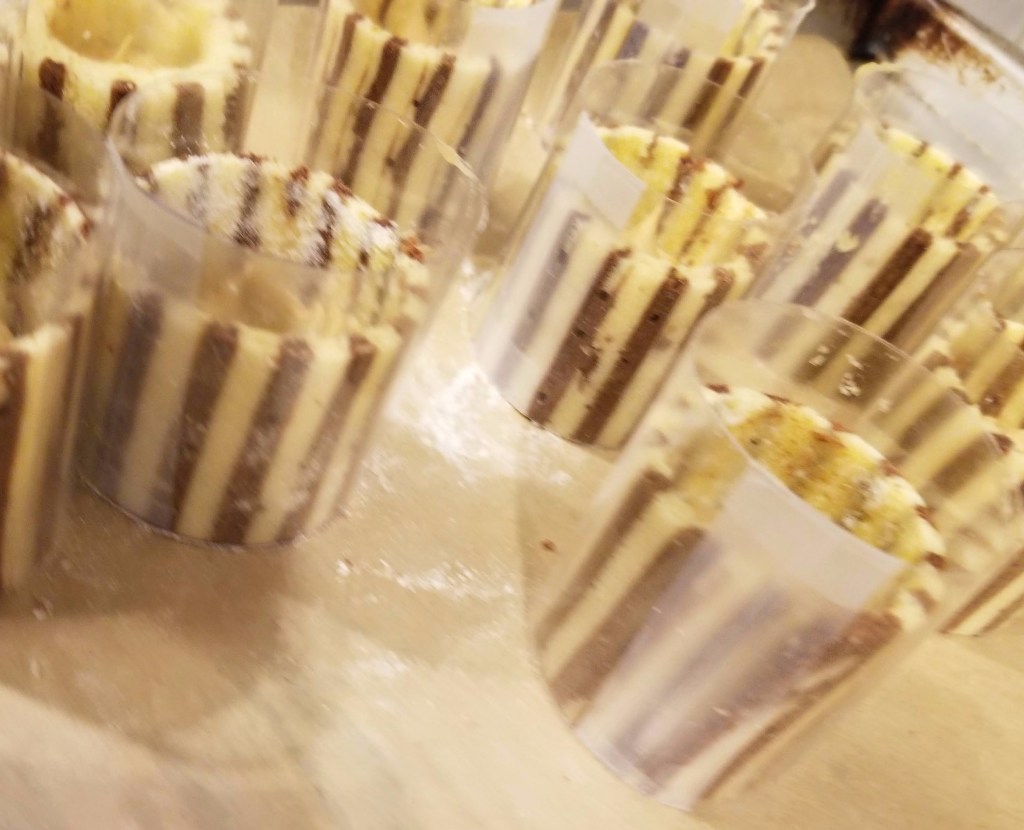
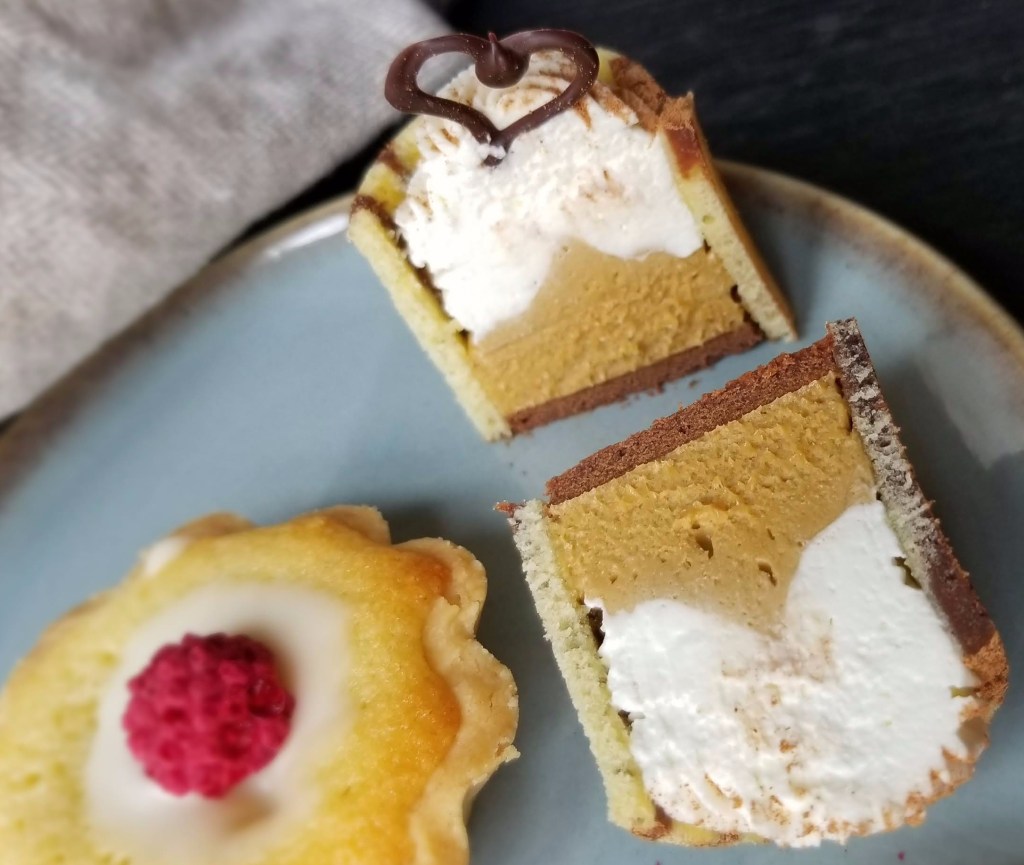
Because I don’t have individual-sized pans with removable bottoms, I made cylinders out of food-safe acetate as molds to form my cakes. When the sponge was completely cooled, I cut strips the same length as the circumference of these tubes and wrapped them around the inside of the cylinders. Then I cut circles out of the baked chocolate tuile paste the same size as the bottom of the cylinders (I had to trim them a bit with scissors to get them to fit inside the tubes of cake.) and pushed them down to the bottom of the cake tubes.
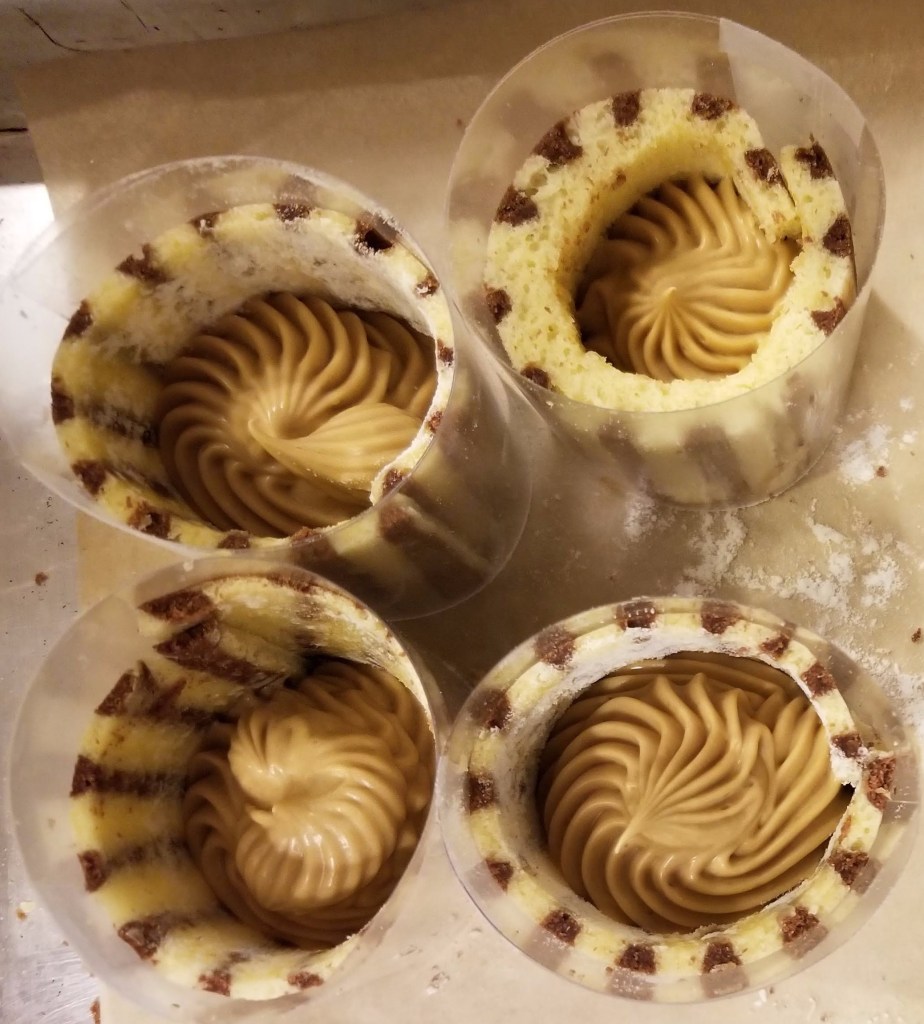
To fill my cylinders of cake, I started with the coffee buttercream, piping it about halfway up. I then stuck them in the fridge while I made a mascarpone whipped cream flavored with a little amaretto. I piped that on top of the buttercream all the way to the top. I garnished them with cocoa powder and tiny chocolate hearts.
My husband is not a big eater of sweets, but these were a big hit with him. He kept coming back for more, and at one point remarked that the coffee buttercream was just the perfect amount of coffee and sweetness for him. I also shared a few of these treats with some friends — while practicing proper social distancing, of course — and they enjoyed them immensely!
Mini Bakewell Tarts
Raspberry filling adapted from RoseBakes.com
Frangipane adapted from TheSpruceEats.com
Icing adapted from CrumbBlog.com
For the shortbread tart shells:
- 1 c. unsalted butter, softened
- ½ c. + 1 T. caster sugar
- 2 1/3 c. all-purpose flour
- 7 T. cornstarch
- 1½ t. almond extract
Directions
- Place butter and salt into a mixer bowl and, using a paddle attachment, mix on medium speed until creamy, about 2-4 minutes. Add sugar and almond extract and mix until well blended and the mixture is nice and creamy, about 1-2 minutes. Add flour and cornstarch and mix on low setting until the flour is mixed in and the dough forms clumps. DO NOT OVERMIX.
- Using floured hands or a spatula, bring the dough together to form a cohesive ball, then turn out onto a flat surface and flatten dough into a disc shape.
- Transfer the dough to a gallon-size ziplock bag, but don’t close the bag. On a flat, smooth surface, use a rolling pin to gently roll the dough into the corners of the bag, maintaining an even thickness, to form a rectangle about 10½ x 9 inches and about ½ inch thick. Keeping the bag open will allow excess air to escape so you can roll the dough out without the bag exploding.
- Once the dough is ½-inch thick, seal the bag and place it on a baking sheet in the refrigerator. Leave to chill for 30-60 minutes, or until the dough is firm.
- Carefully remove the dough from the bag. (I ended up cutting the bag open along the side seam.) Place flattened dough on parchment paper on a smooth surface, and cut the dough in half. Place one half of the dough back in the refrigerator while working with the other half. Roll to a thickness of about ¼ inch. Then, using a round cookie cutter (mine was 2½ inches in diameter), cut 6 circles (or as many as you can get) and transfer each to a small tart mold (mine were 1¾-inch diameter at the base), pressing gently into the bottom of the mold with your fingers or a tart press. If the dough cracks, press the cracks together with your finger, or press a small piece of dough into the crack.
- Repeat with the other half of the dough to get a total of 12 tart shells. If you have to, you can reroll the scraps to cut out more circles, but try not to work the dough too much or it will become tough and chewy. Any leftover dough can be refrigerated or frozen for later use, or just bake the scraps and eat with tea or coffee for a midafternoon snack!
- Before baking the tart shells, use a fork or toothpick to prick the bottom and sides of each shell. Place them on a cookie sheet and refrigerate for another 30-60 minutes, until well chilled and stiff.
- Preheat oven to 400°F. Place a piece of foil inside each tart shell and fill with dried beans or rice. Blind bake shells for 7 minutes or until the foil comes away from the pastry dough without sticking. After removing the foil and beans from the partially baked shells, return to the oven for another 4-5 minutes or until they are light golden-brown and completely dry. Remove shells from baking sheet to a cooling rack, and allow to cool while you make the filling.
For the raspberry filling:
- 1 c. frozen raspberries
- 3 T. sugar
- 2 T. water, divided
- ½ t. lemon juice
- 2½ t. cornstarch
Directions
- Combine raspberries, sugar, 1 tablespoon water and lemon juice in a small pan over medium-high heat, and bring to a boil. Reduce heat to medium-low and simmer until berries break apart and juice is reduced, about 10-15 minutes.
- Remove pan from heat and pour juice and berries into a sieve, pressing them through with a silicone spatula to get as much juice and pulp as possible while straining out the seeds. Scrape the underside of the sieve to get all of the pulp off. Pour juice and pulp back into the pan.
- In a small bowl, mix together cornstarch and remaining 1 tablespoon water until dissolved. Then whisk it into the raspberry mixture. Bring mixture to a boil again, stirring constantly to prevent sticking and scorching. Turn the heat down and continue cooking until the mixture is thickened, about 5 minutes. Cool in the refrigerator for about 30 minutes.
For the frangipane:
- 3 T. butter, softened
- ¼ c. sugar
- ½ c. ground almond meal
- 1 egg
- ¾ t. almond extract
- 1 T. all-purpose flour
Directions
- Place butter and sugar in the bowl of a stand mixer and cream together. Add the almond meal and mix to combine. Then add the egg and almond extract, gently beating together until all ingredients are combined. Add flour and mix together until well mixed.
For assembling, baking and topping:
- ¾ c. powdered sugar
- 1 T. amaretto liqueur (or more)
- 12 fresh or freeze-dried raspberries
Directions
- When tart shells are cool, heat oven to 325°F. Spoon ½-1 teaspoon of jam into the bottom of each, then top with frangipane, smoothing the tops. Bake for 18-20 minutes or until the filling is puffed and golden. Remove to wire rack, and cool completely before icing.
- Once tarts are cooled, whisk together powdered sugar and amaretto (or you could use 1 T. water and ¼ t. almond extract), adding more liquid 1 teaspoon at a time until it’s reached the consistency of a thick glaze. Spread a layer of icing onto the cooled tarts and top with a raspberry.
Tiny Tiramisu Cakes
Coffee buttercream adapted from LittleFrenchBakery.com and SeriousEats.com
For the tuile paste:
- ¾ c. sifted cake flour*
- ½ c. sifted unsweetened cocoa powder*
- ½ c. butter, softened
- 1¼ c. sifted powdered sugar*
- 4 egg whites, room temperature
- ½ t. almond extract
Directions
- *Make sure the dry ingredients are sifted first before measuring.
- Combine cocoa powder and cake flour together and sift into a small bowl; set aside. In a mixing bowl, using a paddle attachment, cream butter and powdered sugar together on medium speed. Lower speed to medium-low and and add egg whites, one at a time, scraping bowl in between additions. Add almond extract and then the flour and cocoa powder mixture, mixing just until combined.
- Place silicone baking mat on a flat cookie sheet. Spread a thin layer of tuile paste evenly to 1/16th of an inch thick. Run decorating comb through the paste to achieve the desired pattern (straight, diagonal or curvy). (You will have enough paste left over to fill one or two more cookie sheets. I made two cookie sheets with stripes and one solid to use as the base of my cakes.) Put baking mats and cookie sheets in the freezer until firm, about 20 minutes.
For the joconde sponge:
- 2/3 c. blanched, finely ground almonds
- ½ c. + 1 T. powdered sugar
- 1/3 c. + 2 T. bread flour, plus more for dusting
- 3 eggs
- 1 egg yolk
- 2 egg whites
- 2 T. sugar
- 2 T. unsalted butter, melted
Directions
- Place almond meal, powdered sugar and bread flour into a mixing bowl and, using paddle attachment, mix on high for 1-2 minutes. Add whole eggs and mix on high for another 5 minutes. Lower speed to medium and add the egg yolk, mixing until combined. Set aside.
- Change mixer attachment to whisk and, in a clean bowl, whip egg whites and sugar just until soft peaks form. Fold half of beaten egg whites into egg yolk mixture. Stir melted butter into egg yolk mixture and then fold in remaining egg whites.
- Preheat oven to 450°F. Remove cookie sheets from freezer and spread sponge batter evenly over the top, as thin as possible. Repeat with second cookie sheet, if desired. Bake for about 5 minutes, or until the sponge is just starting to brown slightly. Remove from oven and allow to cool for about 5 minutes. Dust top of sponge lightly with flour and invert onto a baking sheet lined with parchment paper. Cool completely.
- Cut 12 food-grade acetate strips 1½ inch wide by 8 inches long. Roll into tubes, overlapping the ends of the strips by 1 inch, and seal with tape on the outside. Cut 12 strips of the striped joconde sponge 1½ inch wide by 7 inches long. Roll up and insert into the acetate tubes. Cut 12 circles out of the baked chocolate tuile paste to fit inside the cylinders of cake. Push them down to the bottom of each cylinder, trimming as needed.
For the coffee buttercream:
- ¾ c. + 2 T. water
- 4 oz. (scant 2 c.) instant espresso or coffee crystals
- 1 3/8 c. sugar, divided
- 5 egg yolks
- 1 T. brandy (or coffee or water)
- ¾ c. vanilla extract
- ¼ t. kosher salt
- 8 oz. (2 sticks) unsalted butter, softened to room temperature (about 65°F)
Directions
- First, make the French coffee extract by dissolving the instant coffee in the water in a small saucepan and bringing it to a boil. In another saucepan, add 1 cup of sugar and heat it until the sugar dissolves and turns a dark amber color. When the sugar is the right color, slowly pour in the hot coffee. It will bubble and sputter, so be careful to protect your hands and fingers. Stir until all the caramel dissolves. Cool and store in the refrigerator. (You won’t need all of it for this batch, but this recipe is so yummy you’ll want to make it again!)
- For the buttercream, in a heatproof mixer bowl, combine egg yolks with 3/8 cup sugar, brandy (or other liquid), vanilla and salt. Whisk until completely blended together.
- Find a saucepan that will hold 1½ inches of water and will support the bowl without the bowl touching the surface of the water. Alternatively, use a ring of crumpled aluminum foil in the bottom of the pan to keep the bowl above the water’s surface. Place the pan of water over high heat until steaming; then adjust the heat to maintain a gentle simmer.
- Place the bowl of egg yolk mixture over the simmering pan of water, stirring and scraping the egg yolk syrup constantly with a flexible spatula until the mixture reaches 155°F. This should only take about 5 minutes; if it seems to be taking too long, simply turn up the heat.
- Transfer the bowl to a stand mixer fitted with a whisk attachment and whisk at high speed until mixture is fluffy and stiff and beginning to ball up around the whisk—about 8 minutes. By this time the bottom of the bowl should be cool to the touch.
- With the mixer still running, add butter, 1-2 tablespoons at a time, waiting only a second or two between additions. This should result in a thick, creamy and spreadable texture. If the mixture seems to break apart, keep mixing; it will come back together.
- Add 1 tablespoon of the coffee extract and mix well. Taste to see if the coffee flavor is rich enough. If not, add another tablespoon or more, to taste. The buttercream should be a creamy coffee color with a nice coffee flavor.
- Fit a piping bag with a plain tip and fill with coffee buttercream. Fill each cake tube halfway with buttercream. Place in refrigerator to chill while making the mascarpone cream. NOTE: Leftover buttercream can be refrigerated for up to two weeks or frozen for up to two months. To reuse, rewarm to room temperature and rewhip before using.
For the mascarpone cream:
- ½ c. (4 oz.) mascarpone cheese
- ¼ c. powdered sugar
- 1 c. heavy cream
- 1 t. amaretto liqueur (optional)
Directions
- Using mixer fitted with whisk attachment, whisk mascarpone until light and fluffy. Add powdered sugar and whisk until fully incorporated. Pour in cream and liqueur (if using) and, starting on low speed and gradually increasing, whisk until stiff peaks form. Fit a piping bag with a star tip and fill with mascarpone cream. Remove cakes from refrigerator and fill to the top with mascarpone cream. Refrigerate while making garnish.
For garnish and assembly:
- ¼ c. chopped chocolate
- 1-2 T. cocoa powder
Directions
- In microwave-safe bowl, melt chocolate in microwave on low power for 30 second intervals, stirring each time, until chocolate is completely melted. Transfer melted chocolate to a piping bag fitted with a small plain tip or to a ziplock bag. If using a ziplock bag, cut a tiny hole in one corner and push the chocolate into that corner. Pipe 12 small hearts or other designs onto parchment or waxed paper. Allow to set.
- Sprinkle cocoa powder on top of each cake. Gently peel chocolate decorations off of parchment paper and stick one into the mascarpone cream on each of the cakes. Refrigerate until ready to serve.
Discover more from Here's the Dish
Subscribe to get the latest posts sent to your email.

Everything looks perfectly made and delicious.
LikeLiked by 1 person
Thank you!
LikeLike