
Vol au vent means “flying in the wind” in French. As with much of French gastronomy, the history of vol-au-vents is intertwined with other, similar pastries, such as the bouchée à la reine and the puits d’amour. What they all have in common is that they are hollow shells, simply vessels if you will, created to hold all sorts of esculent delights.

The puits d’amour seem to have come first, as they are mentioned in a 1735 cookbook by Vincent La Chapelle, famous chef who at one time was in the employ of Madame de Pompadour, the favorite mistress of King Louis XV. These were made with a disc of puff pastry topped by a ring of choux pastry, then baked to golden perfection and filled, traditionally with redcurrant jelly, raspberry jam and/or pastry cream.
Perhaps out of jealousy, Louis XV’s wife, Marie Leczinska, commissioned her own pastry chef, Nicolas Stohrer, to create a dish with aphrodisiac properties to regain his ardor. This became bouchée à la reine — “the queen’s morsel.” The original recipe consisted of puff pastry garnished with a mixture of vegetables, fish or meat, specifically mentioning such delicacies as sweetbreads (a calf’s pancreas), lamb testicles, cock’s crest and kidneys. While it didn’t have the desired effect on her husband, bouchée à la reine did become quite a hit and is still popular today, although more likely to be filled with seafood or chicken and mushrooms in a thick sauce.
The vol-au-vents came along a few years later. Although they are generally attributed to Antonin Carême in the early 1800s, there is a recipe for “petits gâteaux vole au vent” in a 1739 cookbook by François Marin. However, Carême is known for developing a lighter, crispier puff pastry, so he gets credit for popularizing these tasty tidbits.

Vol-au-vents have shrunk over the years, from their original size of 6 to 8 inches to 4 or even 2 inches. They were especially popular in the 1970s and ‘80s at cocktail parties, where they served as appetizers with fillings like chicken and mushrooms, shrimp salad or beouf bourguignon.
These delicate shells are made of puff pastry. Most recipes for vol-au-vents that you’ll find online simply call for using frozen puff pastry dough, but of course the Bake-Off judges required the bakers in the Great White Tent to make theirs from scratch.
To make a vol-au-vent, you simply cut out two discs of pastry dough, then you cut a smaller circle out of the center of one of the discs to form a ring. You brush the solid disc with egg yolk and place the ring on top, then bake it. The dough will rise, forming a small hollow cylinder of flaky pastry ready to be filled with whatever strikes your fancy.

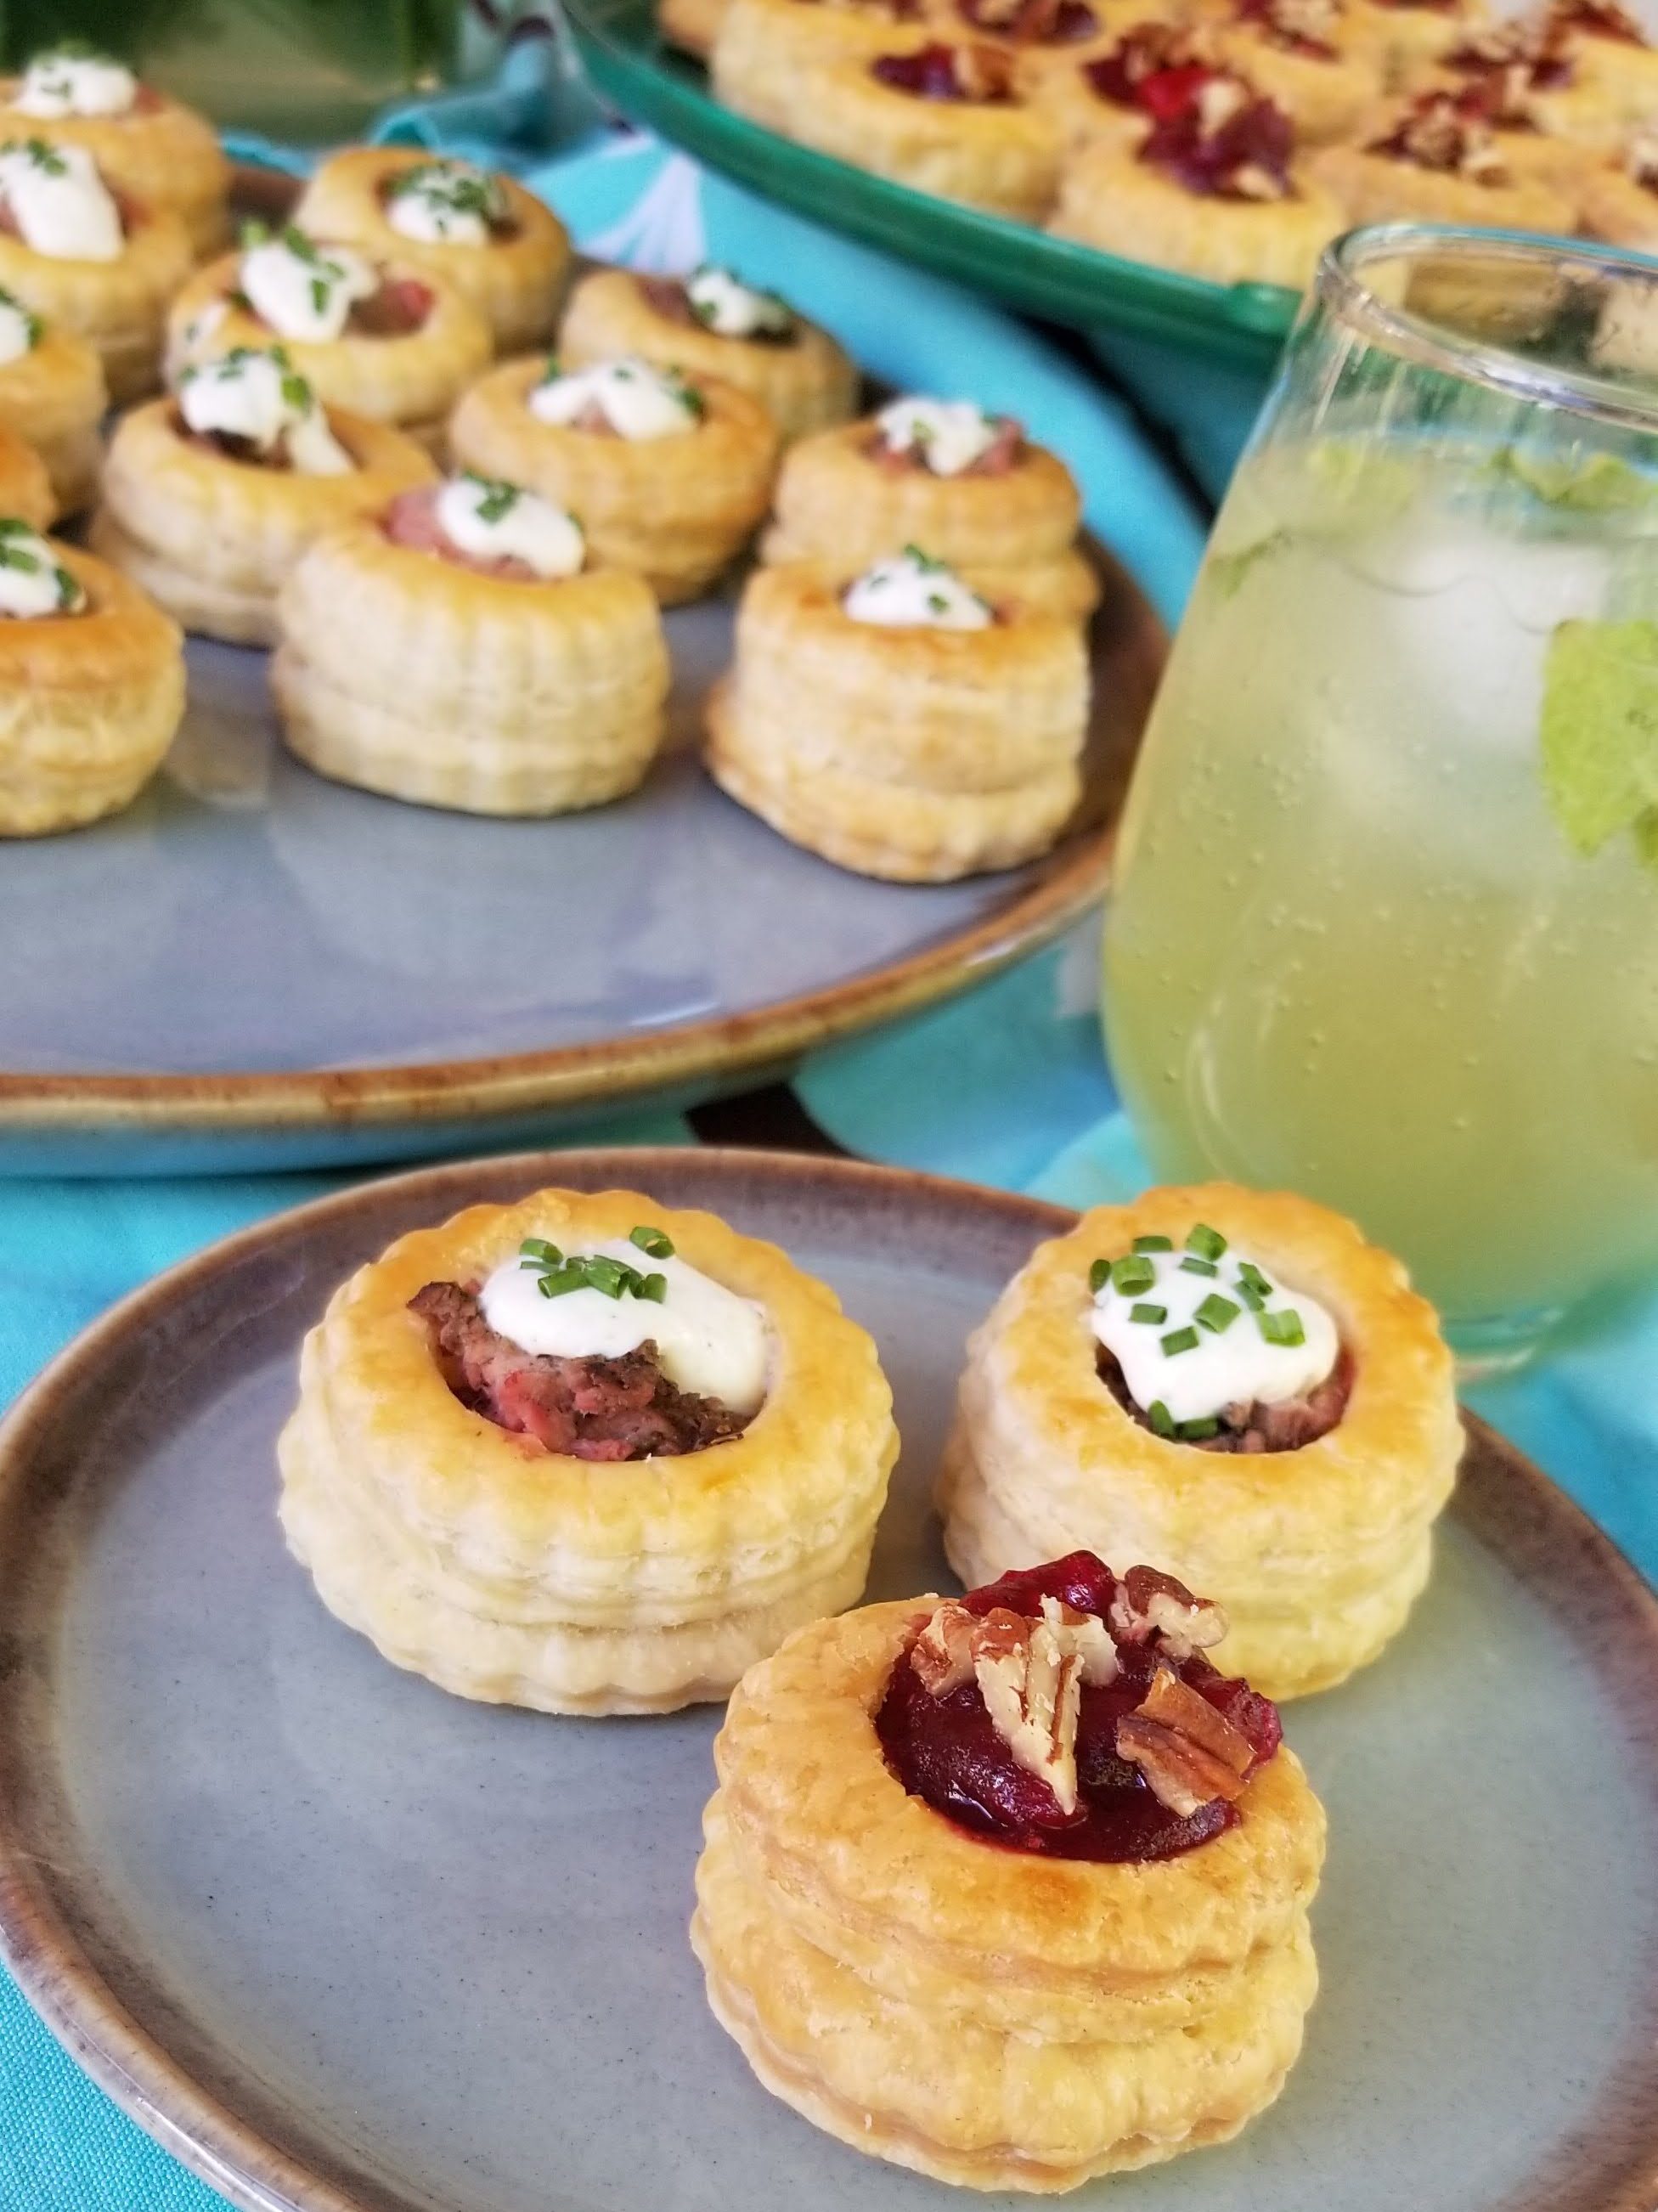
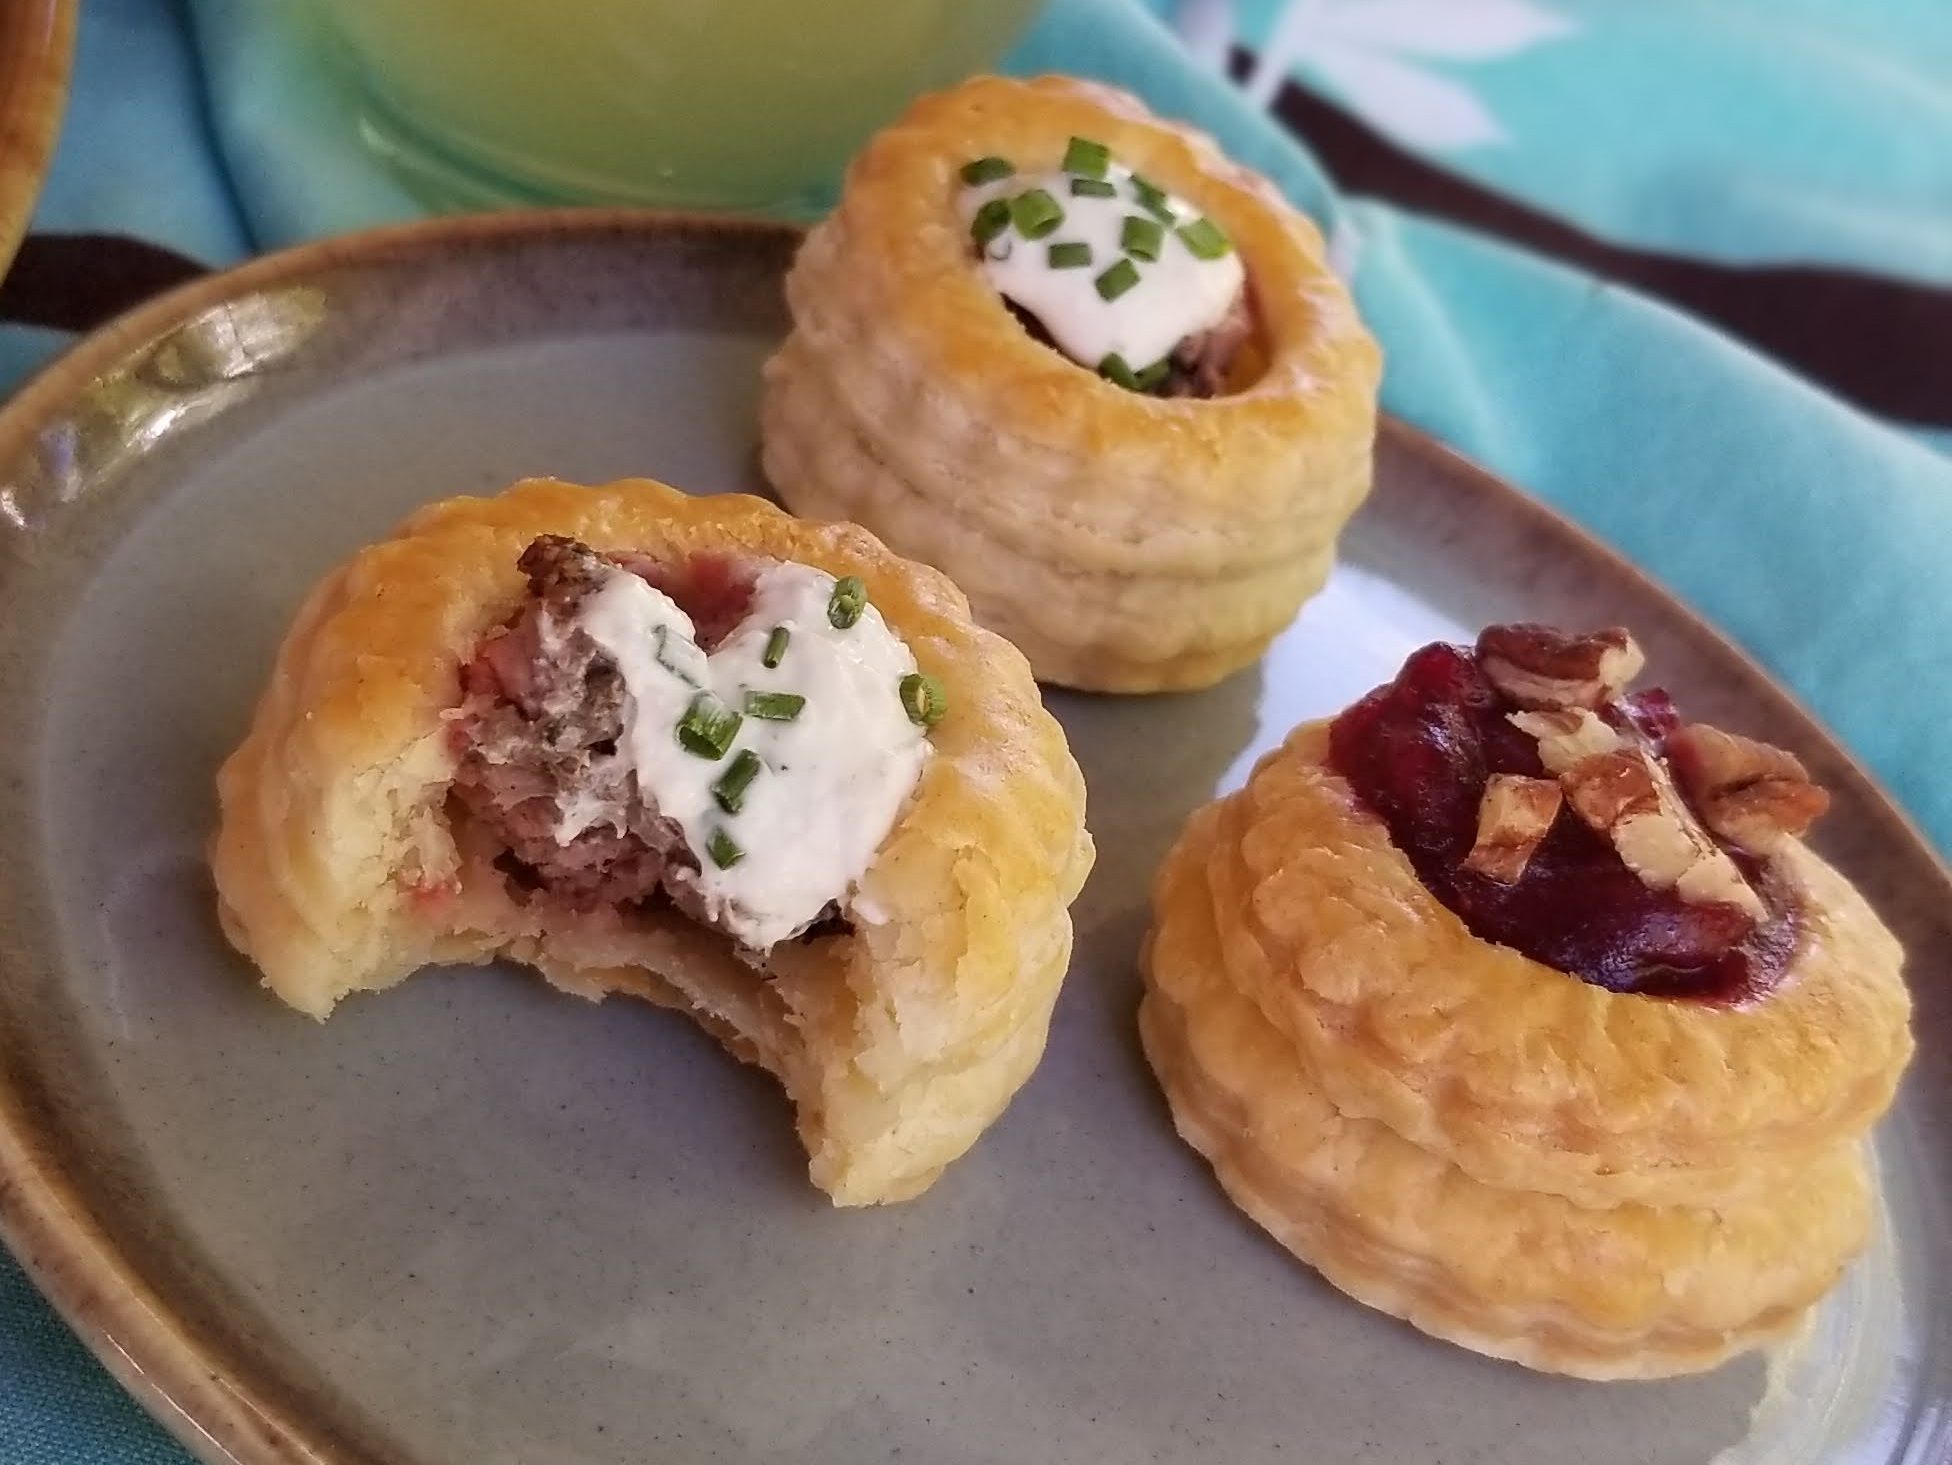
The brief for this challenge was to make 48 vol-au-vents with two types of fillings, so 24 each. For my first filling, I took as my inspiration Beef Wellington, but instead of the mushroom duxelles I opted for a simple horseradish sauce. It reminded me of the beef tenderloins served at the corporate Christmas parties I used to attend with my husband. My second filling also stemmed from a holiday tradition — usually New Year’s Eve — when I generally make brie en croute with cranberry chutney.
After watching the successes and failures of the GBBO contestants as they made these showstopper pastries — and doing a bit of trial-and-error research myself — here’s what I learned:
- After rolling out the puff pastry, cut out the tops first. You can use the leftover scraps of dough, smooshed all together and rolled out again, for the bottoms. I know what you’re thinking — you won’t get those nice even layers! But the bottoms don’t really need to rise — they simply form the base of the vol-au-vent. It’s even recommended that you dock the bottom with a fork or toothpick to deter it from rising.
- When cutting out the tops, don’t twist the cutter. A straight, even cut will produce a straight, more even rise.
- Following Mat’s cue, I cut out the inner circles of the top portions of my vol-au-vents but left them in place while they baked. Although this adds the rather putzy step of having to carefully remove the circles after baking, I believe it also helps the vol-au-vents rise straight and evenly. Mat may have been the only baker who did this, but you’ll remember that his vol-au-vents were deemed perfect by the judges.
- Ian and Flora used two different methods when baking their vol-au-vents. Ian placed a cooling rack over his baking tray, supported by small jars or tins about 2 inches high. He said the purpose of the rack was to prevent the vol-au-vents from rising too high. Flora, on the other hand, placed a silicone mat directly on top of her vol-au-vents, which she said would help them rise more evenly. I tried both methods. The cooling rack made no difference at all because my vol-au-vents didn’t rise that high, and I felt the silicone mat, while it may have helped keep the vol-au-vents all the same height, kept them from rising to their full potential. In the end, I wouldn’t recommend either method.


While making puff pastry is time-consuming, I find it relaxing and rather therapeutic. Although the process of cutting out, forming, baking and then filling the vol-au-vents can seem fastidious, these elegant morsels can make an impressive complement to a cocktail reception, be served as hors d’oeuvres at a fancy dinner party or even become the inspiration for an entire meal of small plates. The types of fillings are only limited by your imagination.
Vol-au-Vent Shells
Ingredients
- Measure 4 cups of flour and 2 teaspoons salt into a large bowl and stir to mix. Add the chilled butter and blend it into the flour with a pastry cutter or your fingers until the mixture looks like coarse meal. Add the cold water and stir briskly with a fork until a rough dough forms and pulls away from the side of the bowl. (If necessary, you can add more cold water, one tablespoon at a time.)
- Knead the dough on a floured surface for two or three minutes until smooth, adding more flour if necessary to keep the dough from sticking. Wrap dough in plastic wrap and chill for 30 minutes.
- While the dough is chilling, mix the softened butter with the ½ cup of flour until well-combined. Transfer the butter-flour mixture to a large piece of plastic wrap. Cover with another piece of plastic wrap. With your hands or a rolling pin, flatten and shape the butter into a square or rectangle about ¾-inch thick. Put it in the fridge to firm up.
- After the dough has chilled for 30 minutes, remove it from the fridge. On a lightly floured surface, roll it out enough so that it will cover the butter when folded over. Set the chilled butter slab in the center of the dough, and fold the edges in around the butter to enclose it completely. Press the edges together to join them.
- The dough encompassing the butter must now be rolled out and folded six times. Depending on how warm your kitchen is, you’ll need to chill it between each folding (called a “turn”) or after every two turns. This is to prevent the butter from becoming so soft that it oozes out while you work the dough.
- Lightly flour the work surface. With the rolling pin, hit or firmly tap the dough (and enclosed butter) into a rectangle. Once the rectangle has taken shape and the butter has softened a bit, roll the dough to shape it into an elongated rectangle about ¼-inch thick. Rotate the dough several times while you roll it, and dust the work surface with more flour as needed to prevent the dough from sticking.
- Straighten the edges of the rectangle with your hands. Then fold the rectangle into thirds, like you would a letter — folding one short side in a third of the way, then folding the opposite side over it to form three layers. Brush off any excess flour as you fold, and align the edges as neatly as possible. This is the first turn.
- If the butter hasn’t started oozing out, proceed to the second turn. Otherwise, wrap the dough in plastic wrap and chill it in the fridge for 20-30 minutes.
- For the second turn, reposition the dough a quarter turn and roll it into another rectangle about ¼-inch thick. Again, rotate the dough several times as you work, and flour your surface as needed. Straighten the edges and fold into thirds again, brushing off any excess flour and aligning the edges. This completes the second turn. Wrap it in plastic and chill it for 20-30 minutes.
- Repeat the rolling and folding four more times, for a total of six turns, chilling the dough between every one or two turns, as needed. (Do not complete more than two turns without chilling the dough in between.) It might help to mark the plastic wrap with hashmarks or 1, 2, 3, etc. so you remember which turn you’re on. (Note of caution: Be careful if using Sharpie. It can easily rub off of the plastic wrap onto your hands or the dough!)
- When all six turns have been completed, wrap the dough and chill it for an hour or two before using. (It will keep in the fridge for two days.) Before rolling it out, divide it in half and keep one half in the fridge while you work with the other half. This will keep it from getting too soft.
- To form the vol-au-vents, roll half the dough out to ¼-inch thick. Using a 2-inch round or fluted cutter, cut out 24 discs. Transfer them to baking sheets lined with parchment. Using a 1-inch round cutter, cut a circle in the center of each disc, but don’t remove the center circle. Place baking sheets in the fridge to keep the first 24 discs chilled while you repeat with the other half of the dough.
- Gather the scraps of pastry into a ball, wrap in plastic and chill it for 15-30 minutes, then roll it out again to ¼-inch thick. Cut out 48 more 2-inch discs. Transfer them to baking sheets lined with parchment and dock them with a fork or toothpick. Place them in the fridge for 15-20 minutes.
- Beat the egg yolk with 1 t. water. Remove one baking sheet of whole discs and one baking sheet of discs with circles cut out of them from the fridge. Brush each of the whole discs with a little egg wash, being careful not to let the egg drip down the sides, and then place one of the discs with the circle cut out on top, leaving the center circle of dough in place. Brush the tops with a little more egg wash, again being careful not to let any get on the sides. Place them back in the refrigerator for at least 2 hours or overnight. Repeat with the rest of the discs.
- When ready to bake, preheat oven to 400˚F. Remove pastries from fridge and brush the tops with a little more egg wash. Bake for 15-17 minutes, rotating baking sheets halfway through to promote even browning. When pastry shells are lightly browned, remove from oven and let cool slightly. Then, using a sharp knife, gently remove the center circles from the tops. If the insides are doughy, put the pastry shells back in the oven for 4-5 minutes to help them dry out. Transfer shells to cooling racks and cool completely before filling.
Directions
Beef Tenderloin Vol-au-Vents with Horseradish Sauce
Credit for sauce: NatashasKitchen.com
For the beef:
For the horseradish sauce:
- NOTE: You will not need all of the meat for 24 vol-au-vents, but it’s hard to roast a tenderloin smaller than 2 pounds without overcooking it, so plan on having an elegant meal with the rest of the beef!
- Remove beef tenderloin from refrigerator one hour before roasting. Preheat oven to 325˚F. In a small mixing bowl, combine the oregano, dried thyme, dried rosemary, garlic powder, salt and pepper. Coat the tenderloin with the herb mixture.
- Heat an oven-proof skillet over high heat and add the olive oil once the skillet is hot. To the hot oil, add the tenderloin, and sear each side for 3-4 minutes or until golden brown.
- Add butter, garlic, fresh rosemary and thyme sprigs to the skillet. Once the butter has melted, spoon it over the tenderloin.
- Place the skillet in the oven, and roast the meat for 30 minutes or until the internal temperature reaches 135˚F to 140˚F.
- While the beef is cooking, make the sauce: Stir all ingredients together. Taste and adjust seasonings as desired.
- When meat is done, remove from oven; transfer to a cutting board and tent with foil. Let rest for 15 to 20 minutes before cutting. Slice thinly.
- To assemble vol-au-vents, fill each with thin slices of beef. Top with horseradish sauce and garnish with chives. Serve at room temperature.
Directions
*Ask your butcher to trim and tie the tenderloin for you when you purchase it. (I called ahead and asked them to have it prepared for me when I arrived.)
Brie & Cranberry Vol-au-Vents
For the chutney:
- ¼ c. water
- 3 T. sugar
- 3 oz. fresh cranberries
- ¼ c. apple, peeled, cored and diced
- 2 T. cider vinegar
- 2 T. raisins
- 1/8 t. cinnamon
- 1/8 t. ginger
- 1/8 t. allspice
- 1/8 t. cloves
For the brie:
- 6 oz. brie, cut into ½-inch cubes
- 2/3 c. cranberry chutney
- ½ c. chopped pecans
Directions
- To make the chutney, in a medium saucepan, combine water and sugar. Bring to a boil over medium heat. Add cranberries, apples, vinegar, raisins and spices. Bring to a boil, then simmer gently for 10 minutes, stirring often. When the cranberries soften, press them against the side of the pan with a spoon until they pop. This will release the juices.
- Pour mixture into a mixing bowl. Place plastic wrap directly onto the surface of the sauce. Cool to room temperature.
- To assemble the vol-au-vents, insert 2-3 cubes of brie into each pastry shell. Preheat oven to 350˚F. Pop vol-au-vents back in the oven and bake for about 10 minutes, until the cheese has melted. Top with a teaspoon or two of chutney and ½ teaspoon chopped pecans. Allow to cool slightly before serving.
Up next: Raised Game Pie
Discover more from Here's the Dish
Subscribe to get the latest posts sent to your email.

Well done!
LikeLiked by 1 person
Stunning and elegant!
LikeLiked by 1 person
Thank you!
LikeLiked by 1 person