
I may never go back.
I’d never made English muffins before. I’d never even tasted a homemade English muffin before. I had no idea how yummy they are! There really is no comparison to the flat, dry, almost tasteless English muffins you find in the refrigerator section of the grocery store. These are tender, light and chewy, with multitudes of those “nooks and crannies” which that brand-name English muffin always promises.
And why not? It’s Paul Hollywood’s recipe, after all, because this was the technical challenge for bread week in the Great White Tent. Paul and Mary were looking for a chewy texture with a soft crumb, light air holes and an even bake.

While English muffins are fairly simple to make, they do take time. The key to a good flavor and lots of little holes inside is a long, slow rise. Some recipes call for letting the dough rise in the refrigerator for up to four days, especially if you like that sourdough flavor. Even Paul says, in the Masterclass episode (season 2, episode 1 on Netflix) of The Great British Bake Off where he demonstrates his English muffin recipe, “The flavor comes from the proving of the dough itself.”


It begins with an enriched dough, which starts out sticky, but once it’s been kneaded for awhile becomes smooth and silky. Then it’s allowed to rise before being rolled out and cut into inch-thick circles. After that, the muffins are proved again before being baked on a griddle or heavy frying pan till browned on both sides.
The main difficulty I had was in getting eight muffins out of the dough. I used a 3.5-inch-diameter cutter like the recipe stipulated, but I must have rolled my dough too thick, so I rerolled it and used a slightly smaller cutter, but that meant that not all of my muffins were nice and smooth. When I make these again (and I plan to), I think I’ll use my normal-sized biscuit cutter, which is 2.5 inches in diameter.
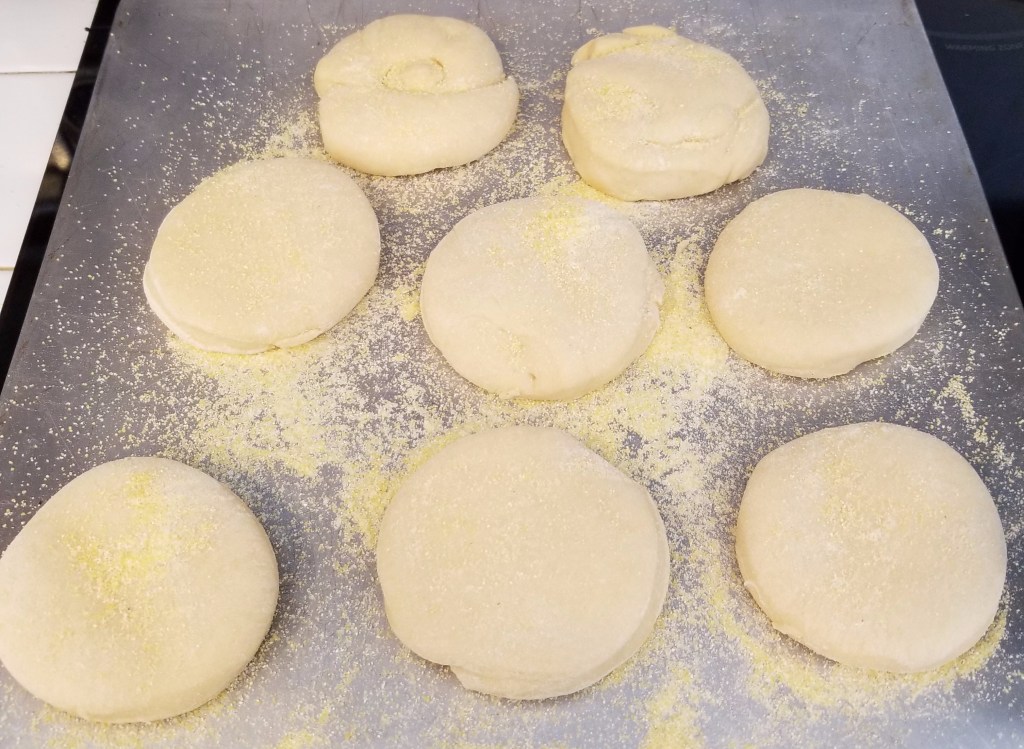
They weren’t all nice and smooth. 
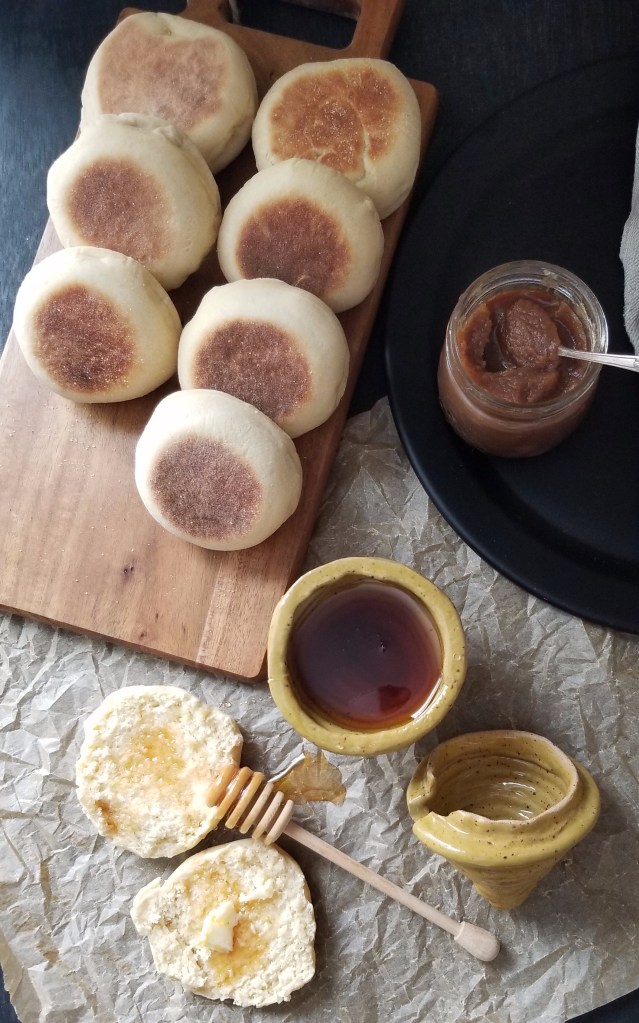
But they puffed up nicely in the frying pan. 
And turned out perfectly golden on both sides.
Unlike most yeast breads, English muffins are “baked” on the stove, usually on a hot griddle or cast iron frying pan. This makes them nice and toasty on each side, but still slightly squidgy in the middle. After they have cooled, it’s important, in order to maintain the honeycomb of holes in the middle, that they are broken open instead of sliced. Piercing the muffin all the way around with a fork can help, or you can invest in an actual English muffin splitter.

Rewriting the History of English Muffins
Despite a rumor promulgated by the Thomas’ brand, English muffins were NOT invented in 1880 by Samuel Bath Thomas, an English expat in New York who called his yeasted muffins “toaster crumpets.” Indeed, the classic nursery rhyme, “The Muffin Man,” dates back to at least 1820, a time when many households in England had their fresh foods delivered, thus the “muffin man” in question would have hawked his wares from door to door.
The earliest recipe for a muffin similar to what we now call English muffins is found in a cookbook that was first published in 1747 — The Art of Cookery, Made Plain and Easy by Hannah Glasse. And it makes sense, since this was a simple type of bread that could be cooked on a flat surface over any heat source, at a time when many homes didn’t yet have proper ovens. According to The BS Historian: “They were a staple snack food that transcended class, being a high-calorie working class convenience food sold in the street that became a dainty teatime treat for the well-to-do.
And I, for one, plan to make these a staple in my baking repertoire.

Here’s a link to Paul’s recipe, but I’ve adapted it for American bakers below.
Paul Hollywood’s English Muffins
Adapted for American bakers
Ingredients
- 2¼ c. white bread flour, plus a little extra for flouring the work surface
- 2¼ t. fast-action yeast
- 1 t. salt
- 1 T. + 1 t. superfine (baker’s) sugar
- 1 T. softened butter, cut into small pieces
- 1 egg, lightly beaten
- ¾ c. whole milk
- 1½ T. cornmeal, plus a little extra for dusting the work surface
Directions
- Put the flour into a large mixing bowl. Sprinkle the yeast on one side of the flour and the salt on the other side. Add the sugar, butter, egg and milk, then mix all the ingredients (except the cornmeal) together to form a soft dough. (I used a mixer, although Paul recommends mixing it by hand, literally, adding the milk a little at a time until you have a wet dough.)
- Turn the dough out of the bowl onto a lightly floured surface, and knead for 10 minutes or until it’s soft, smooth and stretchy.
- Place the dough in a lightly greased bowl, cover and allow to rise in a warm place for about one hour, or until doubled in size.
- Dust work surface with a little bit of cornmeal and white flour. Tip the dough out onto the work surface, and roll it out to a thickness of about 1 inch.
- Lightly dust a large cookie sheet with half of the cornmeal. Using a 2.5- to 3.5-inch diameter biscuit cutter, cut out eight muffins, a few at a time, rolling out the leftover dough as needed to cut more. Place the muffins, evenly spaced, on the dusted baking sheet.
- Sprinkle the remaining cornmeal on top of the muffins, and leave to rise in a warm place for another 30 minutes.
- Preheat a dry (not greased) griddle or heavy (e.g., cast iron) frying pan on the stove on very low heat. Place three or four muffins at a time on the griddle, allowing them to cook slowly for approximately 5-6 minutes on one side. Flip them over and cook the other side for another 5-6 minutes. When brown on both sides and not too squidgy on the sides, remove to a cooling rack. Repeat with the rest of the muffins. Allow to cool.
- To serve, pierce each muffin with a fork around the sides and split horizontally. Toast until lightly browned around the edges. Spread with butter and jam or honey, or make eggs benedict!

Next week: A Decorative Loaf
Discover more from Here's the Dish
Subscribe to get the latest posts sent to your email.

Thanks for the link! Weirdly, I really like Thomas muffins; ours lack the nooks and crannies. We have crumpets and pikelets for that though 😉
LikeLike
I used to like Thomas’ too, until I tried homemade. There’s no comparison! I’ve never heard of pikelets. I’ll have to look that one up. 😊
LikeLike
These looks absolutely delicious!
LikeLiked by 1 person
They really are! You should try them!
LikeLiked by 1 person
I just might do that! The texture looks divine!
LikeLiked by 1 person
Is the amount of yeast correct? The conversion from Paul’s recipe seems off to me. Shouldn’t it be 1 1/2 teaspoons?
LikeLike
Hi, Gay! Thanks for asking. His recipe calls for 6 grams of fast-action, or “instant” yeast, which is equal to 2.12 teaspoons. I rounded it up to 2 1/4 teaspoons, which is the same amount that’s in a 1/4 oz. packet. That amount worked perfectly for me. I hope that helps!
LikeLike
You know, in step 1 when you say “add in all the ingredients, you do not mean the cornmeal. What happens is that all the moisture is sucked up. The cornmeal looks from the show is for the OUTSIDE. NOT WITHIN THE DOUGH. That’s a pity
LikeLike
I’m sorry for the confusion. It’s always a good idea to read through the entire recipe before beginning so you know what to expect. As worded, the recipe specifies which ingredients to add and then says “mix all the ingredients together,” meaning the ingredients already listed. I can understand how that can be confusing, however, so I have changed the wording so the reader knows not to add the cornmeal to the dough. I appreciate your feedback; it helps me improve my recipe-writing skills.
LikeLike
I could not get the inside to cook for some reason. They are nice and big but just cannot get the dough to cook. Any idea why? Under proofed?
LikeLiked by 1 person
Thanks for asking, Jessica. Usually, if the outside is cooked and the inside is raw, it means your heat is too high. The pan should be preheated on very low heat. If your stove gets too hot, try taking the pan off the heat between batches to let it cool down some. I hope that helps!
LikeLike