
Believed to have been invented by Marie-Antoine Carême, who is known as the first celebrity chef, éclairs were originally called pain à la Duchesse, or “bread to the duchess.” Though Carême died in 1833, it wasn’t until 1850 that the name of this oblong-shaped pastry was given its current moniker, which translated from French means “flash of lightning.” The first printed reference to éclairs in English was in an article in Vanity Fair in 1861, and the first recipe for éclairs in an English-language cookbook was in the Boston Cooking School Cook Book by Mrs. D.A. Lincoln, published in 1884.
The éclair is made of pâte à choux, or choux (pronounced like shoe) pastry, the same type of dough from which we get cream puffs and profiteroles. Choux pastry is unique among pastry doughs in that it is actually cooked twice — once on the stovetop as water and butter are brought to a boil, then flour is mixed in and cooked to a thick paste before adding eggs, one at a time, to create a wet dough. The dough is then piped into rounds (for cream puffs) or oblongs (for éclairs) and baked in the oven.
To understand the science behind cooking it on the stove, think about how flour is used to thicken sauces. As the flour and water cook, the starch in the flour becomes gelatinized, which thickens the batter, and the gluten structure is altered, making the dough sturdy enough to maintain its structure in the oven, even as the water turns to steam, creating airy pockets that will hold any creamy filling you could possibly imagine.
As Daniel Gritzer explains on SeriousEats.com: “The gluten-rich, starch-strengthened mass is stretchy enough to swell as steam inflates the expanding pocket of air within it, strong enough to contain that growing bubble without tearing apart, but not so elastic that it might spring back on itself before the exterior has set and collapse like a deflating balloon.”
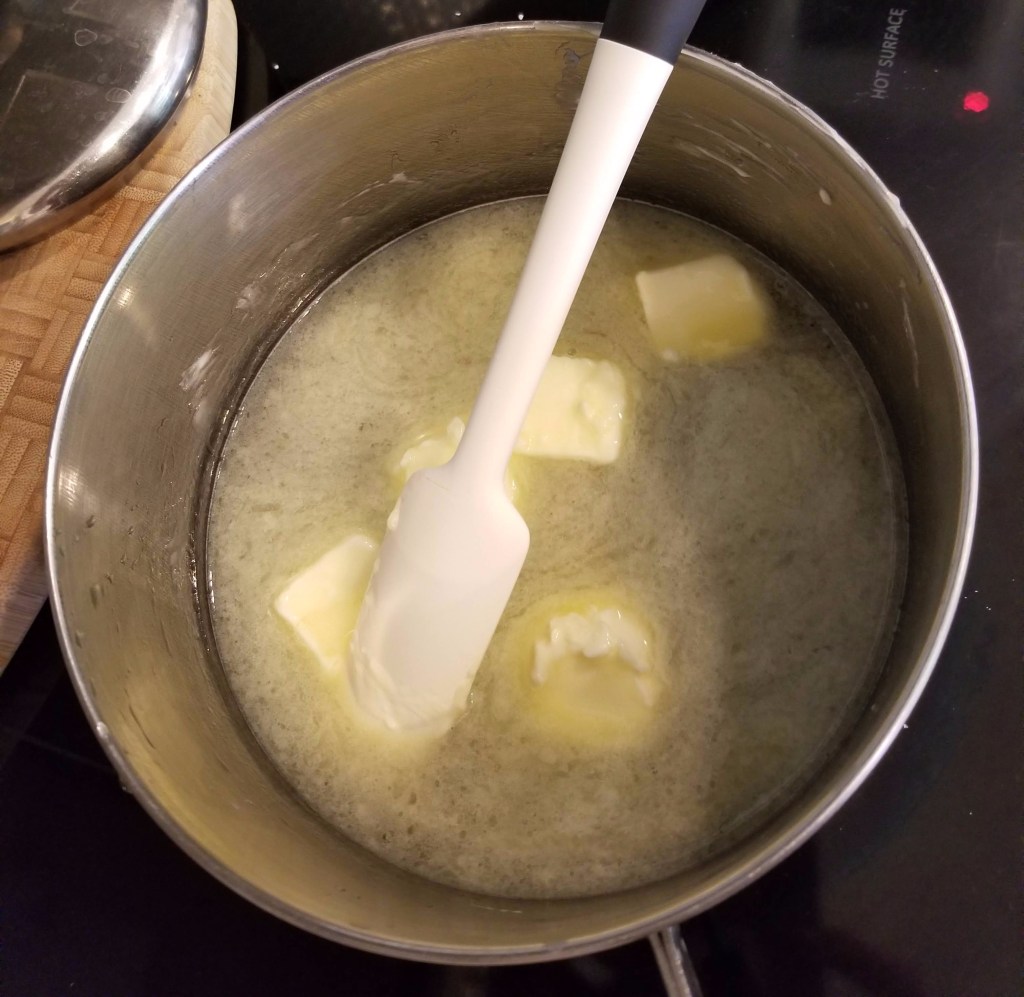
Bring water and butter to a boil before adding flour. 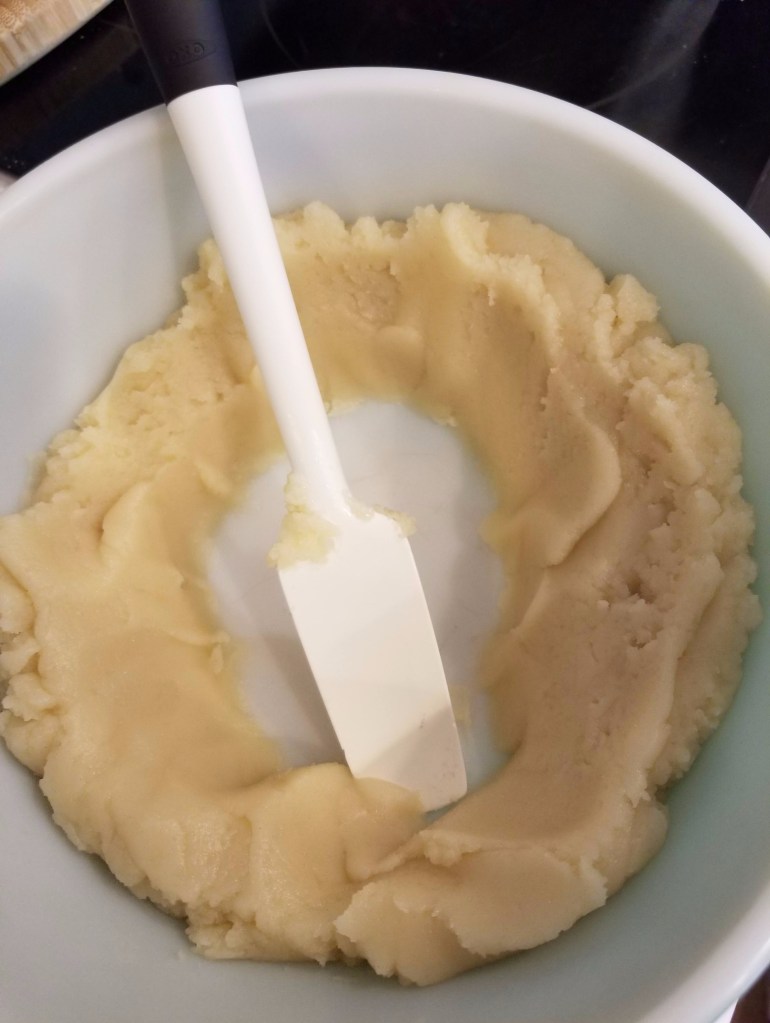
After cooking flour and water on stove, transfer to bowl to cool. 
Stir in eggs, one at a time. 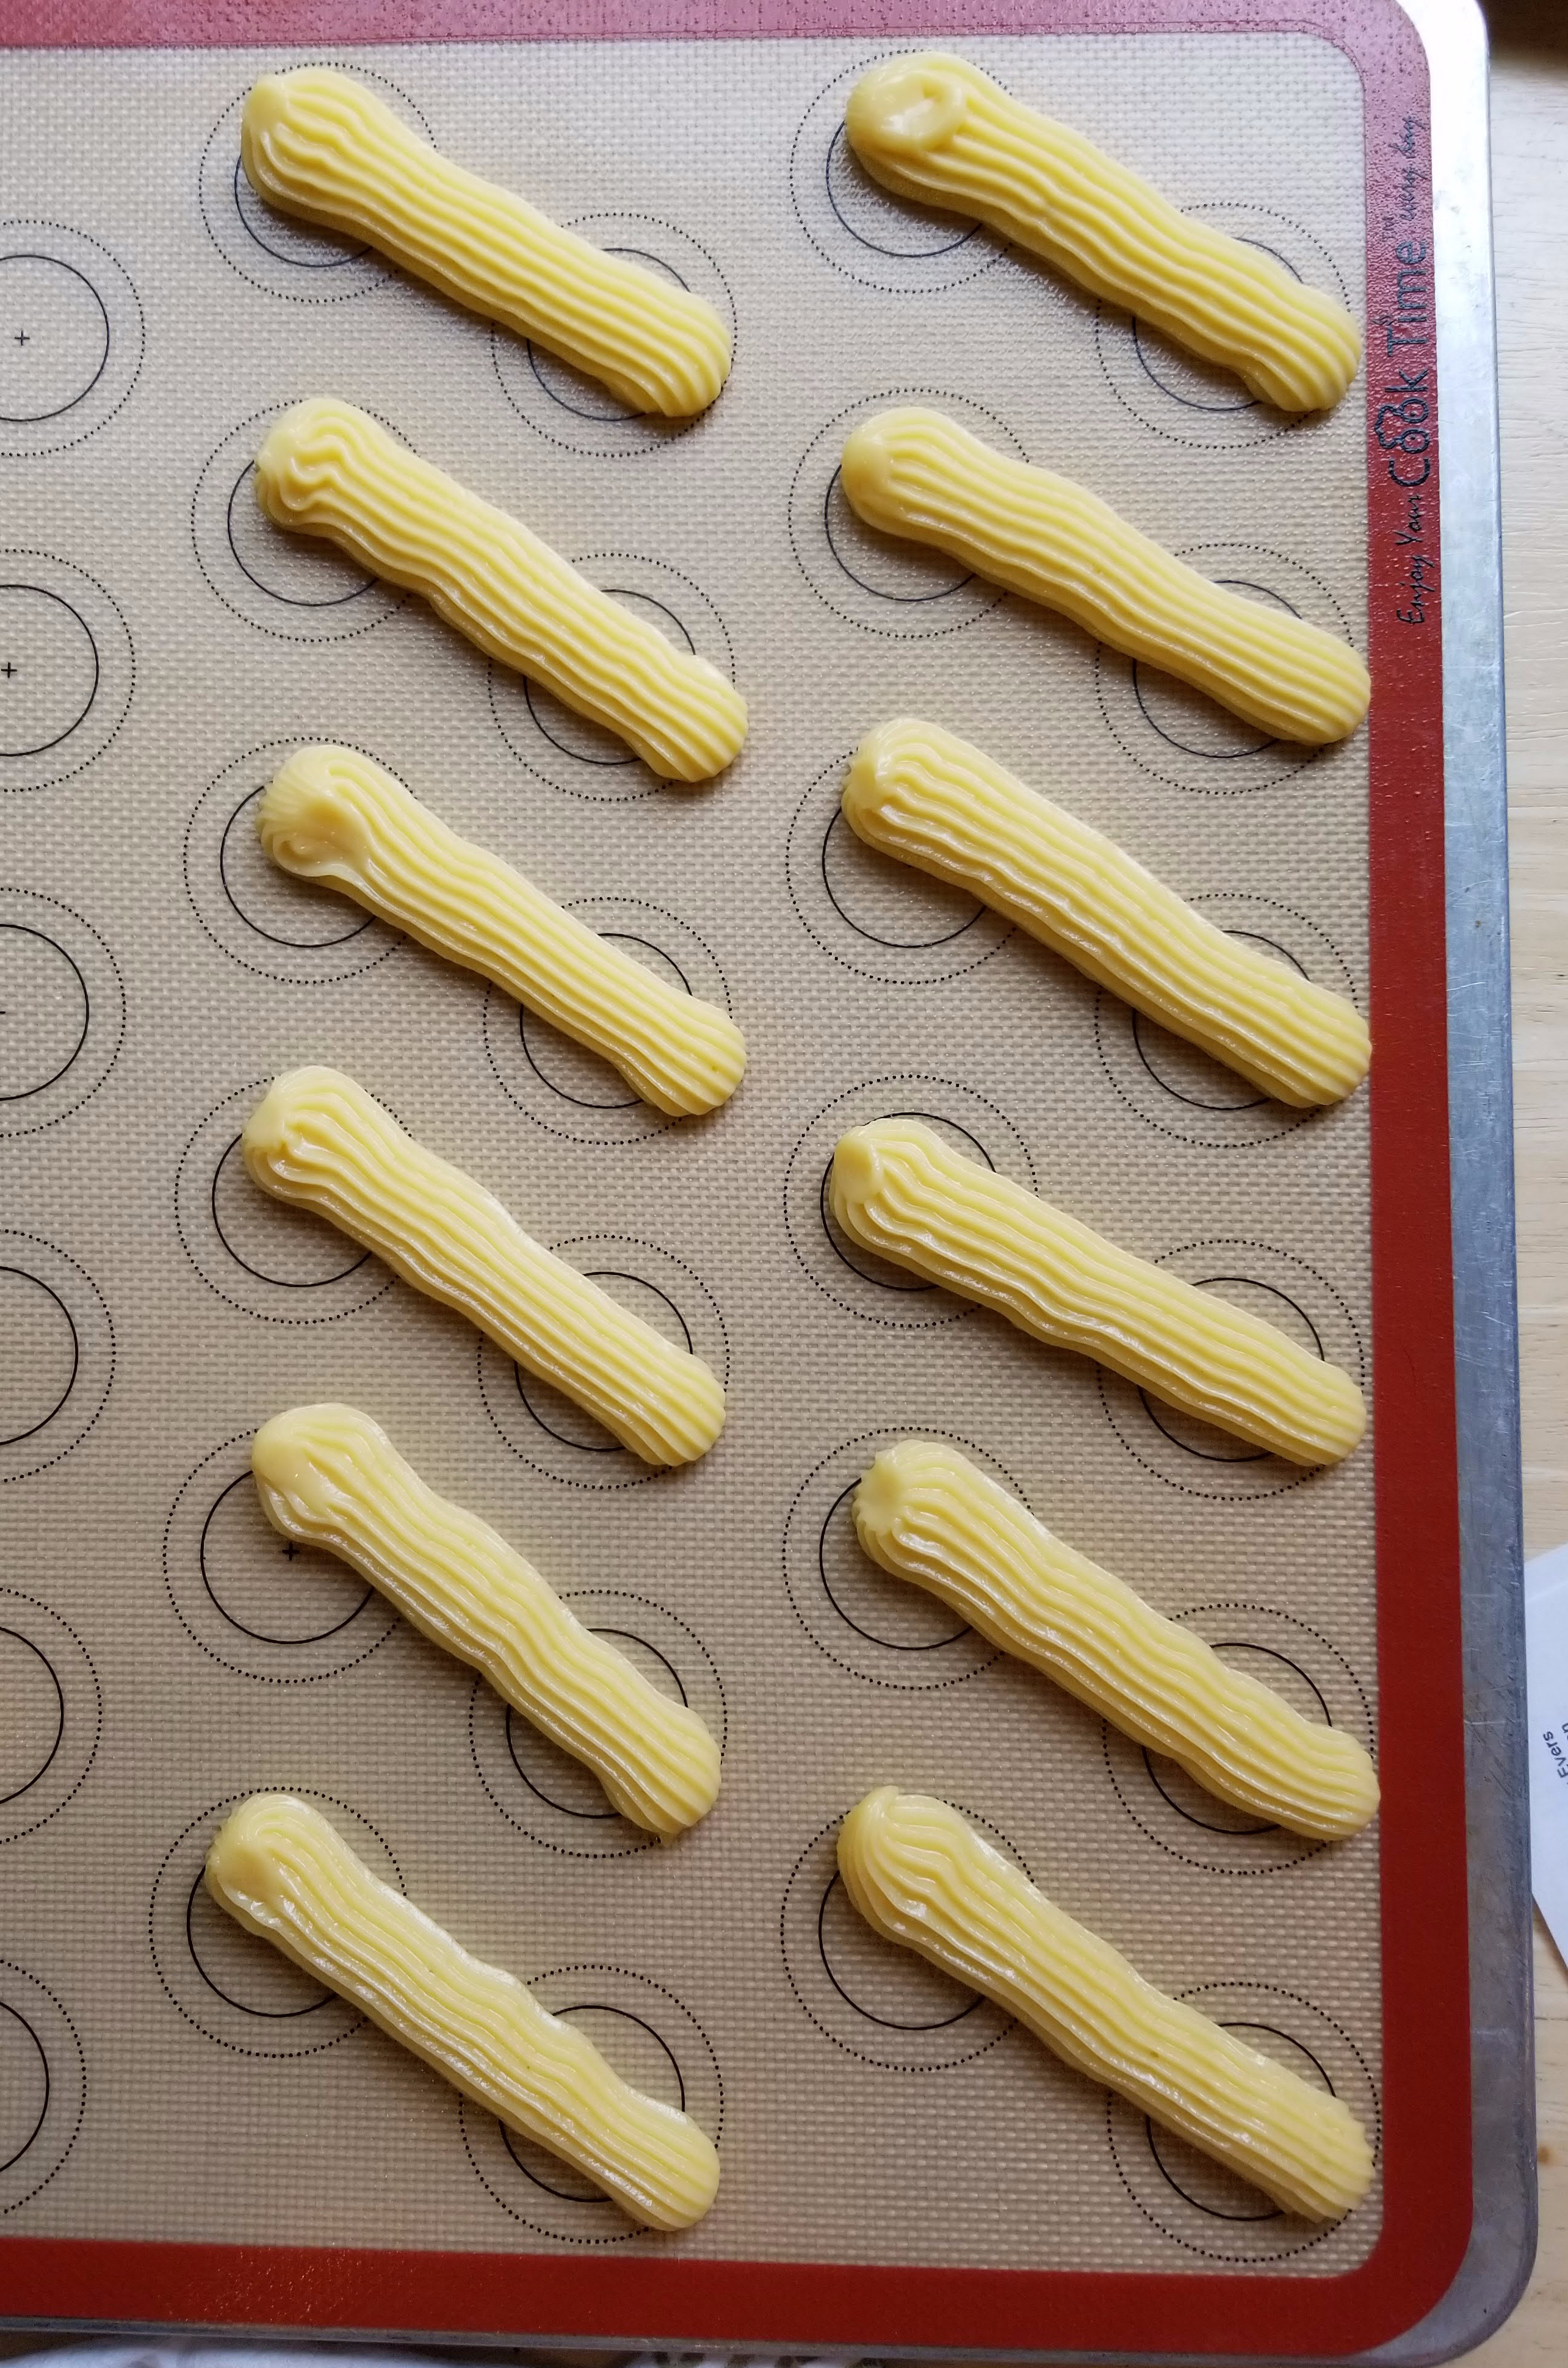
Pipe the dough and bake. 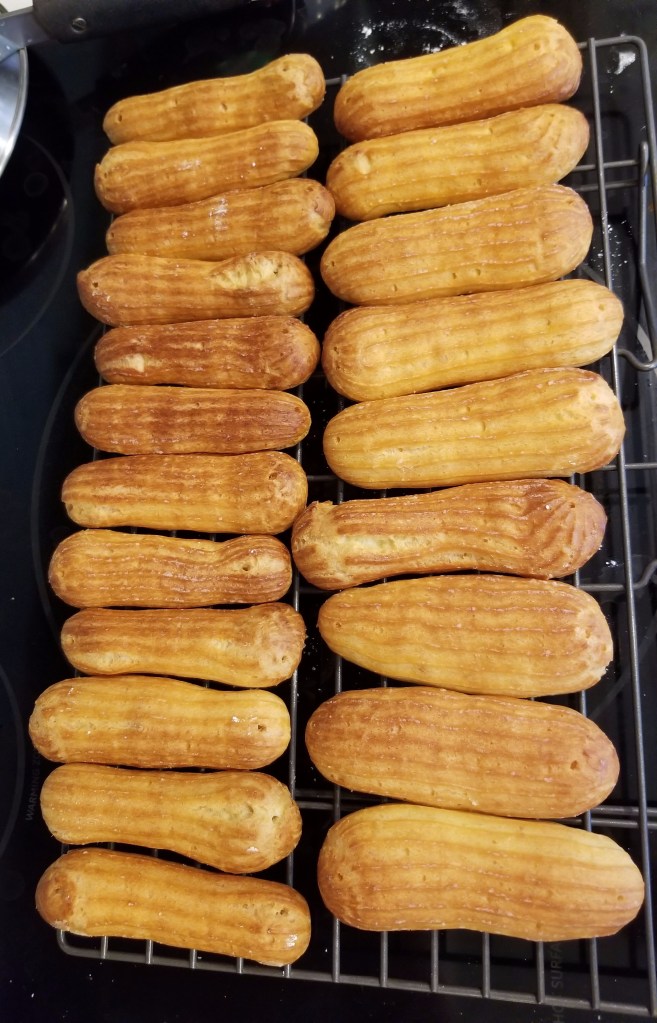
Mine weren’t all the same size. 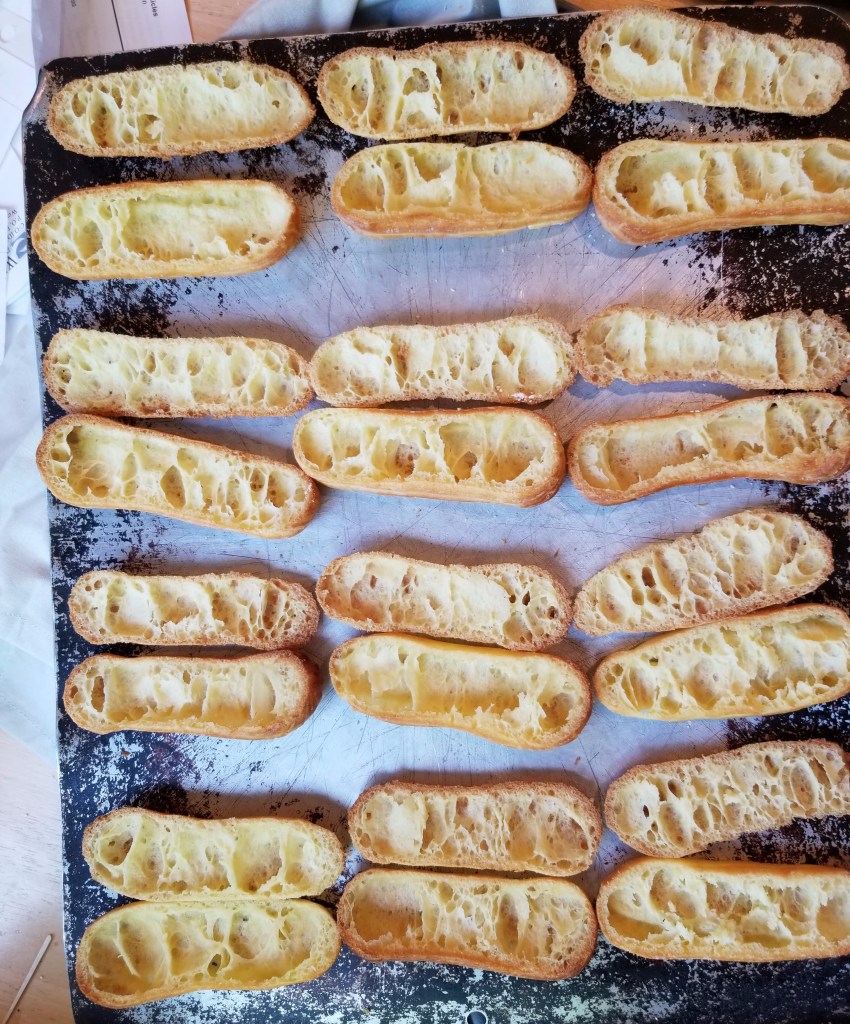
But they were nice and airy inside.
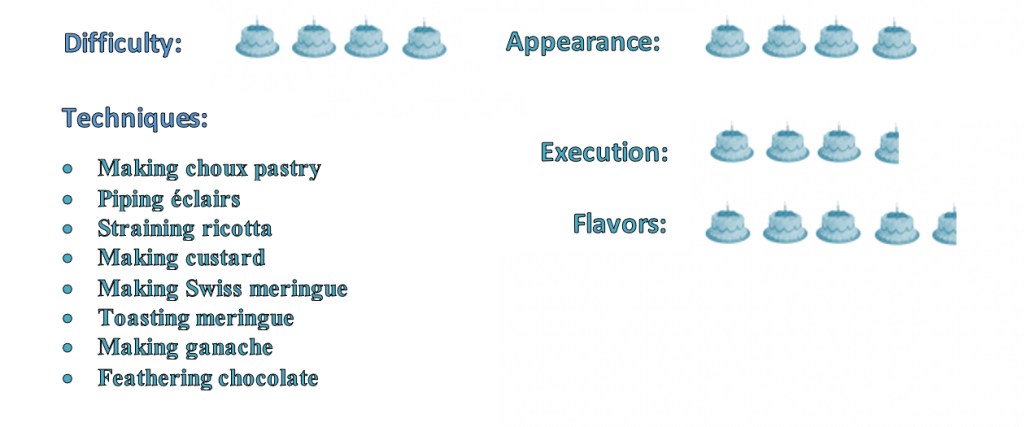
Now that we’ve explained the history and science behind these luscious pastries, let’s talk about the challenge. The bakers in the Great White Tent were given the challenge of making 24 éclairs — 12 each of two different flavors. They could be sweet or savory, but Paul Hollywood was looking for innovation and creativity. Mary Berry said the choux pastry should be dry on the inside (before filling, of course) and look perfect on the outside.
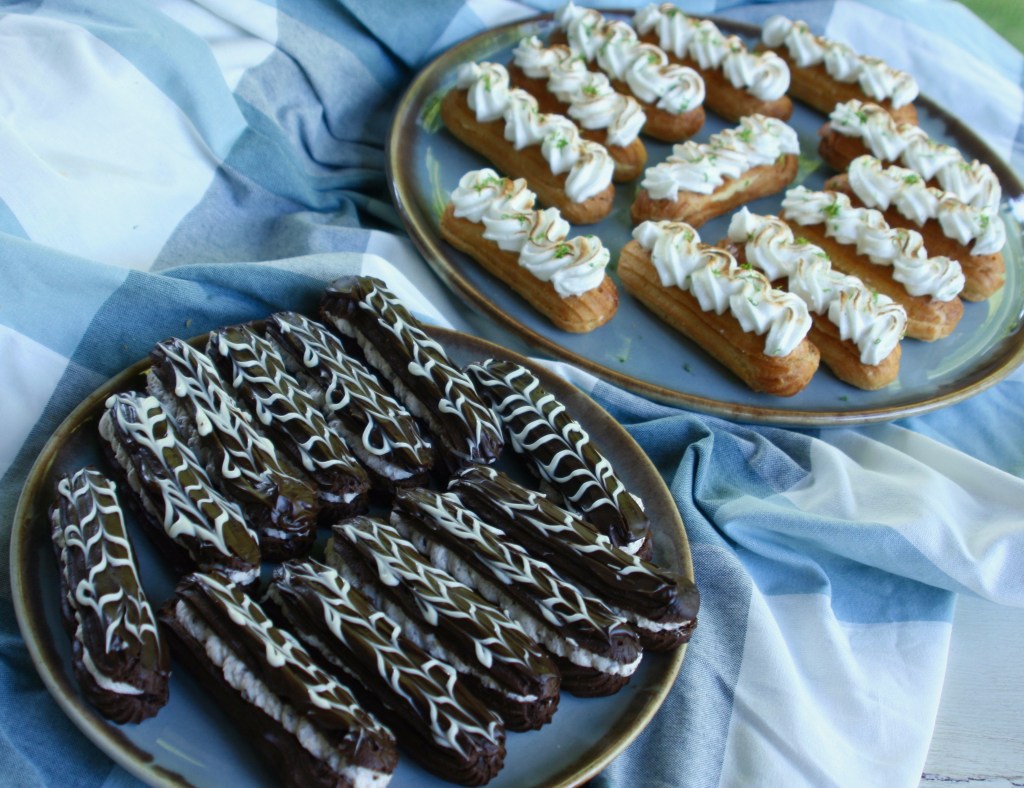
For my take on the challenge, I chose to make Key lime éclairs topped with toasted Swiss meringue and chocolate éclairs filled with a stracciatella cannoli filling.
To make the choux pastry, I leaned heavily on the advice of TheFlavorBender.com. She has a very detailed tutorial on choux pastry in general, as well as advice for making éclairs and chocolate choux pastry. I’ve made choux pastry before, both for Mary Berry’s religieuses technical challenge and for my Paris-Brest, but I wanted to up my game in order to perfect my éclair-making skills.
Chocolate choux, it turns out, presents its own challenges, as the cocoa powder dries out the dough somewhat and makes it heavier. Therefore, it doesn’t puff up as much in the oven. I found that, while mine puffed up slightly, they weren’t as light and airy as the regular éclairs. They were more the size of “choux fingers” than éclairs. My advice would be to pipe the chocolate ones slightly bigger so that both types of éclairs turn out the same size.
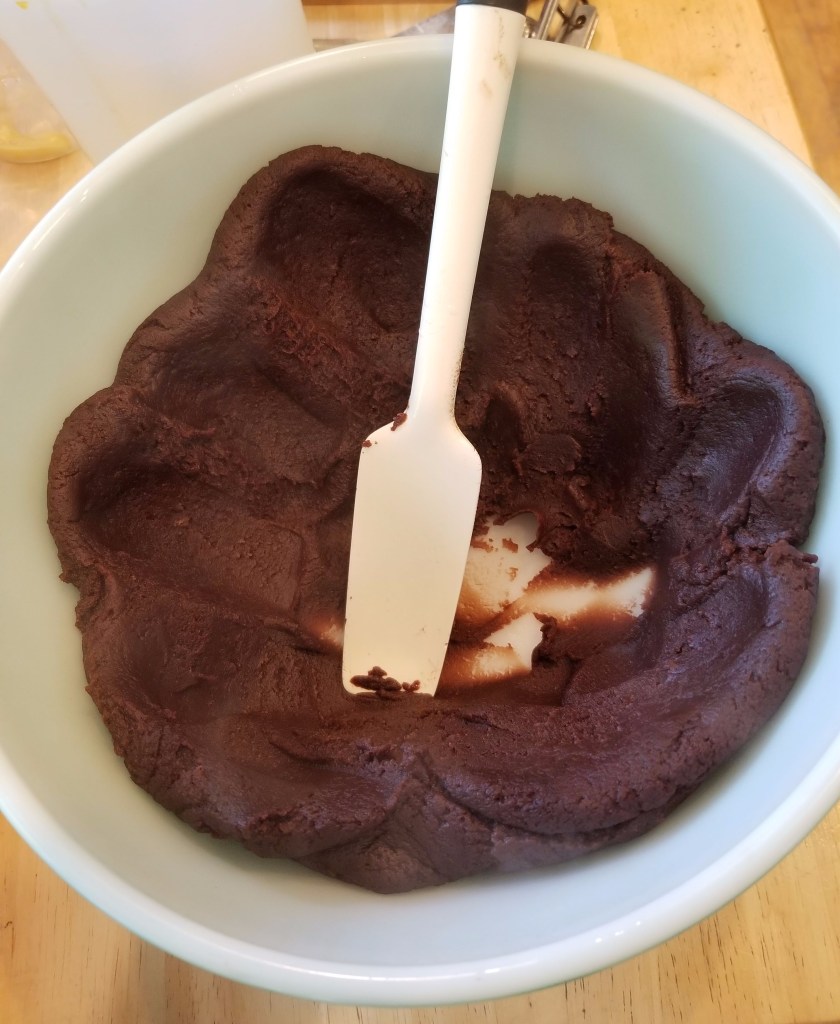
Before adding eggs, it looks like dry mashed potatoes. 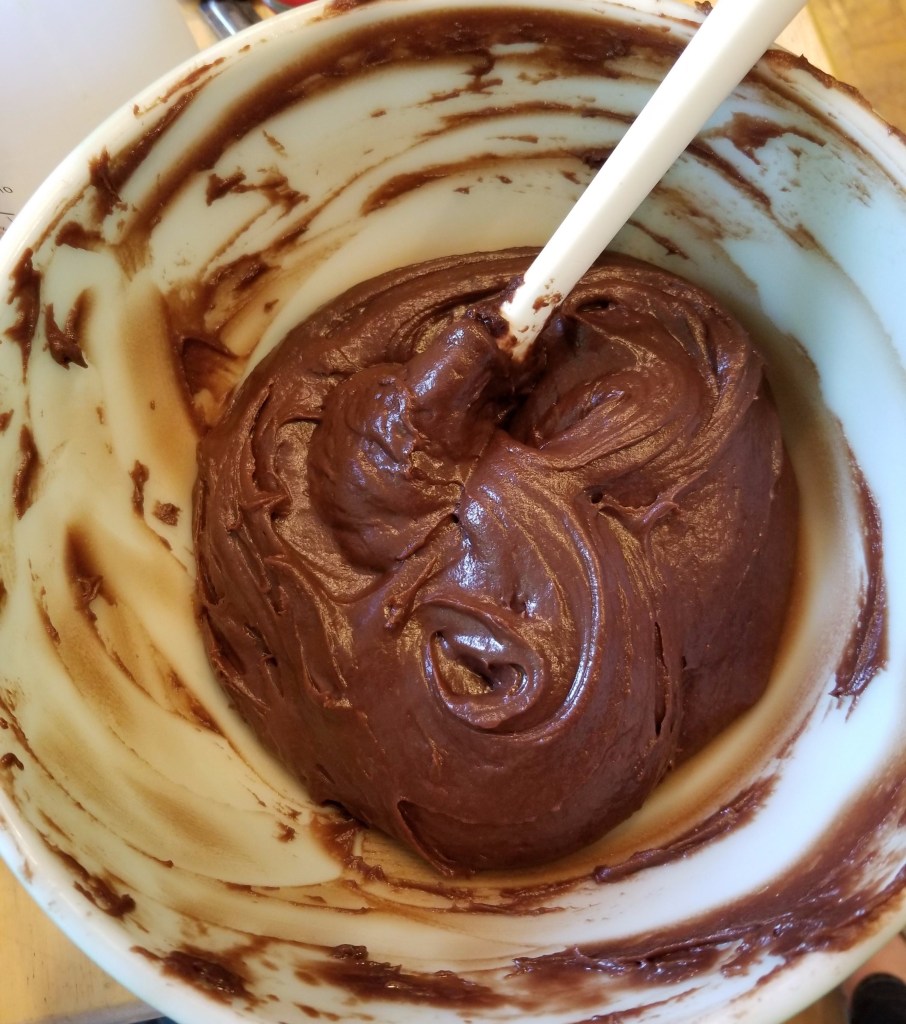
After adding eggs, the dough has a glossy sheen. 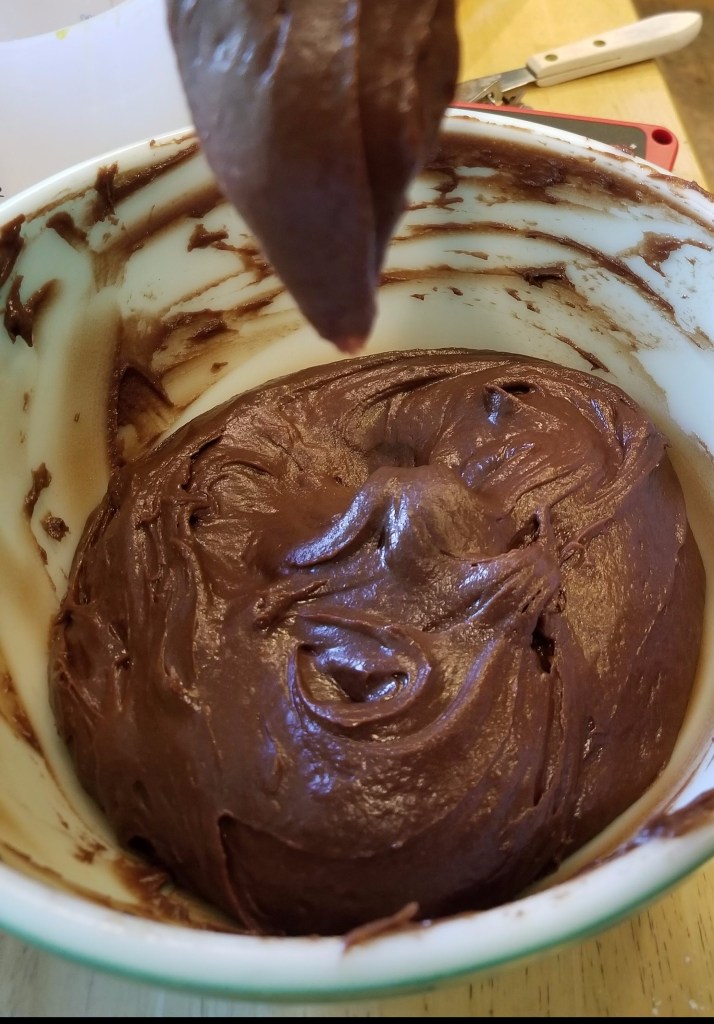
The dough forms a V when lifted out of the bowl. 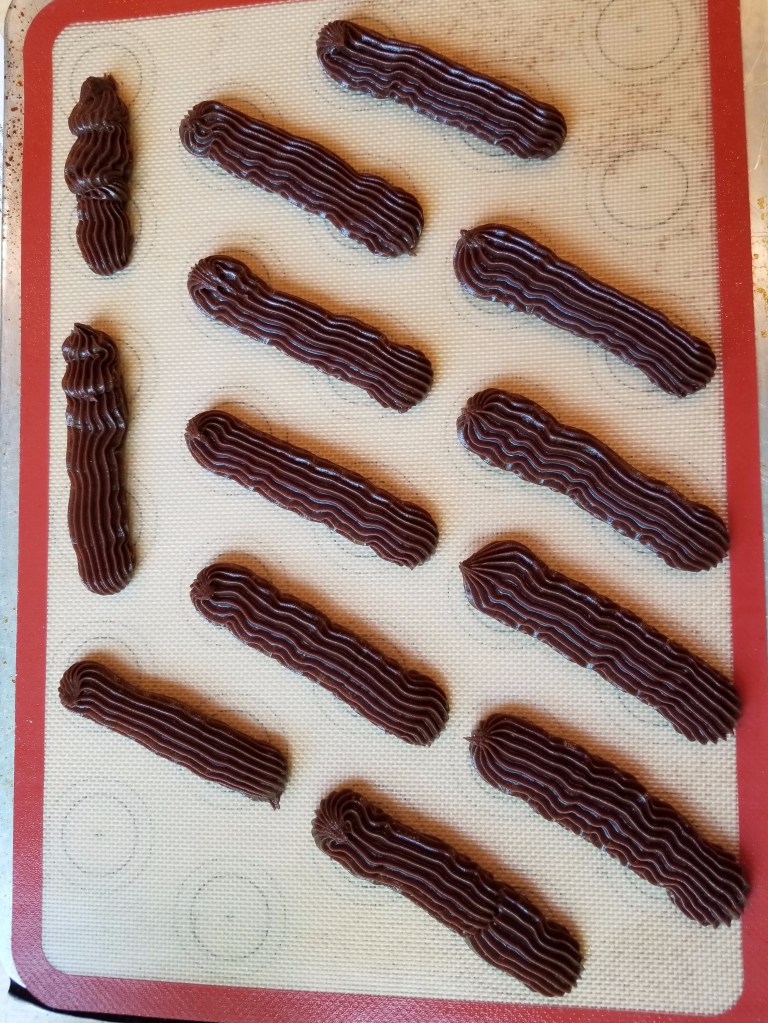
It holds its shape when piped. 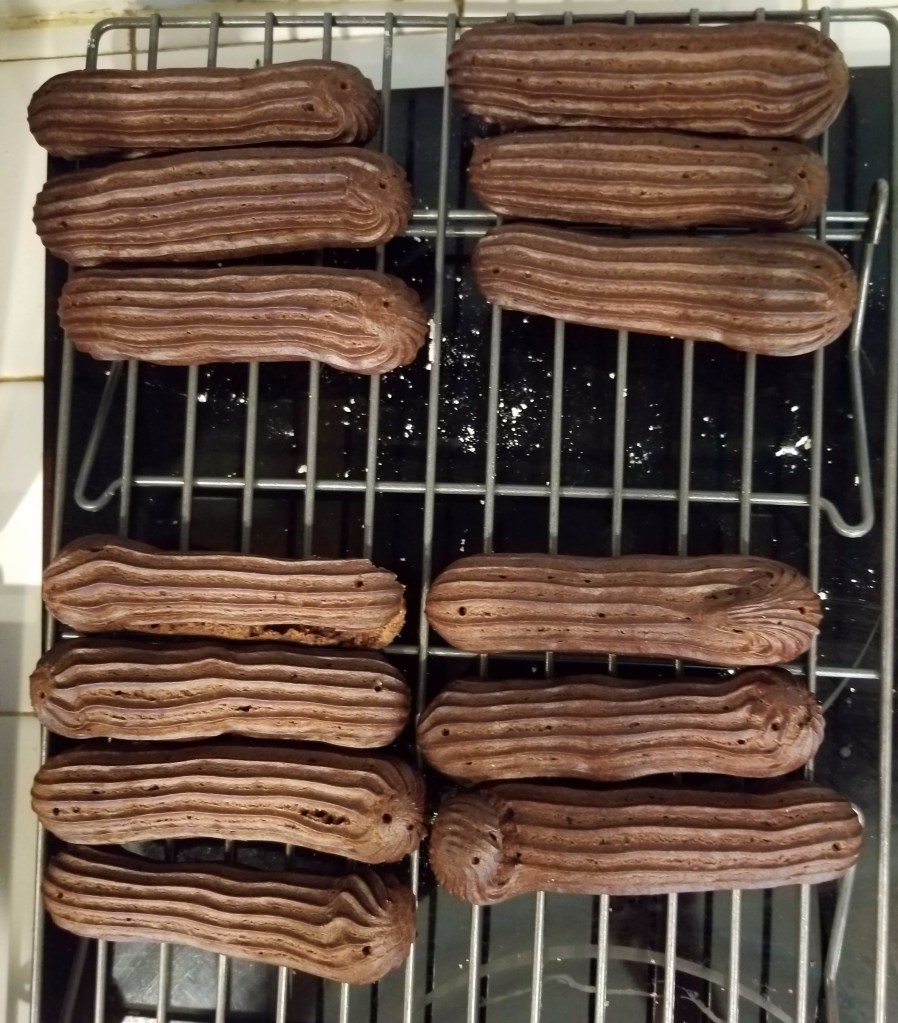
The chocolate shells don’t puff up as much as the regular ones. 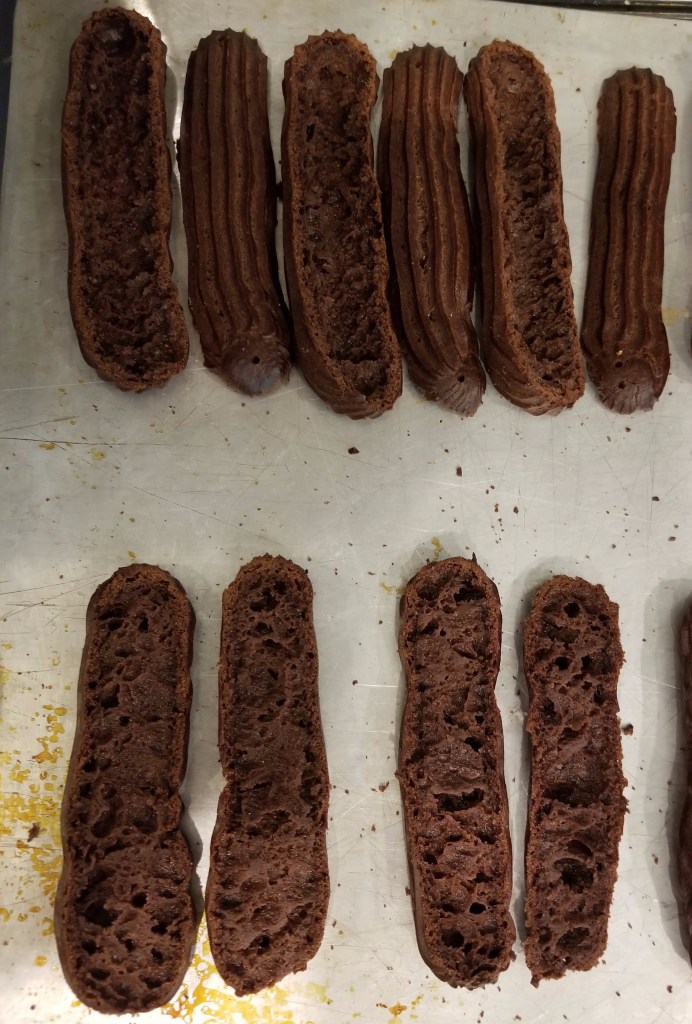
They’re not as airy inside, so I scooped out the excess pastry.
The stracciatella cannoli filling combines the flavors of two Italian favorites: Stracciatella gelato and classic cannoli. Stracciatella has a few different meanings in Italian — it can refer to an egg drop soup as well as a soft cheese made from Italian buffalo milk — but for me it conjures up memories of licking rich, chocolate-studded gelato from a crunchy cone as I stand on the sun-warmed sidewalk of a street in Rome. The difference between stracciatella and plain-old American chocolate-chip gelato is that the pieces of chocolate are irregular (in this case chopped by hand), creating a mixture of very fine chocolate shavings and small but more substantial pieces you can really sink your teeth into.
The key to making a smooth and creamy cannoli filling is to strain the ricotta overnight, draining off the excess liquid so the filling doesn’t become watery. The recipe I used calls for folding in whipped cream at the end, making it lighter than many cannoli recipes, which simply combine ricotta cheese with powdered sugar and flavorings.
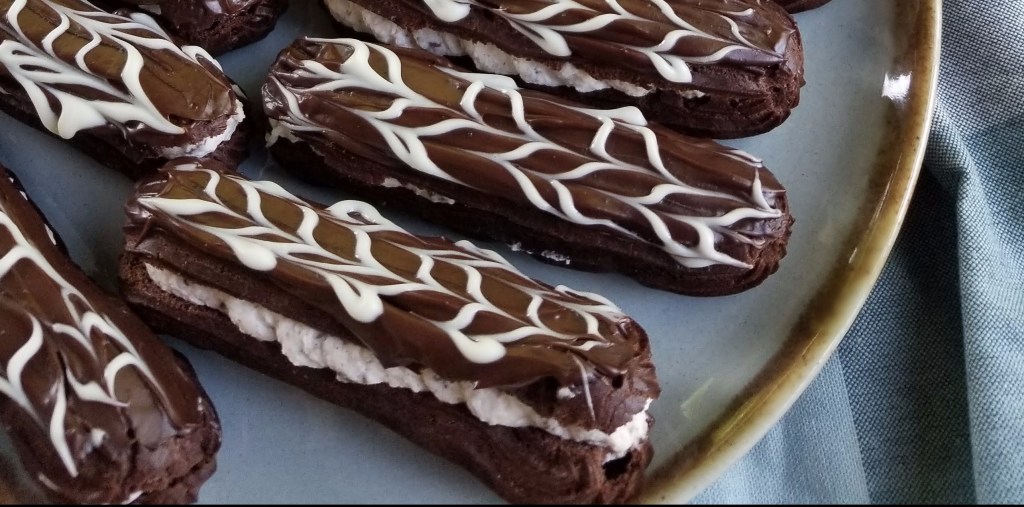
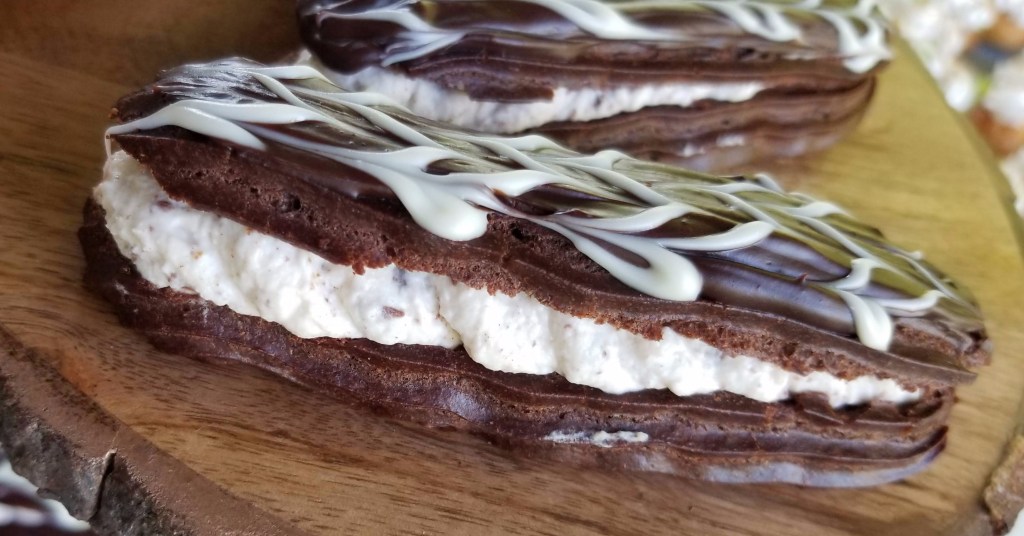
To decorate my chocolate éclairs, I spread chocolate ganache on top and, while it was still warm, drizzled melted white chocolate over it, then feathered the white chocolate with a toothpick. (See video tutorial here.)
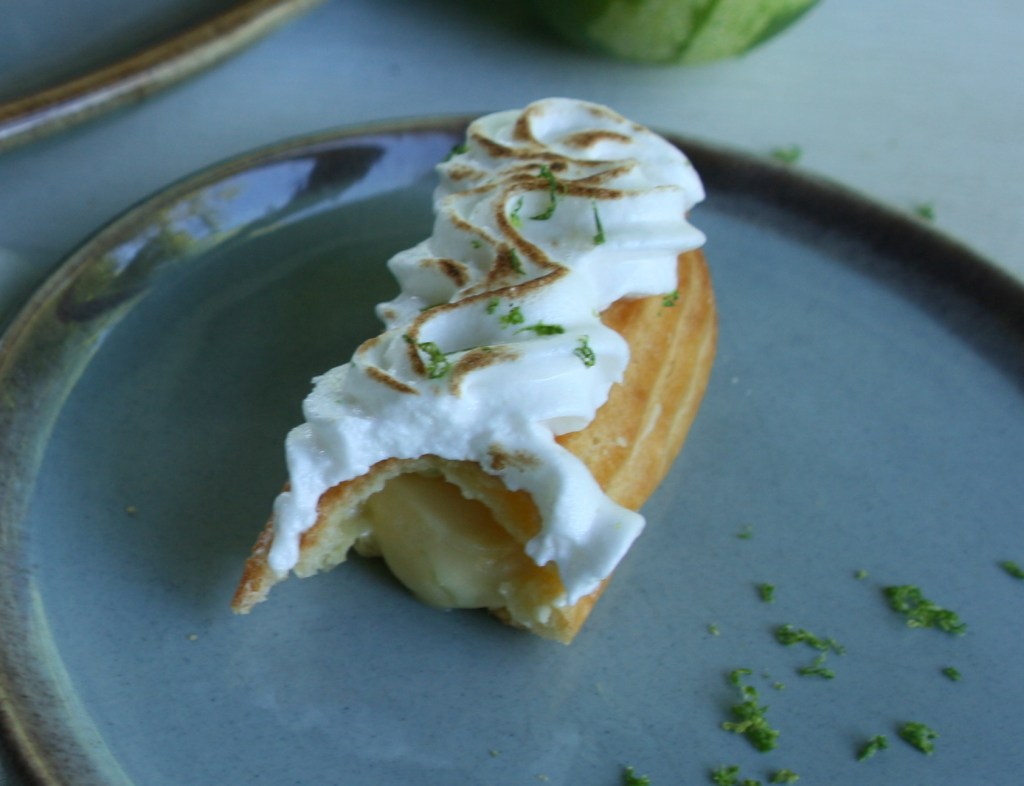
For the Key lime éclairs, I used The Flavor Bender’s classic éclair recipe, and found this recipe for Key lime tarts that provided the custard-pie-type filling I was looking for that didn’t require baking. Lime juice and egg yolks are cooked on the stove until they thicken to a custard consistency. Then lime zest and sweetened condensed milk are added to sweeten and thicken the mixture. After chilling, it piped wonderfully, but I barely had enough to fill 12 éclairs. (I’ve changed the proportions in the recipe below to make 1½ times the original recipe, so you should have plenty!)
For the topping, I made my go-to Swiss meringue (used here), which I prefer because the egg whites are brought to a food-safe temperature. After piping it onto the filled éclairs, I used my kitchen torch to brown the edges, giving it a beautiful professional finish.
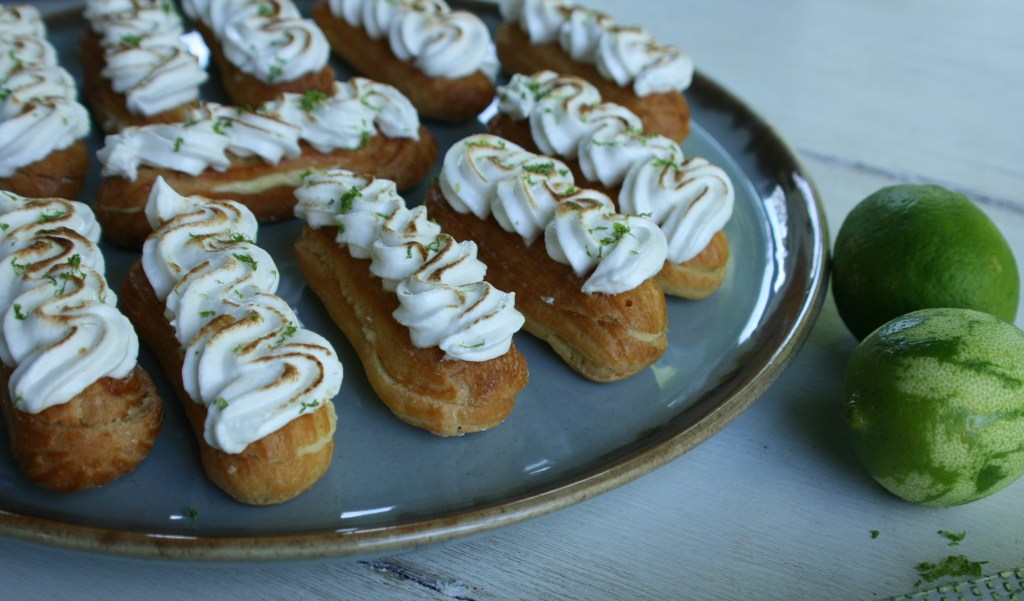
What my éclairs lacked in size consistency (especially when comparing the chocolate éclairs with the Key lime ones), they made up for in flavor. The Key lime éclairs really packed a punch, with a burst of zesty lime and marshmallowy sweet meringue in every bite. The stracciatella éclairs didn’t disappoint, either, with the deep chocolate outer shell balanced by the mildly sweet but not overpowering cannoli filling. I would definitely make both of these again, and I hope you’ll try them, too!
AUTHOR’S NOTE: Making choux pastry is a pretty exact science. For that reason, I recommend measuring ingredients by weight. A basic food scale is inexpensive and a good investment for any home baker. I provide measurements by volume here, too, but for best results, weigh your ingredients.
Key Lime Pie Éclairs
Key lime filling recipe adapted from PudgeFactor.com
Credit for meringue: BettyCrocker.com
For the choux pastry:
For the Key lime filling:
- 3 egg yolks
- ½ c. freshly squeezed Key Lime juice (or freshly squeezed regular lime juice)
- 14 oz. can sweetened condensed milk
- ¾ t. lime zest
For the meringue:
- 3 egg whites, room temperature
- 6 T. sugar
- ¼ t. cream of tartar
- ½ t. vanilla
- Zest of 1 lime
Directions
- To make the pastry shells: Preheat oven to 375°F. Measure out all ingredients ahead of time. Place the water, butter, salt and sugar in a medium-sized saucepan and heat over medium heat, stirring occasionally. (Make sure the salt and sugar dissolve completely and the butter melts BEFORE the water comes to a boil).
- As soon as the water comes to a boil (with a few bubbles breaking through the surface), move the pan away from the stove and add the sifted flour into the boiling liquid all at once. Using a wooden spoon or a silicone spatula, stir vigorously to allow the flour to absorb all the water and to eliminate any lumps of flour, until it forms a ball of dough. (This should take about 45-60 seconds of stirring.)
- Return the pan to the stove on medium heat and let the dough cook for 2-3 minutes more while stirring. Do this until you see a film of dough forming on the bottom of your pan. (NOTE: This only occurs with stainless steel pans, not nonstick pans.)
- Remove pan from the heat and transfer the dough into a large mixing bowl. Mix the dough gently for 2-3 minutes to release the steam and cool it down to below 160°F. (Alternatively, you can flatten the dough along the wall of the bowl and leave it to cool for a few minutes.)
- Crack the eggs into a small pitcher or glass measuring cup and whisk lightly. When the dough has cooled down, add the eggs in 5-6 additions, mixing each addition well into the dough before adding more. (You can use a stand mixer or a spatula to mix in the eggs.) Stop adding eggs when the dough starts to look glossy, then check for the right consistency. (NOTE: The best way to tell when you have the right consistency is to lift the spoon/spatula from the bowl and see if the dough hanging from the spoon forms a V shape. The dough should also have a glossy sheen and a pipeable consistency.)
- Transfer the dough to a 16-inch piping bag fitted with a ½-inch tip (a French star tip works best). Secure the bag opening and set it aside while you get the baking sheet ready. Line a baking sheet with a silicone mat or parchment paper. Have a small bowl of water and a small mesh strainer filled with powdered sugar ready, as well.
- Holding the pastry bag at a 45-degree angle with the tip touching the baking surface, pipe 10-12 éclairs, about 5 inches in length, 1-1½ inches apart. When piping, make sure the ends are a little larger than the middle portion of the éclairs (like a dog-bone shape). Twist and lift the piping tip at the end so it leaves a slightly pointed end. Dip your finger in the bowl of water and use it to pat down the pointed ends. Sift some powdered sugar over the eclairs.
- Place the baking sheet on the middle rack of the preheated oven, and set the timer for 25 minutes. After 25 minutes, check to see if the pastry shells are golden brown. If they are, open the oven door and quickly prick one end of each shell with a toothpick or skewer. Close the oven door and let the shells bake for 5-10 minutes more, until they turn a darker golden color. (You want the shells to be baked a little longer so that they hold their shape better.) When done, remove them from the oven and immediately prick the other end of each one. Let them cool down for about 10 minutes on the baking tray and then transfer them onto a wire rack.
- Pipe more éclairs onto another lined baking sheet and bake. Repeat until you have used up all the choux pastry. Once the éclairs have cooled down, they are ready to be filled.
- To make the filling: Beat egg yolks at medium speed of an electric mixer until thick and lemon-colored, about 4 minutes. Heat Key lime juice in small saucepan over medium heat until hot. While the mixer is still running, gradually pour about one-fourth of the hot lime juice into the egg yolks. Then transfer the mixture back into the pan with the remaining hot lime juice, stirring constantly. Cook over medium heat, stirring constantly, for 2 minutes or until mixture is thickened.
- Remove from heat and cool for about 10 minutes. Add sweetened condensed milk and lime zest, stirring well. Transfer to a small bowl and cover with plastic wrap, pressing plastic wrap to the surface of the mixture. Refrigerate.
- To make the meringue: Pour about an inch of water into a medium saucepan and place a heatproof bowl on the pan, making sure the bottom of the bowl doesn’t touch the surface of the water. Bring the water in the pan to a simmer. Take bowl off the pan and whisk the egg whites, sugar, cream of tartar and vanilla in the bowl until blended. Set the bowl over the pan of simmering water and stir occasionally with the whisk until the sugar has dissolved and the mixture reaches 160°F. Pour the mixture into the large bowl of a mixer fitted with a clean whisk attachment. Whisk on high speed for 8-10 minutes until stiff, glossy peaks form. Transfer to a large piping bag fitted with a star tip.
- Split cooled éclair shells in half horizontally. Scoop out any excess membranes in the bottom half of each shell. Transfer Key lime filling into a piping bag fitted with a ½-inch tip. Pipe filling into the bottom half of each shell. Pipe meringue onto top half of each shell. Use a kitchen torch to brown the edges of the meringue. Carefully place top half of each éclair onto the bottom half and sprinkle with lime zest. Serve immediately.
- NOTE: Filling can be made the day before and refrigerated until ready to use. Shells can be made up to a day ahead and kept in an airtight container. To crisp them up again, place on baking tray in 350°F oven for 5-8 minutes. Leftover filled éclairs will keep in the refrigerator for 2-3 days.
Chocolate Éclairs with Stracciatella Cannoli Cream
Credit for cannoli cream: FoodFolksAndFun.net
Credit for chocolate ganache: PrettySimpleSweet.com
For the chocolate choux:
For the cannoli cream filling:
- ½ c. whipping cream
- 15 oz. whole milk ricotta cheese, strained*
- ½ c. powdered sugar
- ½ t. vanilla
- ¼ t. cinnamon
- 1¾ oz. semisweet chocolate, finely chopped (I used 3½ squares of Ghirardelli Premium Baking chocolate)
For topping and decorating:
Directions
- To make the pastry shells: Measure out all the ingredients ahead of time. Sift the flour and cocoa powder together and set aside in a small bowl. Lightly whisk the eggs together in a small pitcher or glass measuring cup. Place the salt, water, sugar and butter in a saucepan, and heat over medium heat while stirring occasionally. Make sure the butter, salt and sugar melt before the water comes to a boil.
- When the water comes to a boil, remove the pan from the heat and immediately add the cocoa powder and flour mixture all at once. Using a wooden spoon or silicone spatula, vigorously stir in the flour mixture so that it absorbs all the water. When the flour has absorbed all the water and it forms a cohesive dough, return the pan to the stove.
- Stirring continuously, cook the dough for about 1 minute over medium heat until you get a dough that pulls away from the sides of the pan and resembles dry mashed potatoes. (The cooking time will vary depending on your stove and pan size.) You should also notice a dough film forming on the bottom of the pan, unless you’re using a nonstick pan. Transfer the dough to a bowl and let it cool slightly for a few minutes to below 160°F.
- Pour the equivalent of about one egg into the bowl with the dough and mix well until it is thoroughly mixed in. Then add the second and third egg, one at a time, mixing well after each addition. After the third egg is thoroughly mixed in, add the final egg in increments, mixing after each addition, until you get the right consistency. (This is a crucial step, so take care not to add too much egg as this will result in flat/deflated puffs.) You may or may not use up all of the final egg. (NOTE: The best way to tell when you have the right consistency is to lift the spoon/spatula from the bowl and see if the dough hanging from the spoon forms a V shape. The dough should also have a glossy sheen and a pipeable consistency.)
- Transfer the dough to a piping bag fitted with a ½-inch tip (a French star tip works best). Push air out of bag, close tightly and wait for the dough to come to room temperature (30-60 minutes).
- Preheat oven to 400°F, and line a baking sheet with a silicone mat or parchment paper. Pipe the éclairs onto the baking sheet, making each one about 5-6 inches in length, lifting and twisting the piping bag at the end. To flatten any sharp points, dip your finger in water and pat them down. Make sure to leave at least 1 inch of space between each éclair.
- Place baking sheet on middle rack of oven and bake for about 5 minutes, then reduce the heat to 375°F and bake for about 20 minutes more. DO NOT open the oven door during this step. After 25 minutes of total bake time, the choux pastry should have puffed up. Quickly open the oven door and rotate the baking sheet. (If you piped larger mounds, let them cook a little bit longer before opening the oven door.) Bake for another 5 minutes.
- At this stage, the éclairs should have a hardened outer shell. Open the oven door and quickly prick each of the cases with a toothpick or skewer. Bake for another 3-5 minutes to allow the pastries to dry out a little, then remove them from the oven and prick them one more time. Let them cool down for about 10 minutes on the baking tray and then transfer onto a wire rack in a draft-free area (preferably somewhere that is not cold).
- Preheat the oven to 400°F again for the next batch. Pipe and bake the second tray of éclairs.
- To make the cream filling: In the bowl of a mixer fitted with a whisk attachment, whip the cream until stiff peaks form. Transfer the cream to a small bowl and set aside.
- To the same mixing bowl, add strained* ricotta cheese, powdered sugar, vanilla and cinnamon. Mix on medium speed until well-combined, about 1 minute. Fold in whipped cream and chocolate chips. Chill for at least 2 hours. Transfer to piping bag fitted with ½-inch tip.
- To make ganache: Place semisweet chocolate in a small heat-proof bowl and set aside. In a small saucepan over medium heat, bring cream just to a boil. Remove from heat and immediately pour cream over chocolate. Let it sit without stirring for 1-2 minutes, then whisk gently until chocolate is completely melted and mixture is smooth. Cool for 15-30 minutes until thickened but still pourable.
- Transfer melted white chocolate to a ziplock bag or disposable piping bag and snip a small hole in the corner.
- Split the cooled éclair shells in half horizontally. Scoop out any excess membranes in the bottom half of each shell. Pipe filling into the bottom half of each shell.
- Spread ganache onto the top half of each shell. Pipe parallel lines of white chocolate across the ganache at even intervals. Drag a toothpick or skewer lightly up and down the length of the éclair, perpendicular to the white chocolate lines, creating a feathered effect. Place top half of each shell onto corresponding bottom half.
- Serve immediately or refrigerate until chocolate has set.
- NOTE: Filling can be made the day before and refrigerated until ready to use. Shells can be made up to a day ahead and kept in an airtight container. To crisp them up again, place on baking tray in 350°F oven for 5-8 minutes. Leftover filled éclairs will keep in the refrigerator for 2-3 days.
*To strain the ricotta, line a strainer with cheesecloth and place the strainer over a small bowl. Place ricotta in the strainer, and using a rubber spatula, gently push and spread ricotta into an even layer. Loosely cover the bowl with plastic wrap, and leave in the fridge overnight, or at least 8 hours. Discard the liquid in the bowl and use ricotta as directed in recipe.
A Sweet Fruit Loaf
Discover more from Here's the Dish
Subscribe to get the latest posts sent to your email.

1 thought on “Éclairs”